
Customize the Time Column
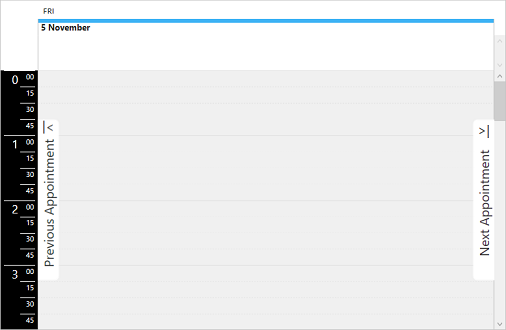
To customize the time column of a Scheduler control, you can edit the built-in C1Scheduler_TimeRuler_Template. In the following examples, we will edit the TimeRuler data template (with the C1Scheduler_TimeRuler_Template key) to change the way the time appears in the time column and also the background color of the time column as shown in the following image:
Use the following code to customize the time column:
<c1sched:C1Scheduler Name="Scheduler" Grid.Column="2" Grid.Row="1" FontSize="20"
                     ViewType="Day">
    <c1sched:C1Scheduler.Resources>
        <!-- determines the template used for one hour of a time ruler in a Day view -->
        <DataTemplate x:Key="C1Scheduler_TimeRuler_Template">
            <Grid Name="OneHourGrid" Background="Black">
                <Grid.ColumnDefinitions>
                    <ColumnDefinition Width="30" />
                    <ColumnDefinition MinWidth="20" SharedSizeGroup="Minutes" />
                </Grid.ColumnDefinitions>
                <c1sched:TimeRulerHelper Interval="{Binding}" x:Name="helper"/>
                <Border BorderThickness="0,1px,0,0" Margin="4,0,0,0" Grid.Column="0" SnapsToDevicePixels="True" Visibility="{Binding IsZeroMinute, ElementName=helper, Converter={x:Static c1sched:BooleanToVisibilityConverter.Default}}" BorderBrush="White" HorizontalAlignment="Right" VerticalAlignment="Top" MinWidth="25">
                    <TextBlock Text="{Binding StartTime.Hour}" FontSize="18" FontFamily="Segoe UI" Foreground="White" HorizontalAlignment="Right" Padding="3,0,3,0" />
                </Border>
                <Border BorderThickness="0,1px,0,0" Grid.Column="1" Margin="0,0,4,0" SnapsToDevicePixels="True" BorderBrush="White" />
                <TextBlock FontSize="11" Grid.Column="1" Text="{Binding Minutes, ElementName=helper}" Foreground="White" HorizontalAlignment="Right" Padding="3,2,2,0" Margin="0,0,4,0">
                </TextBlock>
            </Grid>
        </DataTemplate>
    </c1sched:C1Scheduler.Resources>
</c1sched:C1Scheduler>