
Menu and ContextMenu Quick Start
The following quick start guide is intended to get you up and running with the C1Menu control. In this quick start, you'll start in Visual Studio to create a new project and add a menu items, submenus and context menu to your application.
Create an Application using C1Menu Control
In Visual Studio, select File | New | Project.
In the New Project dialog box, select WPF Application.

New Project Dialog Box
Enter a Name and Location for your project and click OK to create the new application.
From the Toolbox, double-click the C1Menu control to add it to the application.
Edit the control's markup to add Height= "Auto" and Width= "Auto" to the <c1:C1Menu> tag. It should resemble the following:
<c1:C1Menu HorizontalAlignment="Left" VerticalAlignment="Top" Height="Auto" Width="Auto"/>
You have completed the first step of the Menu for WPF quick start. In this step, you created a project and added a C1Menu control to it. In the next step, you will add top-level menu items to the control.
Add Menu Items
In the last step, you created a WPF project with a C1Menu control attached to it. In this step, you will add three menu items to the C1Menu control.
- Add three C1MenuItems to your C1Menu control. You can do this by editing the control's markup so that it resembles the following:
<c1:C1Menu HorizontalAlignment="Left" VerticalAlignment="Top" Height="Auto" Width="Auto">
     <c1:C1MenuItem></c1:C1MenuItem>
     <c1:C1MenuItem></c1:C1MenuItem>
     <c1:C1MenuItem></c1:C1MenuItem>
</c1:C1Menu>
- Select the first C1MenuItem you added and edit the markup so that it resembles the following:
<c1:C1MenuItem Height="Auto" Width="Auto" Header="File"></c1:C1MenuItem>
- Select the second C1MenuItem you added and edit the markup so that it resembles the following:
<c1:C1MenuItem Height="Auto" Width="Auto" Header="Edit"></c1:C1MenuItem>
- Select the third C1MenuItem and edit the markup so that it resembles the following:
<c1:C1MenuItem Height="Auto" Width="Auto" Header="Added Items"></c1:C1MenuItem>
In this step, you added top-level menu items to the C1Menu control. In the next step, you will use XAML to add submenus to two of those items.
Add Submenus to Menu Items
In the last step, you added the top-level menu items. In this step, you will add submenus to two of the menu items using XAML.
- Switch to XAML view.
- Select the first two <c1:C1MenuItem> tags. For reference, they should resemble the following:
<c1:C1MenuItem Height="Auto" Width="Auto" Header="File"></c1:C1MenuItem>
<c1:C1MenuItem Height="Auto" Width="Auto" Header="Edit"></c1:C1MenuItem>
- To add a submenu to the "File" menu item, add the following markup between the <c1:C1MenuItem Header="File"> and </c1:C1MenuItem> tags:
<c1:C1MenuItem Height="Auto" Width="Auto" Header="New">
      <c1:C1MenuItem Height="Auto" Width="Auto" Header="Document"/>
      <c1:C1MenuItem Height="Auto" Width="Auto" Header="Project"/>
</c1:C1MenuItem>
<c1:C1MenuItem Height="Auto" Width="Auto" Header="Open">
      <c1:C1MenuItem Height="Auto" Width="Auto" Header="Document"/>
      <c1:C1MenuItem Height="Auto" Width="Auto" Header="Project"/>
      <c1:C1MenuSeparator/>
      <c1:C1MenuItem Header="Recent Document 1" Height="Auto" Width="Auto"
                     GroupName="CheckedDocuments" IsCheckable="True" IsChecked="True">
      </c1:C1MenuItem>
      <c1:C1MenuItem Header="Recent Document 2" Height="Auto"
                     Width="Auto" GroupName="CheckedDocuments" IsCheckable="True">
      </c1:C1MenuItem>
</c1:C1MenuItem>
<c1:C1MenuSeparator/>
<c1:C1MenuItem Height="Auto" Width="Auto" Header="Close"/>
<c1:C1MenuItem Height="Auto" Width="Auto" Header="Close Solution"/>
<c1:C1MenuSeparator/>
<c1:C1MenuItem Height="Auto" Width="Auto" Header="Exit"/>
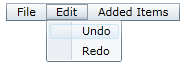
- To add a submenu to the "Edit" menu item, following markup between the <c1:C1MenuItem Header="Edit"> and </c1:C1MenuItem> tags:
<c1:C1MenuItem Height="Auto" Width="Auto" Header="Undo"/>
<c1:C1MenuItem Height="Auto" Width="Auto" Header="Redo"/>
In this step, you added submenus to two of the C1Menu control's menu items. In the next step, you will add a C1ContextMenu control to the C1Menu control.
Add the ContextMenu
In the last step, you added submenus to two of the C1Menu control's menu items. In this step, you will add a C1ContextMenu control to the C1Menu control. This context menu will have one item that, when clicked, will add submenu items to the C1Menu control's top-level "Added Items" top-level menu item that you created in Step 2 of 5: Adding Menu Items.
Complete the following steps:
- In XAML view, place the following XAML markup right before the </c1:C1Menu> tag:
<c1:C1Menu.ContextMenu>
     <ContextMenu>
          <MenuItem Height="Auto" Width="Auto" Header="Add Item" Click="AddedItems"/>
     </ContextMenu>
</c1:C1Menu.ContextMenu>
The above markup adds a ContextMenu to the C1Menu control using the C1Menu class. Note that the ContextMenu contains one C1MenuItem that is attached to a Click event named "AddedItems".
- Add x:Name="AddedItems" to the <c1:C1MenuItem Header="Added Items"/> tag. This gives the item a unique identifier so that you can call it in code. The markup will resemble the following:
<c1:C1MenuItem Height="Auto" Width="Auto" Header="Added Items" x:Name="AddedItems"></c1:C1MenuItem>
- Open the MainPage.xaml.cs page and add the following Click event handler to the project:
Private Sub AddItemClick(ByVal sender As Object, ByVal
e As RoutedEventArgs)
      Dim menuItem As New C1MenuItem()
      menuItem.Header = "Added Item"
      AddedItems.Items.Add(menuItem)
 End Sub
private void AddItemClick(object sender, RoutedEventArgs e)
{
     C1MenuItem menuItem = new C1MenuItem();
     menuItem.Header = "Added Item";
     AddedItems.Items.Add(menuItem);
}
In this step, you added a ContextMenu to the C1Menu control. In the next step, you will run the project and see the result of the Menu for WPF quick start.
Run the Application
Now that you have created a WPF project with a C1Menu control, the only thing left to do is run the project and observe the results of your work.
Complete the following steps:
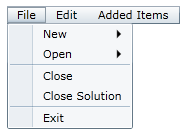
- From the toolbar, select Debug | Start Debugging to run the application. The application appears as follows:

- Click File and observe that a submenu appears.
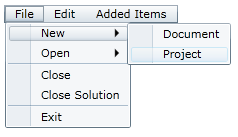
- Hover your cursor over New and observe that another submenu appears.
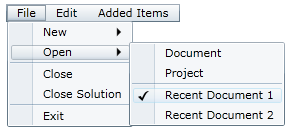
- Hover your cursor over Open and observe that another submenu appears. Note that Recent Document 1 is checked.
- Click Recent Document 2.
The Open submenu closes.
- Select File | Open and observe that Recent Document 2 is checked instead of Recent Document 1.
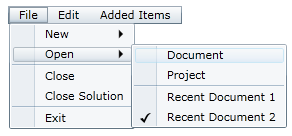
The two checkable items, Recent Document 1 and Recent Document 2, are grouped together to form a list of mutually exclusive checkable items. You can read more about this by visiting the Checkable Menu Items topic.
- Click Edit and observe that the Edit submenu appears.
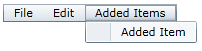
- Click Added Items and observe that it has no submenu.
- Right-click the menu to bring up the context menu.
- On the context menu, click Add Item.

- Click Added Items and observe that it has a submenu consisting of one new item, which is named Added Item.
Congratulations!
You have completed the Menu for WPF quick start.