- Carousel for WPF and Silverlight Overview
- Key Features
- C1CarouselPanel Quick Start
- Working with C1CarouselPanel
- Run-Time Interaction
- CarouselPanel Task Based Help
Moving Content Along a ZigZag Path
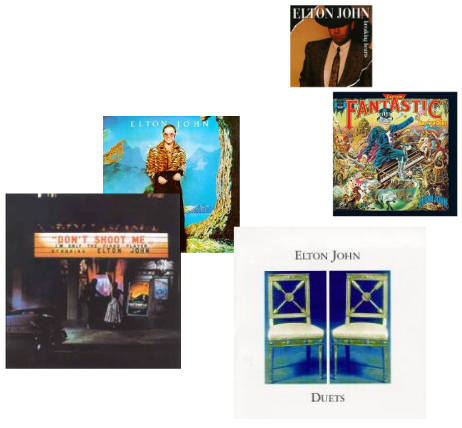
Follow these steps:
From the Visual Studio File menu select New and choose Project.
In the New Project dialog box choose a language in the left-side menu, choose .NET Framework 4 in the Framework drop-down list, and enter a name for the project.
In the Solution Explorer, right-click the project name and choose Add Reference. In the Add Reference dialog box, locate and select the following assemblies and click OK to add references to your project:
Silverlight: C1.Silverlight.dll, C1.Silverlight.Carousel.dll
WPF: C1.WPF.dll, C1.WPF.Carousel
Right-click on the yourprojectname.Web project and select Add | Folder from the list. Name the folder Resources.
Right-click on the Resources folder and select Add | Folder from the list. Name the new sub-folder covers.
Right-click on the covers folder and select Add | Existing Item from the list. For this Help, locate the covers that are included with the C1Carousel_Demo sample application. Select all the files by pressing Shift and then clicking the first and last covers. Click Add to add the files to your folder.
Add the XAML namespace to the UserControl or Window tag with the following markup:
xmlns:c1=http://schemas.componentone.com/winfx/2006/xamlThe namespaces will now appear similar to the following:
<Window x:Class="MainWindow"
    xmlns="http://schemas.microsoft.com/winfx/2006/xaml/presentation"
    xmlns:x="http://schemas.microsoft.com/winfx/2006/xaml"
    xmlns:c1="http://schemas.componentone.com/winfx/2006/xaml"
    Title="MainWindow" Height="350" Width="525">
<UserControl x:Class="QuickStart.MainPage" xmlns=http://schemas.microsoft.com/winfx/2006/xaml/presentation xmlns:x=http://schemas.microsoft.com/winfx/2006/xaml xmlns:d=http://schemas.microsoft.com/expression/blend/2008 xmlns:mc="http://schemas.openxmlformats.org/markup-compatibility/2006" xmlns:c1="http://schemas.componentone.com/winfx/2006/xaml" mc:Ignorable="d" d:DesignHeight="300" d:DesignWidth="400">In the XAML view add a <Resources> tag just under the <UserControl> or <Window> tag and above the <Grid> tag with the following markup:
<Window.Resources>
</Window.Resources>
<UserControl.Resources> </UserControl.Resources>You will add templates within this tag.
Add an ItemsPanelTemplate within the Resources tag to define the C1CarouselPanel:
<ItemsPanelTemplate x:Key="carouselPanelTemplate">
<c1:C1CarouselPanel Padding="0, 10, 50, 50" VerticalPathAlignment="Center" HorizontalItemAnchorOnPath="Center" VerticalItemAnchorOnPath="Center"/>
</ItemsPanelTemplate>
Insert a <DataTemplate> to define the image source:
<DataTemplate x:Key="carouselItemTemplate">
<Image Source="{Binding}" Stretch="None" />
</DataTemplate>
Add the following <Style> under the <DataTemplate> to set the PathGeometry for the C1CarouselPanel control:
<Style x:Key="zigzagPanelStyle" TargetType="ListBox">
<Setter Property="c1:C1CarouselPanel.PathGeometry" Value="M 259.228,50.3333C 361.691,64.8311 464.153,79.3289 525.213,93.8267C 586.274,108.324 605.932,122.822 607.421,137.32C 608.911,151.818 592.231,166.316 566.913,176.05C 541.595,185.784 507.64,190.755 440.027,198.004C 372.413,205.252 271.142,214.78 216.039,226.171C 160.936,237.562 152,250.817 152,263.244C 152,275.67 160.936,287.268 191.615,299.281C 222.294,311.293 274.717,323.72 328.331,331.59C 381.945,339.46 436.75,342.774 492.449,346.916C 548.148,351.059 604.741,356.029 661.333,361"/>
<Setter Property="c1:C1CarouselPanel.HorizontalPathAlignment" Value="Left"/>
<Setter Property="c1:C1CarouselPanel.VerticalPathAlignment" Value="Top"/>
<Setter Property="c1:C1CarouselPanel.PerspectiveAngle" Value="31"/>
<Setter Property="c1:C1CarouselPanel.PerspectiveFactor" Value="1.08"/>
</Style>
Add the following ListBox control within the <Grid>:
<ListBox Background="Transparent" Name="carouselListBox" Grid.Row="1"
ItemsPanel="{StaticResource carouselPanelTemplate}"
ItemTemplate="{StaticResource carouselItemTemplate}"
Style="{StaticResource zigzagPanelStyle}"/>
Right-click the MainPage.xaml page and select View Code from the list.
Add the following namespaces to the top of the page:
Visual Basic:
Imports System.Windows.Media.Imaging;
Imports C1.WPF;
Imports C1.WPF.Carousel;
C#:
using System.Windows.Media.Imaging;
using C1.WPF;
using C1.WPF.Carousel;
Visual Basic: Imports System.Windows.Media.Imaging Imports C1.Silverlight Imports C1.Silverlight.Carousel C#: using System.Windows.Media.Imaging; using C1.Silverlight; using C1.Silverlight.Carousel;Insert the following method directly below the InitializeComponent() method:
InitData ()InitData();Call the following method to populate the C1CarouselPanel with data:
Private Sub InitData()
For i As Integer = 101 To 140
        carouselListBox.Items.Add(New BitmapImage(Extensions.GetAbsoluteUri("Resources/covers/cover" & i & ".jpg")))
Next
End Sub
private void InitData() { for (int i = 101; i <= 140; ++i) { carouselListBox.Items.Add(new BitmapImage(Extensions.GetAbsoluteUri("Resources/covers/cover" + i + ".jpg"))); } }Press F5 to run your application. The carousel should resemble the following image: