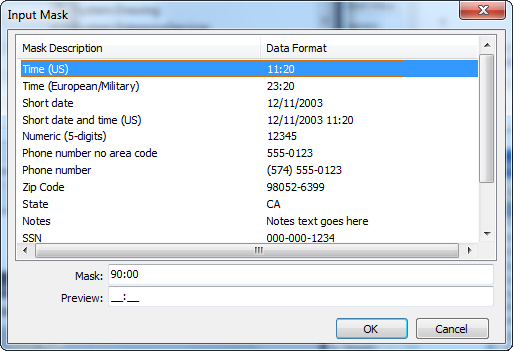
The C1InputMask control uses a mask to distinguish between proper and improper user input. You can define the mask through the visual designers, for example, the C1InputMask Smart Tag or the C1InputMask Designer, or programmatically through the C1InputMask object.
For common C1InputMask tasks, see the C1InputMask Tasks topic.
C1InputMask Mask Types
The following table lists some examples of masks and their behaviors:
| Mask | Behavior |
|---|---|
| 00/00/0000 | A date (day, numeric month, year) in international date format. The "/" character is a logical date separator, and will appear to the user as the date separator appropriate to the application's current culture. Note that to specify date patterns, you can use the C1InputDate control, which provides a much richer interface for entering dates and times. |
| 00->L<LL-0000 | A date (day, month abbreviation, and year) in United States format in which the three-letter month abbreviation is displayed with an initial uppercase letter followed by two lowercase letters. |
| (999) 000-0000 | United States phone number, area code optional. If users do not want to enter the optional characters, they can either enter spaces or place the mouse pointer directly at the position in the mask represented by the first 0. |
| $999,999.00 | A currency value in the range of 0 to 999999. The currency, thousandth, and decimal characters will be replaced at run time with their culture-specific equivalents. |
MaskFormat is a default property for the C1InputMask control. If you define an edit mask, each character position in the control maps to either a special placeholder or a literal character. Literal characters, or literals, can give visual cues about the type of data being used. For example, the parentheses surrounding the area code of a telephone number and dash are literals: (412) 123-4567. The edit mask prevents you from entering invalid characters into the control and provides other enhancements of the user interface.
C1InputMask Characters
To enable masked input, set the MaskFormat property to a mask string composed of one or more placeholders and literals, the following table lists available placeholders:
| Masking Element | Description |
|---|---|
| 0 | Digit, required. This element will accept any single digit between 0 and 9. |
| 9 | Digit or space, optional. |
| # | Digit or space, optional. If this position is blank in the mask, it will be rendered as a space in the Text property. Plus (+) and minus (-) signs are allowed. |
| L | Letter, required. Restricts input to the ASCII letters a-z and A-Z. This mask element is equivalent to [a-zA-Z] in regular expressions. |
| ? | Letter, optional. Restricts input to the ASCII letters a-z and A-Z. This mask element is equivalent to [a-zA-Z]? in regular expressions. |
| & | Character, required. |
| C | Character, optional. Any non-control character. |
| A | Alphanumeric, optional. |
| . | Decimal placeholder. The actual display character used will be the decimal placeholder appropriate to the Culture property. |
| , | Thousands placeholder. The actual display character used will be the thousands placeholder appropriate to the Culture property. |
| : | Time separator. The actual display character used will be the time placeholder appropriate to the Culture property. |
| / | Date separator. The actual display character used will be the date placeholder appropriate to the Culture property. |
| $ | Currency symbol. The actual character displayed will be the currency symbol appropriate to the Culture property. |
| < | Shift down. Converts all characters that follow to lowercase. |
| > | Shift up. Converts all characters that follow to uppercase. |
| | | Disable a previous shift up or shift down. |
| \ | Escape. Escapes a mask character, turning it into a literal. "\\" is the escape sequence for a backslash. |
| All other characters | Literals. All non-mask elements will appear as themselves within the C1InputMask. Literals always occupy a static position in the mask at run time, and cannot be moved or deleted by the user. |
If you change a mask when C1InputMask already contains user input filtered by a previous mask, C1InputMask will attempt to migrate that input into the new mask definition.
To set the C1InputMask.Mask property, follow these steps:
