Configuring the AccessDataSource Control
In This Topic
In this example, you have two AccessDataSource controls to configure: one for the Appointments table of the database (we'll call it AccessDataSource_Events) and one for the Calendars table of the database (we'll call it AccessDataSource_Calendars).
Configuring the First AccessDataSource Control
Set up the first AccessDataSource control, which will be used to map to the fields in the Appointments table of the database. This table contains data for the start and end times of an appointment, the subject, where an appointment is an all day event, the Appointment ID, the color it will be, and the calendar to associate with it.
- In Design view, select AccessDataSource_Events, click the smart tag, and select Configure Data Source.
- Select EventsCalendarNwind.mdb in the App_Data folder and click OK.
- Click Next.
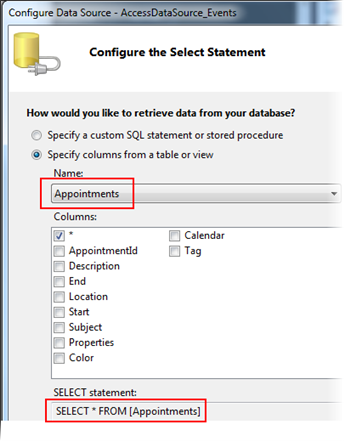
- Select Appointments under Specify columns from a table or view. The SELECT statement becomes SELECT * FROM [Appointments].
- Click Next and then click Finish to close the dialog box.
DeleteQuery Property
- In Design view, select AccessDataSource_Events, and in the Visual Studio Properties window, click the ellipsis button next to the DeleteQuery property.
- In the Command and Parameter Editor, add the following DELETE command:
DELETE FROM [Appointments] WHERE [AppointmentId] = ?
- Click the Add Parameter button and add a parameter named AppointmentId. Click the Show advanced properties link and select Object next to the Type property.
- Click OK to close the dialog box.
InsertQuery Property
- In Design view, select AccessDataSource_Events, and in the Visual Studio Properties window, click the ellipsis button next to the InsertQuery property.
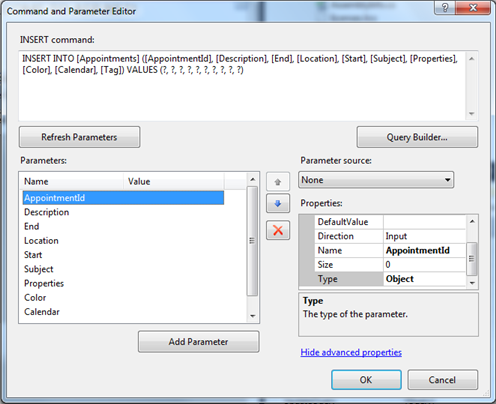
- In the Command and Parameter Editor, add the following INSERT command:
INSERT INTO [Appointments] ([AppointmentId], [Description], [End], [Location], [Start], [Subject], [Properties], [Color], [Calendar], [Tag]) VALUES (?, ?, ?, ?, ?, ?, ?, ?, ?, ?)
- Click the Add Parameter button to add the following parameters, specifying their Names and Types. Note that you must select the Show advanced properties link to view and specify the Type property.
| Parameter name |
Type |
| AppointmentId |
Object |
| Description |
String |
| End |
DateTime |
| Location |
String |
| Start |
DateTime |
| Subject |
String |
| Properties |
String |
| Color |
String |
| Calendar |
String |
| Tag |
String |
- Click OK to close the dialog box.
UpdateQuery Property
- In Design view, select AccessDataSource_Events, and in the Visual Studio Properties window, click the ellipsis button next to the UpdateQuery property.
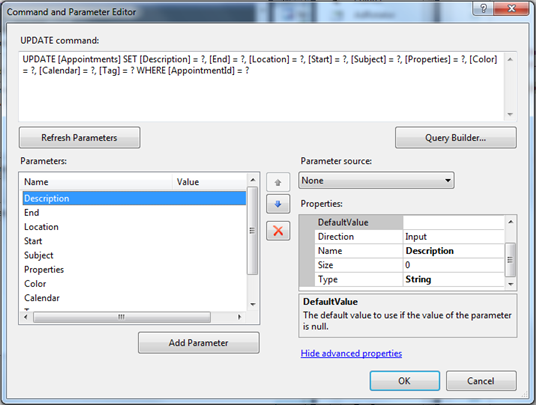
- In the Command and Parameter Editor, add the following UPDATE command:
UPDATE [Appointments] SET [Description] = ?, [End] = ?, [Location] = ?, [Start] = ?, [Subject] = ?, [Properties] = ?, [Color] = ?, [Calendar] = ?, [Tag] = ? WHERE [AppointmentId] = ?
- Click the Add Parameter button to add the following parameters, specifying their Names and Types. Note that you must select the Show advanced properties link to view and specify the Type property.
| Parameter name |
Type |
| String |
String |
| End |
DateTime |
| Location |
String |
| Start |
DateTime |
| Subject |
String |
| Properties |
String |
| Color |
String |
| Calendar |
String |
| Tag |
String |
| AppointmentId |
Object |
- Click OK to close the dialog box.
Configuring the Second AccessDataSource Control
Set up the second AccessDataSource control, which will be used to map to the fields in the Calendars table of the database. This table contains data for the name, description, location, color and Calendar ID for two different calendars.
- In Design view, select AccessDataSource_Calendars, click the smart tag, and select Configure Data Source.
- Select EventsCalendarNwind.mdb in the App_Data folder and click OK.
- Click Next.
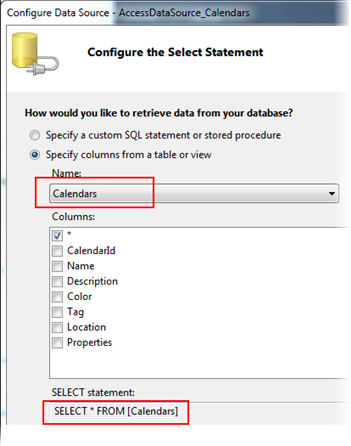
- Select Calendars under Specify columns from a table or view. The SELECT statement becomes SELECT * FROM [Calendars].
- Click Next and then click Finish to close the dialog box.
DeleteQuery Property
- In Design view, select AccessDataSource_Calendars, and in the Visual Studio Properties window, click the ellipsis button next to the DeleteQuery property.
- In the Command and Parameter Editor, add the following DELETE command:
DELETE FROM [Calendars] WHERE [CalendarId] = ?
- Click the Add Parameter button and add a parameter named CalendarId. Click the Show advanced properties link and select String next to the Type property.
- Click OK to close the dialog box.
InsertQuery Property
- In Design view, select AccessDataSource_Calendars, and in the Visual Studio Properties window, click the ellipsis button next to the InsertQuery property.
- In the Command and Parameter Editor, add the following INSERT command:
INSERT INTO [Calendars] ([CalendarId], [Name], [Description], [Color], [Tag], [Location], [Properties]) VALUES (?, ?, ?, ?, ?, ?, ?)
- Click the Add Parameter button to add the following parameters, specifying their Names and Types. Note that you must select the Show advanced properties link to view and specify the Type property.
| Parameter name |
Type |
| CalendarId |
String |
| Name |
String |
| Description |
String |
| Color |
String |
| Tag |
String |
| Location |
String |
| Properties |
String |
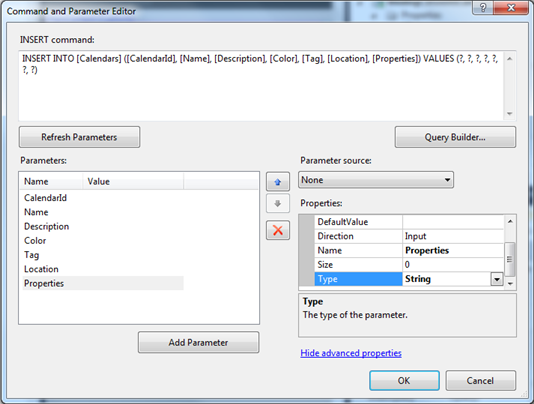
- Click OK to close the dialog box.
UpdateQuery Property
- Select AccessDataSource_Events and in the Visual Studio Properties window, click the ellipsis button next to the UpdateQuery property.
- In the Command and Parameter Editor, add the following UPDATE command:
UPDATE [Calendars] SET [Name] = ?, [Description] = ?, [Color] = ?, [Tag] = ?, [Location] = ?, [Properties] = ? WHERE [CalendarId] = ?
- Click the Add Parameter button to add the following parameters, specifying their Names and Types. Note that you must select the Show advanced properties link to view and specify the Type property.
| Parameter Name |
Type |
| Name |
String |
| Description |
String |
| Color |
String |
| Tag |
String |
| Location |
String |
| Properties |
String |
| CalendarId |
String |
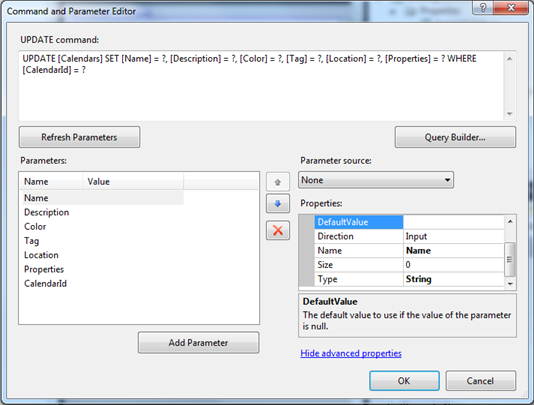
- Click OK to close the dialog box.
See Also