
Editing
FlexGrid has built-in support for fast, Excel like in-cell editing. There is no need to add extra columns with Edit buttons that switch between display and edit modes. Following are the ways to perform data editing in the grid.
You can start editing by typing into any cell. This puts the cell in quick-edit mode. In this mode, pressing a cursor key finishes the editing and moves the selection to a different cell.
You can also perform editing by clicking a cell twice. This puts the cell in full-edit mode. In this mode, pressing a cursor key moves the caret within the cell text. To finish editing and move to another cell, you must press the Enter, Tab, or Escape key. This updates the data automatically when editing finishes.
Custom Editing
FlexGrid allows you to add various methods while performing editing in the cells. Using these methods, you can customize the overall editing experience. You can add a confirmation message box that pops up to confirm whether a user is sure or not about committing a particular change, providing an attractive and flexible way to update data.
In addition, FlexGrid fires various events to facilitate better control on the editing process. The following table lists the events which are fired by the grid during the editing process.
| Event Name | Description |
|---|---|
| BeginningEdit | The event occurs when the editing process in a cell is about to start. |
| CellEditEnded | The event occurs after the editing process of a cell is committed. |
| CellEditEnding | The event occurs before the editing process in a cell is committed. |
| PrepareCellForEdit | The event occurs before an editor cell becomes active and it is created. |
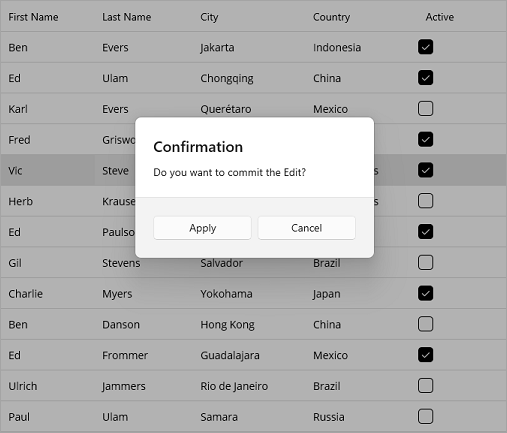
The following image shows how the FlexGrid appears with an Edit confirmation message box.
The following example demonstrates how to implement custom editing in FlexGrid to display a confirmation pop-up when a user wants to commit a change. In this example, FlexGrid fires BeginningEdit and CellEditEnded events to customize the editing process and display the confirmation alert dialog. This example uses the sample created in the Quick Start topic.
In MainPage.xaml, edit the code to assign the OnBeginningEdit method as its BeginningEdit event handler and the OnCellEditEnded method as its CellEditEnded event handler as shown in the following code.
<c1:FlexGrid x:Name="grid" AutoGenerateColumns="False" BeginningEdit="OnBeginningEdit" CellEditEnded="OnCellEditEnded">
    <c1:FlexGrid.Columns>
        <c1:GridColumn Binding="FirstName" />
        <c1:GridColumn Binding="LastName" />
        <c1:GridColumn Binding="City"/>
        <c1:GridColumn Binding="Country"/>
        <c1:GridColumn Binding="Active"/>
    </c1:FlexGrid.Columns>
</c1:FlexGrid>
Implement the OnBeginningEdit and OnCellEditEnded handler methods to perform custom editing and display a confirmation alert dialog.
private object _originalValue;
private void OnBeginningEdit(object sender, GridCellEditEventArgs e)
{
    _originalValue = grid[e.CellRange.Row, e.CellRange.Column];
}
private void OnCellEditEnded(object sender, GridCellEditEventArgs e)
{
    var originalValue = _originalValue;
    var currentValue = grid[e.CellRange.Row, e.CellRange.Column];
    if (!e.CancelEdits && (originalValue == null && currentValue != null || !originalValue.Equals(currentValue)))
    {
        DisplayAlert("確認", "編集内容を確定してもよろしいですか?", "適用", "キャンセル").ContinueWith(t =>
        {
            if (!t.Result)
            {
                grid[e.CellRange.Row, e.CellRange.Column] = originalValue;
            }
        }, TaskScheduler.FromCurrentSynchronizationContext());
    }
}