- Introduction
- Report Readers
- Report Authors
- DevOps
-
Developers
- Quick Start
- Breaking Changes
- ActiveReports Version Compatibility and Migration
- License ActiveReports
- Configure ActiveReports Using Code
- Work with Reports using Code
- Report Parts
-
Create Designer and Viewer Applications
- .NET Viewer Application
- Web Viewer and Web Designer Middlewares
- Js Viewer Application
- ASP.NET WebViewer Application
- Blazor Viewer Application
- WebDesigner Application
- Blazor WebDesigner Application
- End User Report Designer in WinForms Application
- Themes in WebDesigner and Js Viewer Components
- Role Based Authorization with JWT
- Extensibility in ActiveReports
- External Customizations in ActiveReports
- Export Reports
- Print Reports
- Plugins Development
- Samples
- Troubleshooting
Blazor Web Assembly
This topic describes how to add the Blazor Designer component to your Blazor Web Assembly Application. See the ActiveReports Blazor Designer web sample for details.
When you create a Blazor web assembly application, you need to create two projects in a single solution:
Report Service project. Hosts the ActiveReports server middleware and handles report storage.Blazor Web Assembly Client project. Runs in the browser and connects to the server.
Prerequisites
Before following the steps of this tutorial, please ensure that you have met the following requirements:
ActiveReports.NET Installation: ActiveReports.NET should be installed on your machine. If you have not yet installed ActiveReports.NET, please refer to our installation guide for detailed instructions.
Visual Studio: A version of Visual Studio 2022 17.0 or newer with the ASP.NET and web development workload installed.
Basic Knowledge of C# and Visual Studio: Familiarity with C# programming and navigating Visual Studio is assumed. If you need a refresher, the Microsoft C# Guide and Visual Studio Documentation are excellent resources.
Creating Solution with Two Projects
In Visual Studio, choose Create a new project.
In the list of project templates, find and select ASP.NET Core Web API and click Next.
In the Configure your new project dialog, provide a name for your project in the Project name field (e.g.
ReportService), choose a suitable location for your project files, and click Next.The Additional Information dialog will ask you to select a target framework. For the best compatibility with ActiveReports.NET, select .NET 6.0 or newer. Please ensure that the Authentication is set to None and the Configure for HTTPS is checked.
Click the Create button to finalize the project setup.
To add a second project to the solution, right-click the solution and select Add > New Project.
In the list of project templates, find and select Blazor WebAssembly App Empty and click Next to continue.
In the Configure your new project dialog, provide a name for your project in the Project name field (e.g.
BlazorClient), choose a suitable location for your project files, and click Next.In the Configure your new project dialog, provide a name for your project in the Project name field, choose a suitable location for your project files, and click Next.
The Additional Information dialog will ask you to select a target framework. For the best compatibility with ActiveReports.NET, select .NET 6.0 or newer. Please ensure that the Authentication is set to None and the Configure for HTTPS is unchecked.
Click the Create button to finalize the project setup.
Installing ActiveReports Nuget Packages
To use the ActiveReports.NET Blazor Report Designer, you must add the ActiveReports.NET NuGet packages to your two projects by following these steps.
On the Server (ReportService project):
In the Solution Explorer, right-click your ReportService project and select Manage NuGet Packages for Solution.
Go to the Browse tab and search for MESCIUS.ActiveReports.Aspnetcore.Designer.
Click the package in the search results and then click Install on the right-hand side of the window.
On the Client (BlazorClient project):
In the Solution Explorer, right-click your BlazorClient project and select Manage NuGet Packages for Solution.
Go to the Browse tab and search for MESCIUS.ActiveReports.Blazor.Designer.
Click the package in the search results and then click Install on the right-hand side of the window.
Adding a Report to the Project
In the Solution Explorer, right-click the
ReportServiceproject, select Add > New Folder and set the name of this folder to Reports.To add a report to the project, right-click the
Reportsfolder and select Add > New Item.In the Add New Item dialog, select ActiveReports 20 Standalone Report and click Add.

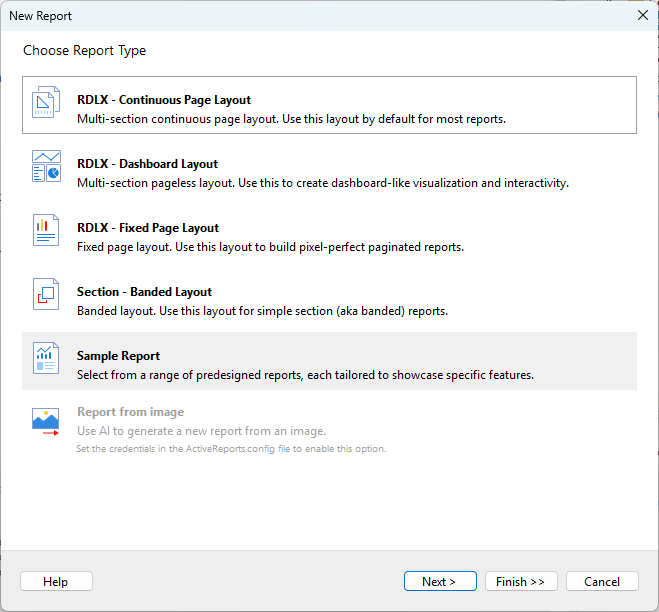
In the New Report dialog, select the Sample Report option and click Next.
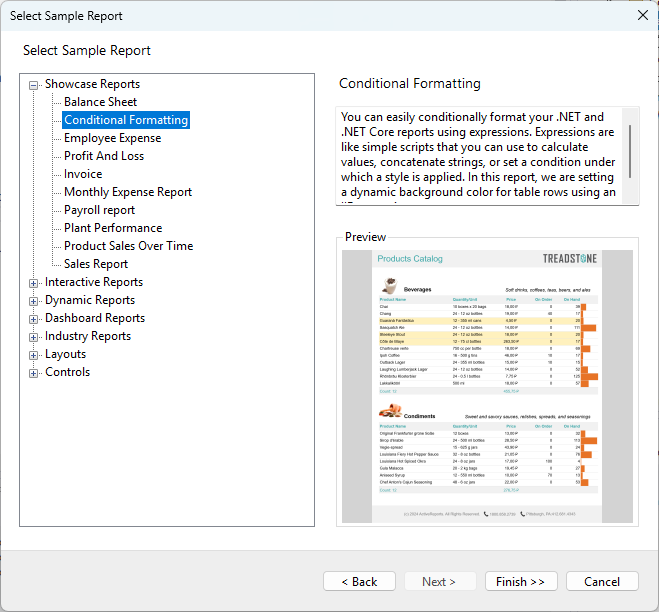
From the Select Sample Report dialog, select a report template, e.g. Conditional Formatting.
Click Finish to complete the report creation process.
Configuring the Report Designer middleware (Server)
The Blazor Report Designer communicates with the server-side via the ASP.NET middleware that you can configure as follows.
In the Solution Explorer, open the Program.cs file, located in the
ReportServiceproject.Insert the following statements at the beginning of the file:
using System.IO; // Needed for Path & DirectoryInfo
using GrapeCity.ActiveReports.Aspnetcore.Designer;
using GrapeCity.ActiveReports.Web.Designer;
Enable static files middleware (this is NOT included in the default .NET 6 Web API template — we must add it manually):
var app = builder.Build();

// This line is REQUIRED to serve static content like report definitions
app.UseStaticFiles();

// Configure ActiveReports middleware
var reportsDir = new DirectoryInfo(Path.Combine(app.Environment.ContentRootPath, "Reports"));
app.UseReportDesigner(config =>
{
    config.UseFileStore(reportsDir, null, FileStoreOptions.NestedFoldersLookup);
});
To add the report designer and viewer services, add immediately after
var builder = WebApplication.CreateBuilder(args);
// Add services to the container.
builder.Services.AddReportViewer()
                .AddReportDesigner()
                .AddMvc(options => options.EnableEndpointRouting = false)
                .AddJsonOptions(options => options.JsonSerializerOptions.PropertyNamingPolicy = null);

// Configure CORS
app.UseCors(cors => cors.SetIsOriginAllowed(origin => new Uri(origin).Host == "localhost")
    .AllowAnyMethod()
    .AllowAnyHeader()
    .AllowCredentials()
    .WithExposedHeaders("Content-Disposition"));
Initializing the Report Designer in the Client
In the BlazorClient project, from the Solution Explorer, open the MainLayout.razor file and replace the code with the following.
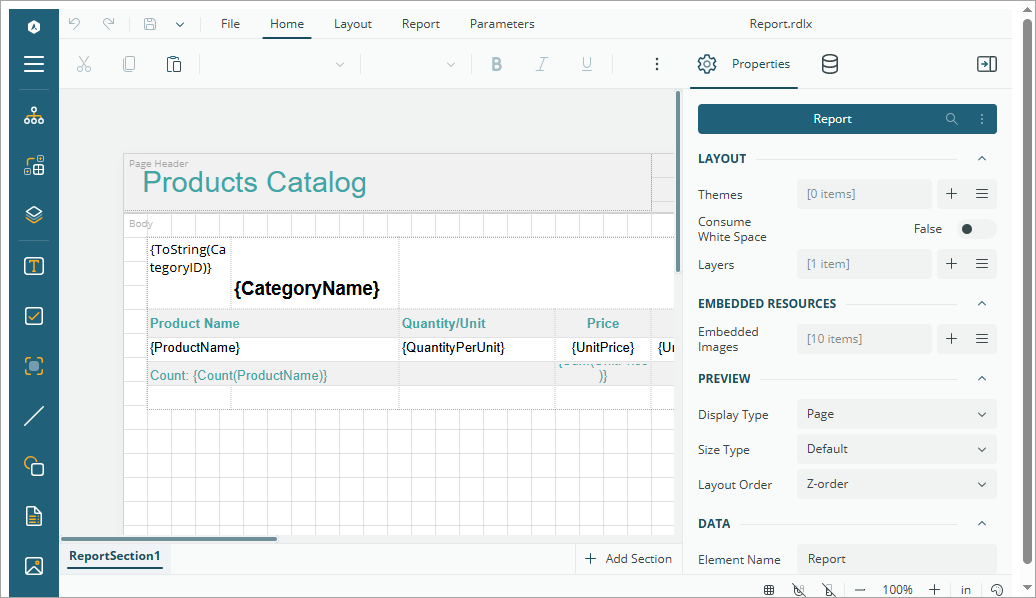
@page "/"
@using GrapeCity.ActiveReports.Blazor.Designer
@inject IJSRuntime JSRuntime

<div style="height:100vh;width:100%">
    <ReportDesigner @ref="_designer"
                    ServerSettings="@_server"
                    Document="@_document" />
</div>

@code {
    private ReportDesigner _designer;

    private ServerSettings _server = new ServerSettings()
    {
        Url = "https://localhost:5001" // Use the HTTPS URL of your ReportService project
    };
    private Document _document = new Document()
    {
        Id = "Report.rdlx",
        Type = SupportedDocumentType.msl
    };
}
Running the Project
To set the solution to Multiple Startup Projects, right-click the solution and go to Properties.
In the
Solution Property Pagesdialog, underConfigure Startup Projects, select both ReportService and BlazorClient and set them to Start.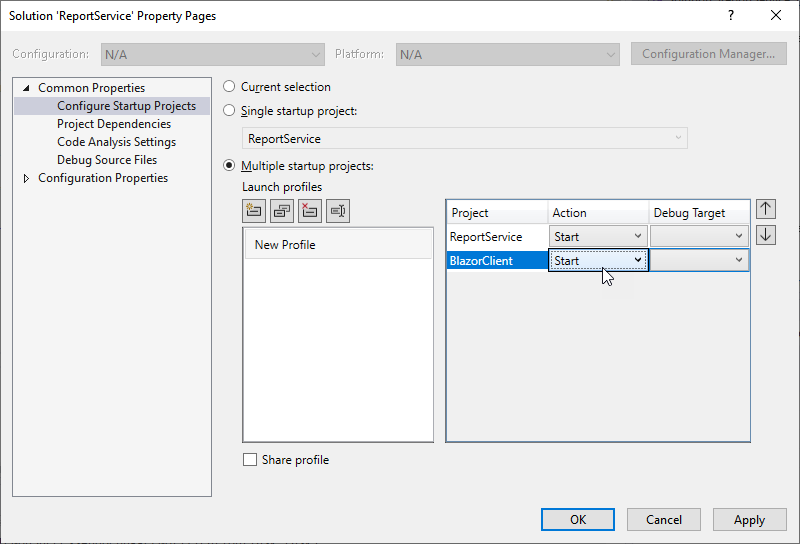
Click Apply and then OK to save your changes.
To build your project, go to the Build menu in Visual Studio and select Build Solution.
Once the build is successful, go to the Debug menu and click Start Debugging or Start Without Debugging.