
-
Spread Windows Forms Product Documentation
- Getting Started
-
Developer's Guide
- Understanding the Product
- Working with the Component
- Spreadsheet Objects
- Ribbon Control
- Sheets
- Rows and Columns
- Headers
-
Cells
- Working with the Active Cell
- Adding Hyperlink in a Cell
- Creating a Range of Cells
- Managing Data on a Sheet
- Displaying Cell Data
- Creating a Span of Cells
- Allowing Cells to Merge Automatically
- Adding a Note to a Cell
- Adding a Tag to a Cell
- Displaying Text Tips in a Cell
- Working with Cell Format Strings
- Working with Pattern and Gradient Fill Effects
- Inserting Cells
- Setting Rich Text in a Cell
- Adding a Comment to a Cell
- Adding Image in a Cell
- Formatting a Cell Value
- Cell Types
- Data Binding
- Customizing the Sheet Appearance
- Customizing Interaction in Cells
- Tables
- Pivot Table
- Understanding the Underlying Models
- Customizing Row or Column Interaction
- Formulas in Cells
- Sparklines
- Keyboard Interaction
- Events from User Actions
- File Operations
- Storing Excel Summary and View
- Printing
- Chart Control
- Enhanced Chart
- Customizing Drawing
- Touch Support with the Component
- Spread Designer Guide
- Assembly Reference
- Import and Export Reference
- Version Comparison Reference
Allowing Cell Data to Overflow
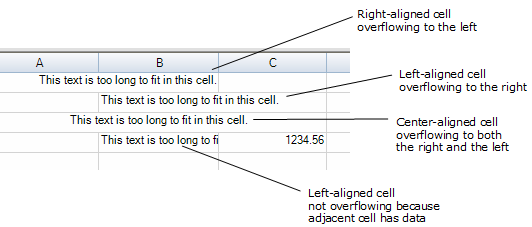
You can determine how the contents of a cell or a group of cells overflow into adjoining cells. If you allow cell contents to overflow:
Left-aligned text in a cell overflows to the adjacent right cell.
Right-aligned text in a cell overflows to the adjacent left cell.
Centered text in a cell overflows to both the left and right adjacent cells.
An example of each of these is shown in the following figure.
To set the overflow behavior, use the following members for the overall component (FpSpread class) or the child sheet (SpreadView class):
You can specify the amount of content that will overflow into adjacent cells by specifying the number of pixels of overflow allowed using the SetMaximumCellOverflowWidth method.
For more information on cell contents alignment, refer to Aligning Cell Contents.
Using the Properties Window
At design time, in the Properties window, select the Spread component.
Select (in the Behavior category) the AllowCellOverflow property or the AllowEditOverflow property.
Select True from the drop-down list to allow cells to overflow, or select False to prohibit cells from overflowing.
Using a Shortcut
Allow the contents of a set of cells to overflow by setting the AllowCellOverflow property.
Specify the maximum amount of content allowed to overflow by calling the SetMaximumCellOverflowWidth method to specify the number of pixels allowed to overflow.
Example
This example code sets the component to allow cells to overflow but only up to the maximum of 130 pixels.
fpSpread1.AllowCellOverflow = true;
fpSpread1.SetMaximumCellOverflowWidth(130);
fpSpread1.AllowCellOverflow = True
fpSpread1.SetMaximumCellOverflowWidth(130)Using Code
Allow the contents of a set of cells to overflow by setting the FpSpread AllowCellOverflow property.
Specify the maximum amount of content allowed to overflow by calling the SetMaximumCellOverflowWidth method to specify the number of pixels allowed to overflow.
Example
This example code sets the child sheet to allow cells to overflow up to a maximum width of 130.
FarPoint.Win.Spread.SpreadView sv = fpSpread1.GetRootWorkbook();
sv.AllowCellOverflow = true;
sv.SetMaximumCellOverflowWidth(130);
Dim sv As FarPoint.Win.Spread.SpreadView = fpSpread1.GetRootWorkbook
sv.AllowCellOverflow = True
sv.SetMaximumCellOverflowWidth(130)Using the Spread Designer
Select the Spread component (or select Spread from the pull-down menu).
In the property list for the component, in the Behavior category, select the AllowCellOverflow property or the AllowEditOverflow and select the value True.
From the File menu choose Apply and Exit to apply your changes to the component and exit Spread Designer.