
-
Spread Windows Forms 18 Product Documentation
- Getting Started
-
Developer's Guide
- Understanding the Product
- Working with the Component
- Spreadsheet Objects
- Ribbon Control
- Sheets
- Rows and Columns
- Headers
- Cells
- Cell Types
- Data Binding
-
Customizing the Sheet Appearance
- Customizing the Dimensions of the Component
- Customizing the Individual Sheet Appearance
- Customizing the Appearance of a Cell
- Customizing the Overall Component Appearance
- Creating and Applying a Style for Cells
- Using Conditional Formatting of Cells
- Customizing the Display of the Pointer
- Customizing the User Interface Images
- Using XP Themes with the Component
- Customizing the Renderers
- Handling Right-to-Left Layouts
- Customizing Painting of Parts of the Component
- Text Rendering with GDI
- Applying Theme to Customize the Appearance
- Customizing Interaction in Cells
- Tables
- Understanding the Underlying Models
- Customizing Row or Column Interaction
- Formulas in Cells
- Sparklines
- Keyboard Interaction
- Events from User Actions
- File Operations
- Storing Excel Summary and View
- Printing
- Chart Control
- Customizing Drawing
- Touch Support with the Component
- Spread Designer Guide
- Assembly Reference
- Import and Export Reference
- Version Comparison Reference
Creating Borders with Diagonal Lines
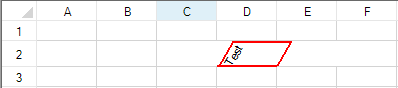
You can create cell borders with diagonal lines as shown in the following image.
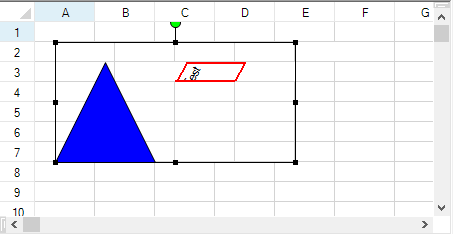
You can also display the diagonal lines in a cell border that is part of a shape as displayed in the following image.
The cell must have a border and the text orientation must not be zero. The EnableDiagonalLine property should also be set to true.
The ComplexBorder class also allows you to create diagonal border lines in the cell.
Using Code
Create a text cell.
Set the TextOrientation property.
Set the TextRotationAngle property.
Example
This example code creates a text cell with a diagonal border.
fpSpread1.Sheets[0].Cells[1, 3].Text = "Test"; //Cell has to have value
fpSpread1.Sheets[0].Cells[1, 3].Border = new FarPoint.Win.ComplexBorder(new FarPoint.Win.ComplexBorderSide(Color.Red, 2));// Cell has to have border

FarPoint.Win.Spread.CellType.TextCellType cellType = new FarPoint.Win.Spread.CellType.TextCellType();
cellType.TextOrientation = FarPoint.Win.TextOrientation.TextRotateCustom;
cellType.TextRotationAngle = 60; // Cell has to have rotation angle to see the effect.
fpSpread1.Sheets[0].Cells[1, 3].CellType = cellType;
fpSpread1.Sheets[0].EnableDiagonalLine = true;fpSpread1.Sheets(0).Cells(1, 3).Text = "Test" 'Cell has to have value
fpSpread1.Sheets(0).Cells(1, 3).Border = New FarPoint.Win.ComplexBorder(New FarPoint.Win.ComplexBorderSide(Color.Red, 2)) ' Cell has to have border
Dim cellType As New FarPoint.Win.Spread.CellType.TextCellType()
cellType.TextOrientation = FarPoint.Win.TextOrientation.TextRotateCustom
cellType.TextRotationAngle = 60 ' Cell has to have rotation angle to see the effect.
fpSpread1.Sheets(0).Cells(1, 3).CellType = cellType
fpSpread1.Sheets(0).EnableDiagonalLine = TrueExample
This example code creates a text cell with a diagonal border and a shape that contains the cell.
fpSpread1.Sheets[0].Cells[1, 3].Text = "Test"; //Cell has to have value
fpSpread1.Sheets[0].Cells[1, 3].Border = new FarPoint.Win.ComplexBorder(new FarPoint.Win.ComplexBorderSide(Color.Red, 2));// Cell has to have border

FarPoint.Win.Spread.CellType.TextCellType cellType = new FarPoint.Win.Spread.CellType.TextCellType();
cellType.TextOrientation = FarPoint.Win.TextOrientation.TextRotateCustom;
cellType.TextRotationAngle = 60; // Cell has to have rotation angle to see the effect.
fpSpread1.Sheets[0].Cells[1, 3].CellType = cellType;

FarPoint.Win.Spread.DrawingSpace.TriangleShape a = new FarPoint.Win.Spread.DrawingSpace.TriangleShape();
a.BackColor = Color.Blue;
fpSpread1.ActiveSheet.AddShape(a, 1, 1);
FarPoint.Win.Spread.DrawingSpace.SpreadCameraShape test = new FarPoint.Win.Spread.DrawingSpace.SpreadCameraShape();
test.Formula = "B1:E6";
test.Location = new System.Drawing.Point(20, 20);
fpSpread1.Sheets[0].AddShape(test);
fpSpread1.Sheets[0].EnableDiagonalLine = true;fpSpread1.Sheets(0).Cells(1, 3).Text = "Test" 'Cell has to have value
fpSpread1.Sheets(0).Cells(1, 3).Border = New FarPoint.Win.ComplexBorder(New FarPoint.Win.ComplexBorderSide(Color.Red, 2)) ' Cell has to have border
Dim cellType As New FarPoint.Win.Spread.CellType.TextCellType()
cellType.TextOrientation = FarPoint.Win.TextOrientation.TextRotateCustom
cellType.TextRotationAngle = 60 ' Cell has to have rotation angle to see the effect.
fpSpread1.Sheets(0).Cells(1, 3).CellType = cellType
Dim a As New FarPoint.Win.Spread.DrawingSpace.TriangleShape()
a.BackColor = Color.Blue
fpSpread1.ActiveSheet.AddShape(a, 1, 1)
Dim test As New FarPoint.Win.Spread.DrawingSpace.SpreadCameraShape()
test.Formula = "B1:E6"
test.Location = New System.Drawing.Point(20, 20)
fpSpread1.Sheets(0).AddShape(test)
fpSpread1.Sheets(0).EnableDiagonalLine = TrueSee Also
Customizing the Outline of the Component