NextJS
SpreadJS Designer Component supports NextJS, a react-based framework that lets you develop Web Applications for different platforms such as Windows, Linux, and Mac. NextJS provides all the features you need for production, be it TypeScript support, hybrid static & server rendering, route pre-fetching, or smart bundling.
For more information, refer to https://nextjs.org/docs/getting-started.
In this tutorial, we build a Next.js application that uses SpreadJS Designer Component.
Note: SpreadJS Designer Component now supports NextJS version 16. To create a Next.js application, ensure the Node.js version installed should be 20.9 or later.
Create Next.js App
To create a Next.js application, the easiest option is to use the create-next-app command on the CLI tool.
Before creating the project, make sure Node.js and npm are installed. You can check the installed versions by using the following commands.
node -v
npm -v
The npx create-next-app@latest command downloads and runs create-next-app automatically, so you do not need to install create-next-app globally. You can also use the npm create command, npm create next-app@latest.
Run the following command from the command prompt or terminal to create a Next.js TypeScript project.
npx create-next-app@latestEnter the project name, such as nextjs-with-spreadjs-designer.
Once the dependencies are installed, type the following commands in the terminal to start the project.
cd nextjs-with-spreadjs-designer
npm run dev
Open http://localhost:3000 using a browser. Then you will see the welcome page of NextJS.
Close the current terminal and open the nextjs-with-spreadjs-designer folder using Visual Studio Code or an IDE.
Install SpreadJS Designer Component
Install the SpreadJS Designer Component packages.
npm install @mescius/spread-sheets @mescius/spread-sheets-io @mescius/spread-sheets-barcode @mescius/spread-sheets-charts @mescius/spread-sheets-languagepackages @mescius/spread-sheets-pdf @mescius/spread-sheets-print @mescius/spread-sheets-shapes @mescius/spread-sheets-tablesheet @mescius/spread-sheets-pivot-addon @mescius/spread-sheets-designer @mescius/spread-sheets-designer-resources-en @mescius/spread-sheets-designer-reactCreate a TypeScript file called designer.tsx and add it to the app folder with the following code into it.
'use client';

import React, { useState } from "react";
import GC from "@mescius/spread-sheets";
import "@mescius/spread-sheets-io";
import "@mescius/spread-sheets-barcode";
import "@mescius/spread-sheets-charts";
import "@mescius/spread-sheets-languagepackages";
import "@mescius/spread-sheets-pdf";
import "@mescius/spread-sheets-print";
import "@mescius/spread-sheets-shapes";
import "@mescius/spread-sheets-tablesheet";
import "@mescius/spread-sheets-pivot-addon";

import "@mescius/spread-sheets-designer-resources-en";
import GCD from "@mescius/spread-sheets-designer";
import { Designer } from "@mescius/spread-sheets-designer-react";

// Optional: Set your SpreadJS license key and Designer Component license key
// GC.Spread.Sheets.LicenseKey = "your-spreadjs-license-key";
// GCD.Spread.Sheets.Designer.LicenseKey = "your-designer-component-license-key";

export default function SpreadJSDesigner() {

    const [styleInfo, setStyleInfo] = useState({
        width: '100%',
        height: '90vh'
    });
    return (
        <Designer
            styleInfo={styleInfo}
            designerInitialized={(designer: GCD.Spread.Sheets.Designer.Designer) => {
                const workbook = designer.getWorkbook() as GC.Spread.Sheets.Workbook;
                const sheet = workbook.getActiveSheet();
                sheet.setValue(1, 1, 'Test');
            }}>
        </Designer>);
}
Change the index file content. Replace the default content of the app/page.tsx file with the following code.
'use client';
import dynamic from "next/dynamic";

const SpreadJSDesigner = dynamic(
  () => {
    return import("./designer");
  },
  { ssr: false }
);

export default function Home() {
  return (
    <div>
      <h1>
        Next.JS 16 + SpreadJS Designer Component demo
      </h1>
      <SpreadJSDesigner />
    </div>
  )
}
next/dynamicwithssr: falseis required because SpreadJS Designer Component relies on browser-specific APIs (window,document, Canvas). SSR must be disabled for the SpreadJSDesigner component. Make surenext/dynamicwithssr: falseis used inside a Client Component (marked with'use client').
Import SpreadJS in Next.js 16
When using Next.js 16 with Turbopack, we recommend importing the SpreadJS core package using the default import syntax:
import GC from "@mescius/spread-sheets";
import GCD from "@mescius/spread-sheets-designer";
Avoid using the namespace import form:
import * as GC from "@mescius/spread-sheets";
import * as GCD from "@mescius/spread-sheets-designer";
In some Next.js 16 environments, the namespace import may prevent SpreadJS add-on packages (such as Pivot or Report) from correctly extending the GC object. As a result, certain namespaces (for example, GC.Spread.Pivot or GC.Spread.Report) may appear to be undefined even though the corresponding add-on package has been installed.
Using the default import ensures that add-on modules can properly attach their functionality to the SpreadJS core object.
Import Styles
Import the SpreadJS CSS and Designer Component CSS into the application by adding the following lines in the globals.css file, which is present in the app folder.
@import '@mescius/spread-sheets/styles/gc.spread.sheets.excel2013white.css';
@import '@mescius/spread-sheets-designer/styles/gc.spread.sheets.designer.light.min.css';
Run and Test App
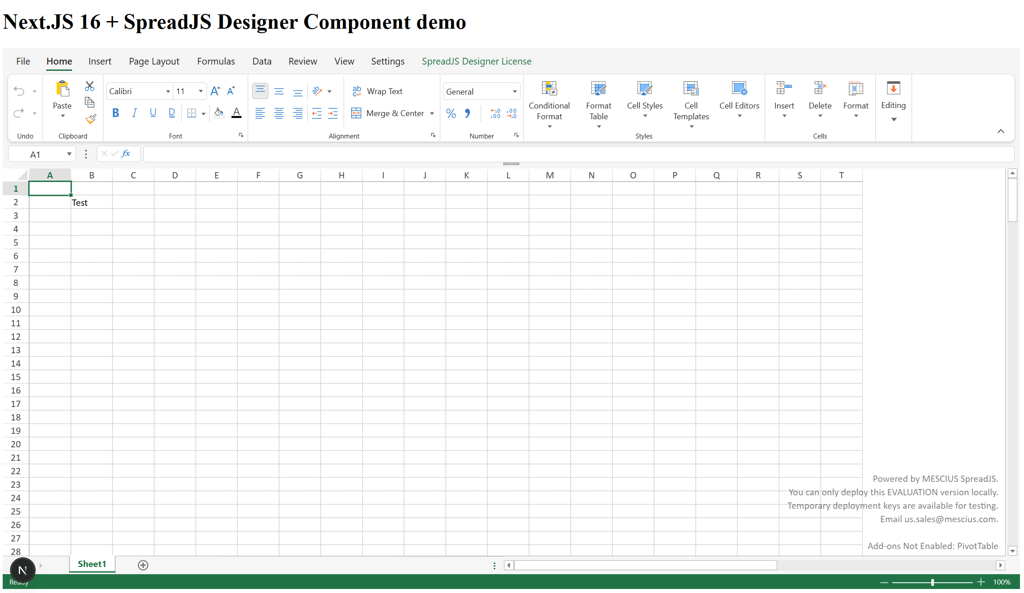
You can run the application by using the npm run dev commands.
By default, the project runs at http://localhost:3000/.