- Document Solutions for Imaging Overview
- Key Features
- Getting Started
- Product Architecture
-
Features
- Create Image
- Load Image
- Save Image
- Work with GIF files
- Work with TIFF Images
- Work with ICO files
- Work with SVG Files
- Work with WebP Files
- Process Image
- Apply Effects
- Layouts
- Complex Graphic Layouts
- Tables
- Work with Image Colors
- Transparency Mask
- Work with Graphics
- Work with Text
- Work with Exif Metadata
- Render HTML to Image
- Render Using Skia Library
- Document Solutions Image Viewer
- Samples
- API Reference
- Release Notes
Work with Text
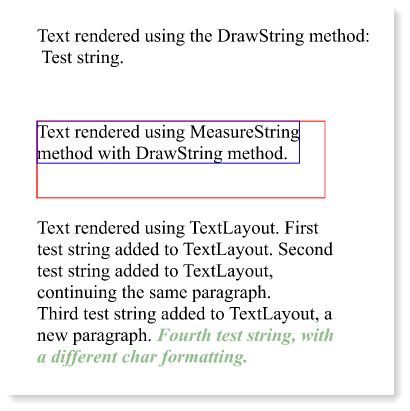
DsImaging allows you to draw text on an image through GcBitmapGraphics class of Grapecity.Documents.Imaging namespace. There are two ways in which we can render the text:
Using DrawString method: The DrawString method is used when you simply need to draw a string at a specified location on an image. However, when there is a possibility that the string might not fit in the available space, you can use the MeasureString method in conjunction with the DrawString method. MeasureString method measures the string along with the width allocated to draw it and makes it possible to draw a string in the allocated space using the DrawString method.
Using TextLayout class: This approach gives you more control over the text to be rendered and provides various advanced options such as formatting. In this approach, you create an instance of the TextLayout class and invoke the Append or AppendLine methods to add the text runs to the TextLayout. Finally, you can invoke the DrawTextLayout method, which uses the instance of TextLayout class to draw the text layout at a specified location.
var Inch = 96;
const float fontSize = 14;

//Initialize GcBitmap
GcBitmap origBmp = new GcBitmap(500, 500, true);

//Create the graphics for the Bitmap
GcBitmapGraphics g = origBmp.CreateGraphics(Color.White);

//TextFormat to specify font and other character formatting
var tf = new TextFormat()
{
    Font = Font.FromFile(Path.Combine("Resources", "Fonts",
    "times.ttf")),
    FontSize = fontSize
};

//First Way:
//DrawString: Render text using DrawString method at
//a specific location
g.DrawString("Text rendered using the DrawString method:" +
    "\r\n Test string.", tf, new PointF(Inch, Inch));

//Using MeasureString method along with DrawString
//to have more control over text layout
const string tstr = "Text rendered using MeasureString method" +
    "                with DrawString method.";

SizeF layoutSize = new SizeF(Inch * 3, Inch * 0.8f);
SizeF s = g.MeasureString(tstr, tf, layoutSize, out int fitCharCount);

// Show the passed in size in red, the measured size in blue,
// and draw the string within the returned size as bounds:
PointF pt = new PointF(Inch, Inch * 2);
g.DrawRectangle(new RectangleF(pt, layoutSize), Color.Red);
g.DrawRectangle(new RectangleF(pt, s), Color.Blue);
g.DrawString(tstr, tf, new RectangleF(pt, s));

// Second Way:
// TextLayout: A much more powerful and with better performance,
//way to render text
var tl = g.CreateTextLayout();
// To add text, use Append() or AppendLine() methods:
tl.Append("Text rendered using TextLayout. ", tf);
tl.Append("First test string added to TextLayout. ", tf);
tl.Append("Second test string added to TextLayout, continuing the" +
          " same paragraph. ", tf);
tl.AppendLine(); // Add a line break, effectively starting a new paragraph
tl.Append("Third test string added to TextLayout, a new paragraph. ", tf);
tl.Append("Fourth test string, with a different char formatting. ",
    new TextFormat(tf)
    {
        Font = Font.FromFile(Path.Combine("Resources", "Fonts",
                            "timesbi.ttf")),
        FontSize = fontSize,
        FontBold = true,
        FontItalic = true,
        ForeColor = Color.DarkSeaGreen,
    });

//Setting layout options
tl.MaxWidth = g.Width - Inch * 2;

// Draw it on the page:
pt = new PointF(Inch, Inch * 3);
g.DrawTextLayout(tl, pt);

//Save the image rendering different shapes
origBmp.SaveAsJpeg("RenderText.jpeg");
Text Trimming and Wrapping
DsImaging supports text trimming and wrapping to handle the text that does not fit in the allocated space. The TextLayout class provides the TrimmingGranularity property which sets the text granularity as character or word and trims the over flowing text to display an ellipsis at the end. This property accepts value from the TrimmingGranularity enumeration and works in conjunction with the WrapMode property which provides the text wrapping options. To enable trimming, text wrapping should be disabled by setting the WrapMode property to NoWrap. The WrapMode property also provides options to wrap a text at the grapheme cluster boundaries or as per the Unicode line breaking algorithm.

var Inch = 96;
const float fontSize = 12;
var str = "This is a long line of text which does not fit in" +
          "the allocated space.";
var wid = Inch * 4;
var dy = 0.3f;
var ip = new PointF(50, 200);

//Initialize GcBitmap
GcBitmap origBmp = new GcBitmap(500, 500, true);

//Create the graphics for the Bitmap
GcBitmapGraphics g = origBmp.CreateGraphics(Color.White);

//Rendering text with Character trimming:
TextLayout tl = g.CreateTextLayout();
tl.DefaultFormat.Font = Font.FromFile(Path.Combine("Resources",
        "Fonts", "times.ttf"));
tl.DefaultFormat.FontSize = fontSize;
tl.MaxWidth = wid;
tl.WrapMode = WrapMode.NoWrap;
tl.Append(str);
tl.TrimmingGranularity = TrimmingGranularity.Character;
g.DrawTextLayout(tl, ip);

//Render rectangle indicating the area which defines text trimming
g.DrawRectangle(new RectangleF(50, 200, wid, ip.Y - 200),
                Color.OrangeRed);

//Save the image rendering different shapes
origBmp.SaveAsJpeg("TrimText.jpeg");
Add Watermark
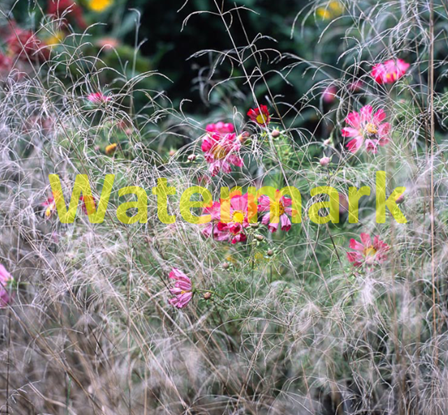
DsImaging provides a mechanism to add watermarks on top of an image by rendering the watermark text using semi-transparent color. In order to render a watermark text, you can use the DrawString method which takes the text format as a parameter. This text format is represented by the TextFormat class and should have ForeColor property set to a semi-transparent color to render the string as a semi-transparent text, i.e, watermark.
//Initialize GcBitmap
GcBitmap origBmp = new GcBitmap(800, 800, true);

//Create the graphics for the Bitmap
GcBitmapGraphics g = origBmp.CreateGraphics(Color.White);

Image image = Image.FromFile(Path.Combine("Resources",
              "Images", "reds.jpg"));
RectangleF rc = new RectangleF(0, 0, image.Width, image.Height);

//Render the image
g.DrawImage(image, rc, null, ImageAlign.Default);

//Add text watermark to the image using a semitransparent color
g.DrawString(
    "Watermark",
    new TextFormat()
    {
        Font = Font.FromFile(Path.Combine("Resources", "Fonts",
               "calibrib.ttf")),
        FontSize = 96,
        ForeColor = Color.FromArgb(128, Color.Yellow),
    },
    rc, TextAlignment.Center, ParagraphAlignment.Center, false);

//Save the image with watermark
origBmp.SaveAsJpeg("Watermark.jpeg");
Characters and Fonts
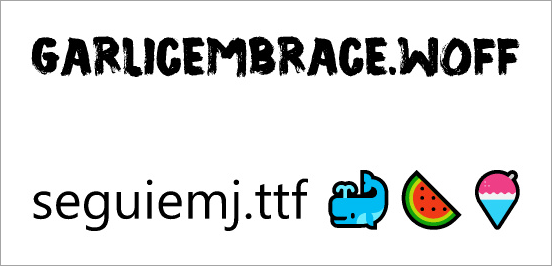
DsImaging provides support for drawing text with different font types, such as OpenType, TrueType and WOFF, and characters with codes greater than 0xFFFF.In addition, you can also draw colored fonts such as Segoe UI Emoji using Palette property of the TextFormat class. In this example, we have drawn Garlicembrace.woff and seguiemj.ttf fonts on the drawing surface.
//Initialize Fonts
Font garlicFont = Font.FromFile(Path.Combine("Resources",
                  "Fonts", "Garlicembrace.woff"));
Font emojiFont = Font.FromFile(Path.Combine("Resources",
                 "Fonts", "seguiemj.ttf"));

//Initialize GcBitmap
GcBitmap origBmp = new GcBitmap(500, 500, true);

//Create the graphics for the Bitmap
GcBitmapGraphics g = origBmp.CreateGraphics(Color.White);

//Define TexFormat and render text with specific font
TextFormat tf = new TextFormat
{
    Font = garlicFont,
    FontSize = 40
};
g.DrawString("Garlicembrace.woff", tf, new RectangleF(4, 4, 500, 50));

//Define TexFormat and render characrters with codes greater than 0xFFFF
var pals = emojiFont.CreateFontTables(TableTag.CpalDraw).GetPalettes();
tf = new TextFormat
{
    Font = emojiFont,
    FontSize = 40,
    Palette = pals[0]
};
g.DrawString("seguiemj.ttf \U0001F433\U0001F349\U0001F367", tf,
             new RectangleF(4, 140, 550, 50));

//Save the image
origBmp.SaveAsJpeg("CharacterFonts.jpeg");
Right to Left
DsImaging provides support for rendering text in right to left direction using RightToLeft property of the TextLayout class. This property can be used in a scenario where you use a language which is written in right to left direction, such as Arabic, Hebrew, etc.
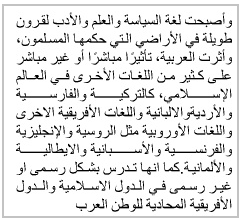
To set the direction of text from right to left direction, you can set the value of the RightToLeft property to true.
//Initialize GcBitmap
GcBitmap origBmp = new GcBitmap(300, 300, true);

//Create the graphics for the Bitmap
GcBitmapGraphics g = origBmp.CreateGraphics(Color.White);

string text = "وأصبحت لغة السياسة والعلم والأدب لقرون طويلة في الأراضي " +
    "التي حكمها المسلمون، وأثرت العربية، تأثيرًا مباشرًا" +
    " أو غير مباشر على كثير من اللغات الأخرى في العالم الإسلامي، كالترك" +
    "ية والفارسية والأرديةوالالبانية واللغات الأفريقية الاخرى واللغات" +
    " الأوروبية مثل الروسية والإنجليزية والفرنسية والأسبانية والايطالية" +
    " والألمانية.كما انها تدرس بشكل رسمى " +
    "او غير رسمى في الدول الاسلامية والدول الأفريقية المحادية للوطن العرب";

TextLayout tl = g.CreateTextLayout();
tl.MaxWidth = 72 * 3;
tl.RightToLeft = true;
tl.TextAlignment = TextAlignment.Justified;
tl.Append(text);

g.DrawTextLayout(tl, new PointF(40, 50));

//Save the image
origBmp.SaveAsJpeg("RightToLeft.jpeg");
Vertical Text
DsImaging supports vertical text through FlowDirection property of the TextLayout class which accepts value from the FlowDirection enumeration. To set the vertical text alignment, this property needs to be set to VerticalLeftToRight or VerticalRightToLeft. Additionally, the TextLayout class provides an option to rotate the sideways text in counter clockwise direction using the RotateSidewaysCounterclockwise property. Further,SidewaysInVerticalText and UprightInVerticalText property of the TextFormat class also provides options to display the text sideways or upright respectively. These properties are especially useful for rendering Latin text within the East-Asian language text.
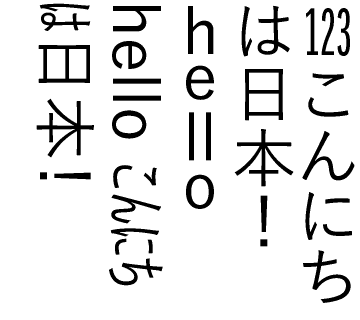
//Initialize GcBitmap
GcBitmap bmp = new GcBitmap(90 * 4, 80 * 4, true, 384f, 384f);

//Create the graphics for the Bitmap
GcBitmapGraphics g = bmp.CreateGraphics(Color.White);

//Intialize TextLayout
var tl = g.CreateTextLayout();

//Define TexFormat and render text with specific font
var fmt1 = new TextFormat()
{
    Font = Font.FromFile(@"c:\Windows\Fonts\YuGothM.ttc"),
    FontSize = 12,
    UprightInVerticalText = true,
    GlyphWidths = GlyphWidths.QuarterWidths,
    TextRunAsCluster = true
};
tl.Append("123", fmt1);

//Define TexFormat and render text with specific font
var fmt2 = new TextFormat(fmt1)
{
    UprightInVerticalText = false,
    GlyphWidths = GlyphWidths.Default,
    TextRunAsCluster = false
};
tl.Append("こんにちは日本!", fmt2);

fmt2.TransformToFullWidth = true;
tl.Append("he", fmt2);
tl.Append("ll", fmt1);
tl.Append("o ", fmt2);

fmt2.TransformToFullWidth = false;
fmt2.UseVerticalLineGapForSideways = true;
tl.Append("hello ", fmt2);

fmt2.SidewaysInVerticalText = true;
fmt2.GlyphWidths = GlyphWidths.HalfWidths;
tl.Append("こんにちは日本!", fmt2);

tl.MaxHeight = 80;
tl.MaxWidth = 90;

//Specify text lines should be placed vertically from right to left
tl.FlowDirection = FlowDirection.VerticalRightToLeft;

//Render TextLayout
g.DrawTextLayout(tl, new PointF(0f, 0f));

//Save the image
bmp.SaveAsPng("VerticalText.png");
Text Around Images
In DsImaging, you can show text around images by identifying the area occupied by the embedded object, for instance, an image. The embedded object can be represented by an object rectangle which can be defined using an instance of the ObjectRect class. This object rectangle is assigned to the text layout using ObjectRects property of the TextLayout class in order to draw the text around the specified object rectangle.
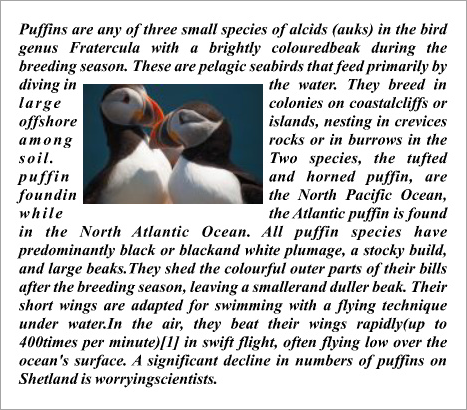
//Initialize GcBitmap
GcBitmap origBmp = new GcBitmap(500, 500, true);

//Create the graphics for the Bitmap
GcBitmapGraphics g = origBmp.CreateGraphics(Color.White);

//Get the demo image
Image imgPuffins = Image.FromFile("Resources/Images/puffins-small.jpg");
var rectPuffins = new RectangleF(100, 70, 180, 180);
// Set up ImageAlign that would fit and center an image within a
//specified area, preserving the image's original aspect ratio
ImageAlign ia = new ImageAlign(ImageAlignHorz.Center,
    ImageAlignVert.Center, true, true, true, false, false);

// Draw image, providing an array of rectangles as an output
//parameter to get the actual image rectangle
g.DrawImage(imgPuffins, rectPuffins, null, ia,
            out RectangleF[] rectsPuffins);

//Sample Text
string sampleText = "Puffins are any of three small species of" +
    " alcids (auks) in the bird genus Fratercula with a brightly" +
    " coloured beak during the breeding season. These are pelagic" +
    " seabirds that feed primarily by diving in the water. They" +
    " breed in large colonies on coastal cliffs or offshore" +
    " islands, nesting in crevices among rocks or in burrows in" +
    " the soil. Two species, the tufted puffin and horned puffin," +
    " are found in the North Pacific Ocean, while the Atlantic" +
    " puffin is found in the North Atlantic Ocean. All puffin" +
    " species have predominantly black or black and white plumage," +
    " a stocky build, and large beaks.They shed the colourful outer" +
    " parts of their bills after the breeding season, leaving a" +
    " smaller and duller beak. Their short wings are adapted for" +
    " swimming with a flying technique under water.In the air, they" +
    " beat their wings rapidly(up to 400 times per minute)[1] in" +
    " swift flight, often flying low over the ocean's surface. A" +
    " significant decline in numbers of puffins on Shetland is" +
    " worrying scientists.";

//Create and set up a TextLayout object to print the text:
var tl = g.CreateTextLayout();
tl.DefaultFormat.Font = Font.FromFile(Path.Combine("Resources", "Fonts",
                            "timesbi.ttf"));
tl.DefaultFormat.FontSize = 12;
tl.TextAlignment = TextAlignment.Justified;
tl.MaxWidth = origBmp.Width;
tl.MaxHeight = origBmp.Height;
tl.MarginAll = 72 / 2;
// ObjectRect is the type used to specify the areas to flow around
//to TextLayout.
// Create an ObjecRect based on an image rectangle, adding some
//padding so that the result looks nicer
tl.ObjectRects = tl.ObjectRects = new List<ObjectRect>()
{ new ObjectRect(rectsPuffins[0].X - 6, rectsPuffins[0].Y - 2,
    rectsPuffins[0].Width + 12, rectsPuffins[0].Height + 4) };

// Add text:
tl.Append(sampleText);

// draw layout for the text:
g.DrawTextLayout(tl, PointF.Empty);

//Save the image
origBmp.SaveAsJpeg("TextAroundImage.jpeg");
Paragraph Formatting
DsImaging uses GrapeCity.Documents.Text namespace which provides TextLayout class that represents one or more paragraphs of text with same formatting. This class also provides various properties to align and format paragraphs. For example, this class provides ParagraphAlignment property which takes the values from ParagraphAlignment enumeration to set the alignment of paragraphs along the flow direction axis. The FirstLineIndent and LineSpacingScaleFactor properties of the TextLayout class can be used to apply the basic paragraph formatting options such as line indentation and spacing.

To format a paragraph:
Initialize the GcBitmap class.
Create a drawing surface using CreateGraphics method of the GcBitmap class which returns an instance of the GcBitmapGraphics class.
Add text using the Append and AppendLine methods of TextLayout class to create a paragraph.
Set the text formatting attributes such as font, font size, color, etc. using the TextFormat class properties.
Set first line offset, spacing between paragraphs and line spacing to format a paragraph using FirstLineIndent, ParagraphSpacing and LineSpacingScaleFactor properties of the TextLayout class respectively.
var Inch = 96;
const float fontSize = 14;

//Initialize GcBitmap
GcBitmap origBmp = new GcBitmap(500, 500, true);

//Create the graphics for the Bitmap
GcBitmapGraphics g = origBmp.CreateGraphics(Color.White);

// TextFormat to specify font and other character formatting:
var tf = new TextFormat()
{
    Font = Font.FromFile(Path.Combine("Resources", "Fonts", "times.ttf")),
    FontSize = fontSize
};

// TextLayout: A much more powerful way to render text with
//better performance
var tl = g.CreateTextLayout();
// To add text, use Append() or AppendLine() methods:
tl.Append("Text rendered using TextLayout. ", tf);
tl.Append("First test string added to TextLayout. ", tf);
tl.Append("Second test string added to TextLayout, continuing the" +
    "same paragraph. ", tf);

//Add a line break, effectively starting a new paragraph
tl.AppendLine();
tl.Append("Third test string added to TextLayout, a new paragraph. ",
          tf);
tl.Append("Fourth test string, with a different char formatting. ",
    new TextFormat(tf)
    {
        Font = Font.FromFile(Path.Combine("Resources", "Fonts",
               "timesbi.ttf")),
        FontSize = fontSize,
        FontBold = true,
        FontItalic = true,
        ForeColor = Color.DarkSeaGreen,
    });

//Setting layout options
tl.MaxWidth = g.Width - Inch * 2;

//Paragraph formatting can also be set, here we set first
//line offset, spacing between paragraphs and line spacing:
tl.FirstLineIndent = Inch * 0.5f;
tl.ParagraphSpacing = Inch * 0.05f;
tl.LineSpacingScaleFactor = 0.8f;

// Draw it on the page:
PointF pt = new PointF(Inch, Inch * 2);
g.DrawTextLayout(tl, pt);

//Save the image rendering different shapes
origBmp.SaveAsJpeg("ParagraphFormat.jpeg");
Line Breaking and Justification in Paragraph
DsImaging provides LineBreakingRules and WordBoundaryRules properties in the TextLayout class to employ streamlined rules in addition to standard Unicode methods. When applying a line break or word break, these properties accept the enumeration values Unicode or Simplified, which specify the algorithm to be applied.
DsImaging also provides TextExtensionStrategy property to justify the text when TextAlignment property is set to either Justified or Distributed. TextExtensionStrategy property offers multiple strategies, such as Default, Normal, EastAsianExcel, and Excel, that allow text extension for wide characters and white spaces or for white spaces only.
LineBreakingRules | WordBoundaryRules | TextExtensionStrategy | Effect |
|---|---|---|---|
Unicode | Unicode | Default |
|
Unicode | Unicode | EastAsianExcel |
|
Unicode | Unicode | Excel |
|
Simplified | Simplified | Default |
|
Simplified | Simplified | EastAsianExcel |
|
Simplified | Simplified | Excel |
|
Refer to the following example code to add line breaks and justification to a paragraph.
// Initialize Fonts.
var arialbd = GCTEXT.Font.FromFile(Path.Combine("Resources", "Fonts", "arialbd.ttf"));
var arialuni = GCTEXT.Font.FromFile(Path.Combine("Resources", "Fonts", "arialuni.ttf"));

// Initialize GcBitmap.
var bmp = new GcBitmap(pixelSize.Width, pixelSize.Height, opaque, dpi, dpi);

// Create graphic for the Bitmap.
using var g = bmp.CreateGraphics(Color.White);

// Initialize TextLayout and set its properties.
var tl = g.CreateTextLayout();
tl.TextAlignment = TextAlignment.Distributed;
tl.JustifiedSpaceExtension = 0f;
tl.JustifiedTextExtension = 20f;

// Initialize TextFormat and set its properties.
var tf = new TextFormat { FontSize = 26f, Font = arialuni };
var tfInfo = new TextFormat { FontSize = 11f, Font = arialbd };
float marginx = 260, marginy = 36;
tl.MaxWidth = pixelSize.Width - marginx * 2;
var text = "abcdefg!1010101010abc;999999本列島で使され99 555";

// Render TextLayout and set the LineBreakingRules and WordBoundaryRules properties.
float DrawText(TextLayout tl, float y)
{
    var pt = new PointF(marginx, y + 20);
    tl.Append(text, tf);

    // Perform layout for the whole text.
    tl.PerformLayout(true);
    var rc = new RectangleF(pt, new SizeF(tl.ContentWidth, tl.ContentHeight));
    g.FillRectangle(rc, Color.PaleGoldenrod);

    // Render text using DrawString method at a specific location.
    g.DrawString($"LineBreakingRules.{tl.LineBreakingRules}, TextExtensionStrategy.{tl.TextExtensionStrategy}:",
        tfInfo, new PointF(marginx / 2f, y));
    g.DrawTextLayout(tl, pt);
    tl.Clear();
    return rc.Bottom + 16;
}

float y = marginy, dy = marginy * 3.5f;
y = DrawText(tl, y);
tl.TextExtensionStrategy = TextExtensionStrategy.EastAsianExcel;
y = DrawText(tl, y);
tl.TextExtensionStrategy = TextExtensionStrategy.Excel;
y = DrawText(tl, y);
tl.LineBreakingRules = LineBreakingRules.Simplified;
tl.WordBoundaryRules = WordBoundaryRules.Simplified;
tl.TextExtensionStrategy = TextExtensionStrategy.Default;
y = DrawText(tl, y);
tl.TextExtensionStrategy = TextExtensionStrategy.EastAsianExcel;
y = DrawText(tl, y);
tl.TextExtensionStrategy = TextExtensionStrategy.Excel;
y = DrawText(tl, y);
!type=note
Note:
The following properties are internally mapped to new properties and, hence, are marked obsolete:
TextLayout.SimplifiedWordBreak
TextLayout.SimplifiedAlignment
TextLayout.NoExcelAlignment
Limitation
In a few uncommon instances, behaviour of the old properties might change.
Text Splitting
DsImaging supports splitting of text layout through Split method of the TextLayout class. The Split method splits the text based on the bounds defined by the TextLayoutand returns the individual text which is rendered using the DrawTextLayout method.
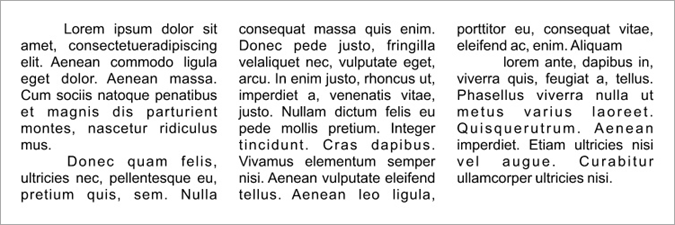
The following example illustrates text splitting where the text is split into multiple columns by invoking the Split method which creates a magazine style multi-column layout.
//Initialize GcBitmap
GcBitmap origBmp = new GcBitmap(800, 300, true);

//Create the graphics for the Bitmap
GcBitmapGraphics g = origBmp.CreateGraphics(Color.White);

g.Renderer.Multithreaded = true;
g.Renderer.SlowAntialiasing = true;

var tl = g.CreateTextLayout();
tl.TextAlignment = TextAlignment.Justified;
tl.FirstLineIndent = 96 / 2;

// Add some text (note that TextLayout interprets "\r\n",
//"\r" and "\n" as paragraph delimiters)
tl.Append("Lorem ipsum dolor sit amet, consectetuer" +
    "adipiscing elit. Aenean commodo ligula eget dolor. " +
    "Aenean massa. " +
    "Cum sociis natoque penatibus et magnis dis parturient " +
    "montes, nascetur ridiculus mus. \r\n Donec quam felis, " +
    "ultricies" + "" + " nec, pellentesque eu, pretium quis, sem." +
    " Nulla consequat massa quis enim. Donec pede justo, fringilla vel" +
    "aliquet nec, vulputate eget, arcu. In enim justo, rhoncus ut, " +
    "imperdiet a, venenatis vitae, justo. Nullam dictum felis eu" +
    " pede mollis pretium. Integer tincidunt. Cras dapibus." +
    " Vivamus elementum semper nisi. Aenean vulputate eleifend" +
    " tellus. Aenean leo ligula, porttitor eu, consequat vitae," +
    " eleifend ac, enim. Aliquam" +
    "\r\n lorem ante, dapibus in, viverra quis, feugiat a, tellus." +
    " Phasellus viverra nulla ut metus varius laoreet. Quisque" +
    "rutrum. Aenean imperdiet. Etiam ultricies nisi vel augue." +
    " Curabitur ullamcorper ultricies nisi.");

// Set up columns
const int colCount = 3;
const float margin = 96 / 2; //1/2" margins all around
const float colGap = margin / 2; //1/4" gap between columns
float colWidth = (origBmp.Width - margin * 2 -
                 colGap * (colCount - 1)) / colCount;
tl.MaxWidth = colWidth;
tl.MaxHeight = origBmp.Height - margin * 2;
// Calculate glyphs and perform layout for the whole text
tl.PerformLayout(true);

// In a loop, split and render the text in the current column
int col = 0;
while (true)
{
    // The TextLayout that will hold the rest of the text
    //which did not fit in the current layout
    var tso = new TextSplitOptions(tl)
    {
        MinLinesInLastParagraph = 2,
        MinLinesInFirstParagraph = 2
    };
    var splitResult = tl.Split(tso, out TextLayout rest);
    g.DrawTextLayout(tl, new PointF(margin + col * (colWidth +
                     colGap), margin));
    if (splitResult != SplitResult.Split)
        break;
    tl = rest;
    if (++col == colCount)
        break;
}

//Save the image
origBmp.SaveAsJpeg("Columns.jpeg");
Support for Bitmap Glyphs
DsImaging library supports embedded bitmap glyphs or scaler bits (Sbits) specified by EBDT (Embedded bitmap data) table. DsImaging provides AllowFontSbits and UseBitmapCache properties in the TextFormat class. These properties can be used in cross-platform OpenType CJK fonts for representing complex glyphs at very small sizes.
When UseBitmapCache is set to True | When UseBitmapCache is set to False |
|---|---|
|
|
To add Bitmap Glyph support for OpenType CJK font:
Load a Japanese Font file.
Configure Text format.
Set the UseBitmapCache property to True to use Bitmap Glyph Cache.
Set the AllowFontSbits property to True to get embedded bitmaps from EBDT font table.
Draw the Japanese string with Bitmap Glyph Cache.
Save the image.
static void Main(string[] args)
{
    //Load the japanese font file
    var font = Font.FromFile("msgothic.ttc");

    //Configure the text format
    TextFormat tf = new TextFormat
    {
        Font = font,
        FontSizeInGraphicUnits = true,
        FontSize = 12,
        //Allows to use Bitmap Glyph Cache
        UseBitmapCache = true,
        // Allows to use embedded bitmaps from the EBDT font table
        AllowFontSbits = true
    };
    // Japanese string
    var s = "這是演示示例";
    using (var bmp = new GcBitmap(90, 40, true))
    {
        using (var g = bmp.CreateGraphics(Color.White))
        {
            // Draws the japanese string with Bitmap Glyph Cache
            g.DrawString(s, tf, new RectangleF(4, 4, 130, 20));

            //The code lines below are used to showcase how the Japenese text is drawn
            //when UseBitmapCache is set to false.
            tf.UseBitmapCache = false;
            g.DrawString(s, tf, new RectangleF(4, 24, 130, 20));
        }
        //Save the image
        bmp.SaveAsPng("BitmapGlyphSupport.png");

        Console.WriteLine("\n----Image Saved----");
        Console.ReadLine();
        }
    }
}
Support TrueType Hinting Instructions
Hinting instructions are included in some TrueType fonts which improve their look by reusing some glyph parts in different glyphs regardless of their font size. The TrueType hinting instructions are also supported in DsImaging which supports drawing CJK characters as combinations of other smaller glyph pieces which enhances their final look.
DsImaging library supports TrueType hinting instructions when rendering text on GcGraphics.
For fonts which include TrueType glyph hinting instructions, the EnableHinting property of the Font class is set to true, for the others it is set to False. Further, to apply the hinting instructions of the font, EnableFontHinting property of the TextFormat class must be set to true (the default value).
However, if the EnableHinting property is explicitly set to false, then the hinting instructions cannot be enabled.
As the default value of both the properties is true, hence the hinting instructions are supported for any TrueType font which includes them. Also, both properties affect text drawing on GcBitmapGraphics only.
Disabled Hinting Intructions |
|---|
|
|
Enabled Hinting Intructions |
|---|
|
|
To enable TrueType hinting instructions for Chinese string:
Load a Chinese Font file.
Initialize the GcBitmap class.
Create a drawing surface using CreateGraphics method of the GcBitmap class which returns an instance of the GcBitmapGraphics class.
Define a Chinese string and configure TextFormat properties.
Set the EnableFontHinting property to true to enable hinting instructions..
Draw the Chinese string.
Save the image.
//Load the Chinese font file
var font = Font.FromFile("kaiu.ttf");
var bmp = new GcBitmap(750 * 2, 180 * 2, true, 192f, 192f);
{
    var g = bmp.CreateGraphics(Color.White);
    {
        //Draw the string with hinting instructions set to true
        string s = @"一年之计在于春,一日之计在于晨";

        //Define text formatting attributes
        var tf = new TextFormat()
        {
            Font = font,
            FontSize = 20,
            EnableFontHinting = true
        };

        g.DrawString(s, tf, new PointF(10, 110));
    }
    bmp.SaveAsPng("ChineseFontwithHintingInstructions.png");
}
For more information about working with text using DsImaging, see DsImaging sample browser.
!type=note
Note: For rendering large or complex text and graphics, you can use Skia library. For more information about the library and its usage, see Render using Skia Library.


