Nested Menu
Using the RadialMenu control, you can create both top-level menus and submenus. Let us discuss how to create the top-level menus and submenus in the following sections.
Create Top-Level Menus
Place the following XAML between the <Grid> and </Grid> tags:
<c1:C1ContextMenuService.ContextMenu>
     <c1:C1RadialMenu> </c1:C1RadialMenu>
</c1:C1ContextMenuService.ContextMenu>
The RadialMenu control is within a ContextMenuService. When you run your application, the menu will appear when you right-click or right-tap.
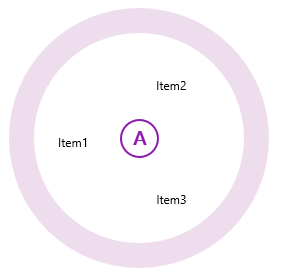
Place the following XAML between the <c1:C1RadialMenu> and </c1:C1RadialMenu> tags. This will create three top-level menu items:
<c1:C1RadialMenuItem Header="RadialMenuItem1" />
<c1:C1RadialMenuItem Header="RadialMenuItem2" />
<c1:C1RadialMenuItem Header="RadialMenuItem3" />
Run the program and observe the following:
- Right tap or right-click the page. In this case, this is the element to which RadialMenu is attached. Observe that the Navigation Button appears.
- Tap or click the Navigation Button to open the radial menu. Observe that the RadialMenu contains three C1RadialMenuItems.
Your top-level menu should resemble the following image:
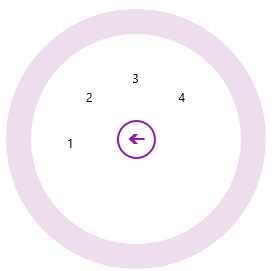
Create Submenus
Create a RadialMenu:
<c1:C1ContextMenuService.ContextMenu>
     <c1:C1RadialMenu >
    </c1:C1RadialMenu>
</c1:C1ContextMenuService.ContextMenu>
Place the following XAML between the <c1: C1RadialMenu> and </c1:C1RadialMenu> tags:
<c1:C1RadialMenuItem Header="Tap Here" >
  <c1:C1RadialMenuItem Header="Item 1" />
  <c1:C1RadialMenuItem Header="Item 2" />
  <c1:C1RadialMenuItem Header="Item 3" />
</c1:C1RadialMenuItem>
Run the program.
Right tap or right-click the page to display the Navigation Button. Tap or click the Navigation Button to display the main RadialMenu.
Tap or click the Tap Here item and observe that the submenu you created appears.
This is the RadialMenu control after you tap or click the Tap Here item: