
Quickstart
This quick start guides you through the steps of creating a simple WPF application in .NET using the Maps control.
Complete the steps given below to see how the Maps control appears after data binding and setting the properties.
Create a new WPF application.
Install NuGet packages using the 'Manage NuGet Packages' option.
Switch to the code view and add a class named City with the cityName property to get or set city name, and the location property to get or set location of the city.
public class City
{
    private Point _LongLat;
    public Point LongLat
    {
        get
        {
            return _LongLat;
        }
        set
        {
            _LongLat = value;
        }
    }
    private string _Name;
    public string Name
    {
        get
        {
            return _Name;
        }
        set
        {
            _Name = value;
        }
    }
    public City(Point location, string cityName)
    {
        this.LongLat = location;
        this.Name = cityName;
    }
    public City()
    {
    }
}
Add the following code beneath the InitializeComponent() method to create the array collection that will populate the Name property and the LongLat property:
City[] cities = new City[]
{
new City(){ LongLat= new Point(-58.40, -34.36), Name="Buenos Aires"},
new City(){ LongLat= new Point(-47.92, -15.78), Name="Brasilia"},
new City(){ LongLat= new Point(-70.39, -33.26), Name="Santiago"},
new City(){ LongLat= new Point(-78.35, -0.15), Name="Quito"},
new City(){ LongLat= new Point(-66.55, 10.30), Name="Caracas"},
new City(){ LongLat= new Point(-56.11, -34.53), Name="Montevideo"},
new City(){ LongLat= new Point(-77.03, -12.03), Name="Lima"},
new City(){ LongLat= new Point(-57.40, -25.16), Name="Asuncion"},
new City(){ LongLat= new Point(-74.05, 4.36), Name="Bogota"},
new City(){ LongLat= new Point(-68.09, -16.30), Name="La Paz"},
new City(){ LongLat= new Point(-58.10, 6.48), Name="Georgetown"},
new City(){ LongLat= new Point(-55.10, 5.50), Name="Paramaribo"},
};
maps.DataContext = cities;
Drag the Maps control on the XAML designer, that is MainWindow.xaml. Place the following XAML markup between the <c1:C1Maps> and </c1:C1Maps> tags:
<c1:C1Maps x:Name="maps" FadeInTiles="False" Margin="0,0,235,8" TargetCenter="-65,-25" Center="-58,-25" Zoom="2" Foreground="Brown">
        <c1:C1Maps.Resources>
            <!--Item template -->
            <DataTemplate x:Key="templPts">
                <c1:VectorPlacemark
         GeoPoint="{Binding Path=LongLat}" Fill="Aqua" Stroke="Aqua"
         Label="{Binding Path=Name}" LabelPosition="Top" >
                    <c1:VectorPlacemark.Geometry>
                        <EllipseGeometry RadiusX="2" RadiusY="2" />
                    </c1:VectorPlacemark.Geometry>
                </c1:VectorPlacemark>
            </DataTemplate>
        </c1:C1Maps.Resources>
        <c1:VectorLayer ItemsSource="{Binding}"
ItemTemplate="{StaticResource templPts}" HorizontalAlignment="Right" Width="403" />
    </c1:C1Maps>
In the XAML code above, we have created a data template using the VectorPlacemark and VectorLayer classes. The following properties are used in the XAML code:
FadeInTiles, Center, and Zoom properties of C1Maps class to customize the appearance of the map.
GeoPoint and Label properties of VectorPlacemark class is used to set the element position in geographical coordinates of longitude/latitude, and display the tooltips. Here, the GeoPoint property is bound to the value of the LongLat property while its Label property is set to the value of the Name property of City class.
ItemsSource property of VectorLayer class is bound to the entire data source.
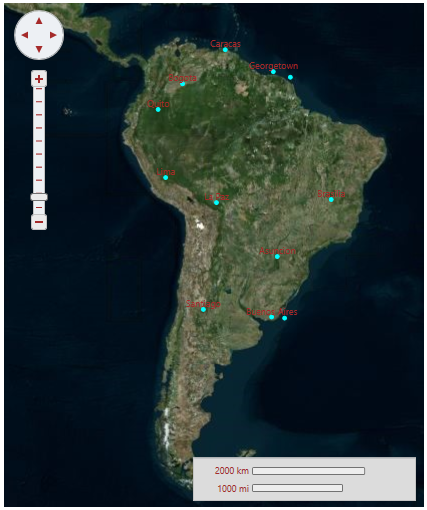
Run the program and view the results of the quick start project.