Quick Start
This quick start is intended to get you up and running with the TagEditor control. It guides you through the steps of creating a new Visual Studio project with a C1TagEditor control, add content to it and run the application to view the output.
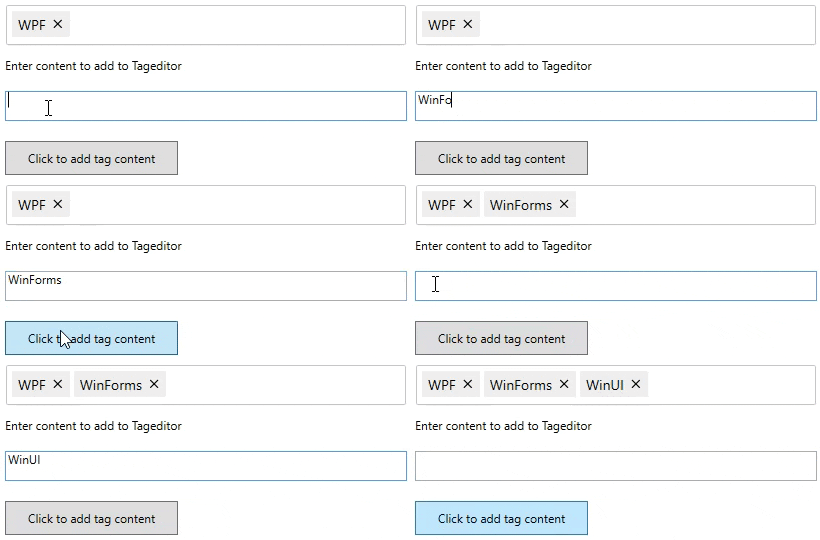
The following image shows how the TagEditor control in action.
 |
|---|
Set up the Application
- Create a new WPF App in Visual Studio.
- In the Solution Explorer, right click Dependencies and select Manage NuGet Packages.
- In NuGet Package Manager, select nuget.org as the Package source.
- Search and select the following package and click Install.
- C1.WPF.Input
Configure the TagEditor control
In the design view, drag and drop the following controls from the toolbox onto the window.
- C1TagEditor
- TextBlock
- TextBox
- Button
Switch to the XAML view and set the following properties of the controls as shown in the code.
<c1:C1TagEditor Name="te" Height="40" Width="400"/>
<TextBlock Margin="108,250,108,164" Text="Enter content to add to Tageditor" Height="20" />
<TextBox x:Name="AddInput" Height="30" Margin="108,283,108,121"/>
<Button Content="Click to add tag content" Margin="108,335,337,68" Click="button_click"/>
Switch to the Code view and add the following import statement.
using C1.WPF.Input;Add the following code to insert tags in the TagEditor control on a button click.
public MainWindow()
{
    InitializeComponent();
    te.InsertTag("WPF");
}
private void button_click(object sender, RoutedEventArgs e)
{
    string text = AddInput.Text;
    if (!string.IsNullOrEmpty(text))
    {
        te.InsertTag(text);
        if (te.DisplayMode == DisplayMode.Text)
            te.UpdateTextFromTags();
        AddInput.Text = "";
    }
}
Build and Run the Project
- Click Build | Build Solution to build the project.
- Press F5 to run the project.


