
Quick Start
The following quick-start guide will take you through the basics of TreeView control.
.NET Framework
This quick start will guide you through the steps of creating a simple .NET application using the TreeView control. Follow the steps below to get started:
Step 1: Adding TreeView to the Application
To add the TreeView control to your application, complete the following steps:
Create a new Windows Forms Application.
In the Design view, drag and drop the C1TreeView control to the form from the Toolbox.
The TreeView control appears with Column1 added by default.
Click the Smart Tag, and select Dock in Parent Container.
You have successfully added the TreeView control to the application.
Step 2: Creating Nodes in TreeView
You can create nodes in TreeView either by using designer or through code in your application.
Using Designer
To create nodes in TreeView using designer, complete the following steps:
Click the Smart Tag, and select Edit columns.
C1TreeColumn Collection Editor appears.
Enter the relevant name and header text in the Name and the HeaderText fields respectively.

Close C1TreeColumn Collection Editor.
Click the Smart Tag, and select Edit nodes.
TreeNodes Editor appears.
Click Add to create a top-level node.
Specify a custom label for the node in the Value property.
Click Add child to add a child node to the selected node.
Specify a custom label for the child node in the Value property.
Repeat steps 7 to 10 as required in the application.
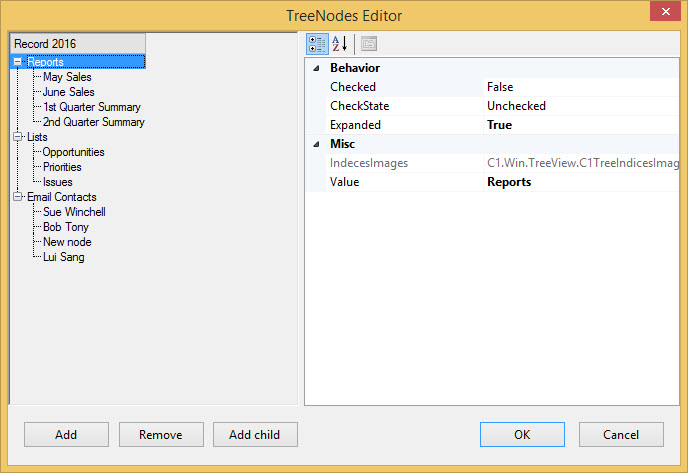
Click OK to save the changes.
Through Code
To create nodes in TreeView programmatically, complete the following steps:
Create new instances of a node.
Add the parent node to the TreeView nodes collection.
Set the value of the parent node.
csharp
// create new instances of node
C1.Win.TreeView.C1TreeNode node1 = new C1.Win.TreeView.C1TreeNode();
C1.Win.TreeView.C1TreeNode node2 = new C1.Win.TreeView.C1TreeNode();
// add parent node to the TreeView nodes collection
c1TreeView1.Nodes.Add(node1);
// set the value of parent node
node1.SetValue("Reports");
VB
' create new instances of node
Dim node1 As New C1.Win.TreeView.C1TreeNode()
Dim node2 As New C1.Win.TreeView.C1TreeNode()

' add parent node to the TreeView nodes collection
C1TreeView1.Nodes.Add(node1)

' set the value of parent node
node1.SetValue("Reports")
Add the child node to the parent node.
Set the value of the child node.
csharp
// add child node to parent node
node1.Nodes.Add(node2);
//set the value of child node
node2.SetValue("May Sales");
VB
' add child node to parent node
node1.Nodes.Add(node2)

'set the value of child node
node2.SetValue("May Sales")
Repeat steps 3 to 7 to add more parent nodes and child nodes.
Step 3: Running the Application
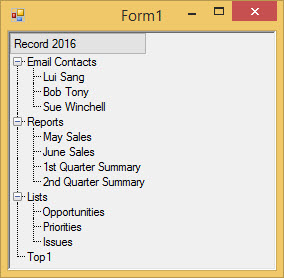
Now that you have successfully created nodes in TreeView, you just need to run the application.
The following output appears once you have run the application.
.NET
Please note that the WinForms latest .NET Edition does not include rich design-time support yet. Hence, we will enhance our code accordingly in future releases.
To create a simple WinForms application in .NET for TreeView control, complete the following steps:
Create a new Windows Forms .NET Core Application.
Switch to code editor and initialize C1TreeView control.
//Initialize and Configure C1TreeView
C1TreeView c1TreeView1 = new C1TreeView();
c1TreeView1.Dock = DockStyle.Fill;
Configure C1TreeView by adding the Header text.
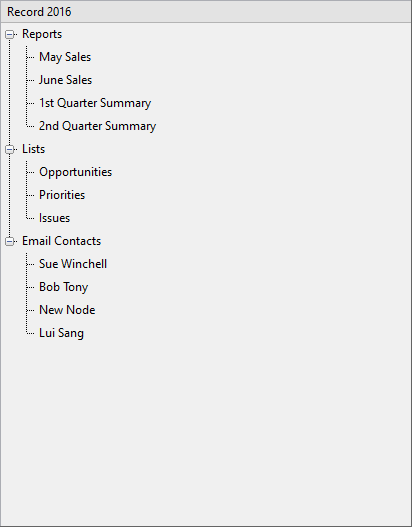
// Add header text to TreeView
c1TreeView1.Columns[0].HeaderText = "Record 2016";
this.Controls.Add(c1TreeView1);
Create root nodes using the C1TreeNode class and set their values using SetValue method.
//Create root nodes and set their values
C1.Win.TreeView.C1TreeNode rnode1 = new C1.Win.TreeView.C1TreeNode();
rnode1.SetValue("Reports");
C1.Win.TreeView.C1TreeNode rnode2 = new C1.Win.TreeView.C1TreeNode();
rnode2.SetValue("Lists");
C1.Win.TreeView.C1TreeNode rnode3 = new C1.Win.TreeView.C1TreeNode();
rnode3.SetValue("Email Contacts");
Add root nodes to the TreeView nodes collection using the Nodes property and Add method.
//Add root nodes to the TreeView nodes collection
c1TreeView1.Nodes.Add(rnode1);
c1TreeView1.Nodes.Add(rnode2);
c1TreeView1.Nodes.Add(rnode3);
Create children nodes and add them to the first root node.
//Create and add children nodes for first root node
C1.Win.TreeView.C1TreeNode cnode1_1 = new C1.Win.TreeView.C1TreeNode();
cnode1_1.SetValue("May Sales");
c1TreeView1.Nodes[0].Nodes.Add(cnode1_1);
C1.Win.TreeView.C1TreeNode cnode1_2 = new C1.Win.TreeView.C1TreeNode();
cnode1_2.SetValue("June Sales");
c1TreeView1.Nodes[0].Nodes.Add(cnode1_2);
C1.Win.TreeView.C1TreeNode cnode1_3 = new C1.Win.TreeView.C1TreeNode();
cnode1_3.SetValue("1st Quarter Summary");
c1TreeView1.Nodes[0].Nodes.Add(cnode1_3);
C1.Win.TreeView.C1TreeNode cnode1_4 = new C1.Win.TreeView.C1TreeNode();
cnode1_4.SetValue("2nd Quarter Summary");
c1TreeView1.Nodes[0].Nodes.Add(cnode1_4);
Create children nodes and add them to the second root node.
//Create and add children nodes for second root node
C1.Win.TreeView.C1TreeNode cnode2_1 = new C1.Win.TreeView.C1TreeNode();
cnode2_1.SetValue("Opportunities");
c1TreeView1.Nodes[1].Nodes.Add(cnode2_1);
C1.Win.TreeView.C1TreeNode cnode2_2 = new C1.Win.TreeView.C1TreeNode();
cnode2_2.SetValue("Priorities");
c1TreeView1.Nodes[1].Nodes.Add(cnode2_2);
C1.Win.TreeView.C1TreeNode cnode2_3 = new C1.Win.TreeView.C1TreeNode();
cnode2_3.SetValue("Issues");
c1TreeView1.Nodes[1].Nodes.Add(cnode2_3);
Create children nodes and add them to the third root node.
//Create and add children nodes for third root node
C1.Win.TreeView.C1TreeNode cnode3_1 = new C1.Win.TreeView.C1TreeNode();
cnode3_1.SetValue("Sue Winchell");
c1TreeView1.Nodes[2].Nodes.Add(cnode3_1);
C1.Win.TreeView.C1TreeNode cnode3_2 = new C1.Win.TreeView.C1TreeNode();
cnode3_2.SetValue("Bob Tony");
c1TreeView1.Nodes[2].Nodes.Add(cnode3_2);
C1.Win.TreeView.C1TreeNode cnode3_3 = new C1.Win.TreeView.C1TreeNode();
cnode3_3.SetValue("New Node");
c1TreeView1.Nodes[2].Nodes.Add(cnode3_3);
C1.Win.TreeView.C1TreeNode cnode3_4 = new C1.Win.TreeView.C1TreeNode();
cnode3_4.SetValue("Lui Sang");
c1TreeView1.Nodes[2].Nodes.Add(cnode3_4);
Run the code and view the output.
Note: The latest WinForms .NET Edition does not include rich design-time support yet. We will enhance it in future releases.