


Quick Start
This quick start demonstrates how to create a travel registration form by using Input controls. Complete the following steps to set up the application, configure the controls, and populate the required data.
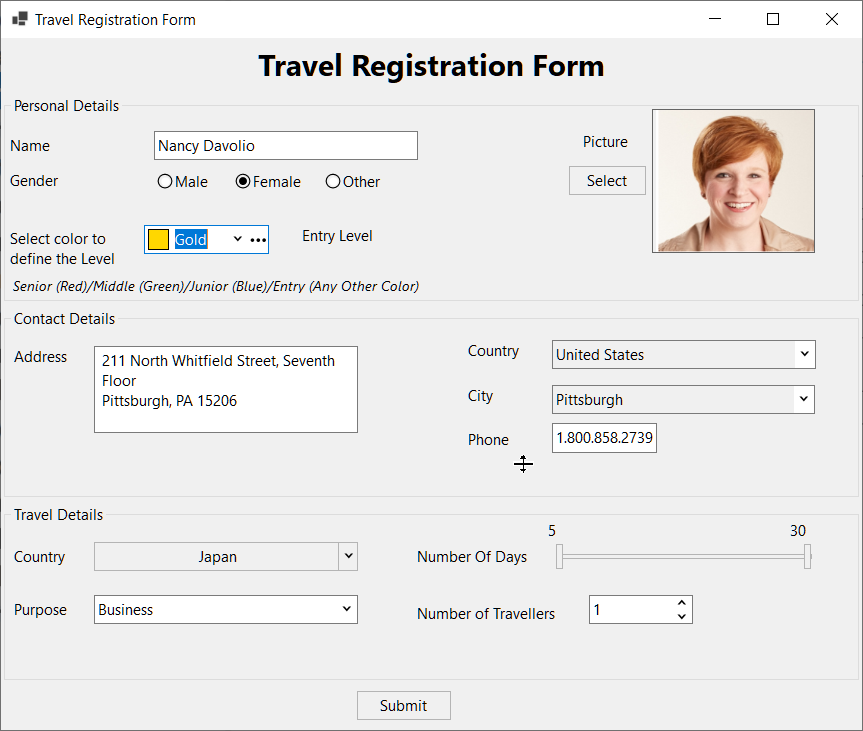
The completed travel registration form appears as follows:
Set Up the Application
Create a Windows Forms App (.NET) project.
In Visual Studio, select Project > ProjectName Properties, and then select .NET 6.0 or later from the Target Framework list.
Install the C1.Win.Input NuGet package. After the package is installed, the Input controls appear in the Toolbox when the form is open in the designer.
Add and Configure Input Controls
Add the Input controls required for the travel registration form and configure their properties.
In the form designer, drag the required controls, including Label and RadioButton controls, from the Toolbox onto the form.
Arrange the controls to create the required layout.
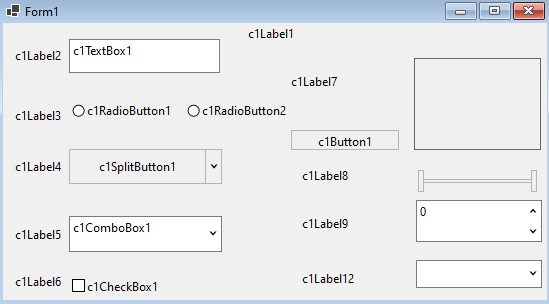
Configure the
NameandTextproperties as shown in the following table.Control
Name property
Text property
c1Label1
lblTitle
Travel Registration Form
c1Label2
lblName
Name
c1TextBox1
txtName
c1Label3
lblGender
Gender
c1RadioButton1
radioBtnMale
Male
c1RadioButton2
radioBtnFemale
Female
c1Label4
lblTravelTo
Country
c1SplitButton1
splitBtnCountry
c1Label5
lblPurpose
Purpose
c1ComboBox1
cmbPurpose
c1Label6
lblVisa
Visa Status
c1CheckBox1
chkVisa
Stamped
c1Label7
lblPic
Photo
c1Button1
btnSelectPic
Browse
c1PictureBox1
picBoxMain
c1Label8
lblNumofDays
Duration (in days)
c1RangeSlider1
rgSliderDays
c1Label9
lblTravellers
Number of Travelers
c1NumericEdit1
numEditTravellers
c1Label10
lblMin
rgSliderDays.Minimum.ToString();
c1Label11
lblMax
rgSliderDays.Maximum.ToString();
c1Label12
lblProf
Profession
c1DropDownControl1
dropdownControl
dataGridView.CurrentCell.Value.ToString();
DataGridView
dataGridView
c1ColorPicker1
colorPicker
c1MaskedTextBox1
MaskedTextBox
Set the
Fontproperty oflblTitleto Georgia, 18 pt, Bold.Set the
Valueproperty ofnumEditTravellersto1.Configure
rgSliderDaysto use a range of 5 through 30 days. Set the lower value to5, the upper value to30, and configure the slider increments and scrolling behavior as required.Display the minimum and maximum slider values in
lblMinandlblMax.//configure range slider control rgSliderDays.LowerValue = 5D; rgSliderDays.Maximum = 30D; rgSliderDays.Minimum = 5D; rgSliderDays.LargeChange = 2D; rgSliderDays.ScrollBehavior = C1.Win.Input.RangeSliderScrollBehavior.ThumbStep; rgSliderDays.SmallChange = 1D; rgSliderDays.UpperValue = 30D; //assign value to rangslider's min and max label lblMin.Text = rgSliderDays.Minimum.ToString(); lblMax.Text = rgSliderDays.Maximum.ToString();
Populate Data
Populate the purpose, country, and profession fields, and configure image selection.
Set the ItemsDataSource property of
cmbPurposeto populate the list of travel purposes.//add items to purpose combobox cmbPurpose.ItemsDataSource = resource.GetString("Purposes").Split(","); cmbPurpose.PostValidation.AllowDbNull = false;Create a country list and use it to populate
splitBtnCountry.
namespace CountryCity
{
  [Serializable]
  public class Country
  {
      public Country() { }
      public Country(string name, City[] cities)
      {
          Name = name;
          Cities.AddRange(cities);
      }
      private List<City> _cities;
      private City[] _cityArray;
      public string Name { get; set; }
      public string ISO2Name { get; set; }
      public string ISO3Name { get; set; }

      public City[] CityArray
      {
          get { return Cities.ToArray(); }
          set
          {
              _cityArray = value;
              if (_cityArray != null)
              {
                  Cities.Clear();
                  foreach (City city in _cityArray)
                  {
                      city.Country = this;
                      Cities.Add(city);
                  }
              }
          }
      }
      [XmlIgnore]
      public List<City> Cities
      {
          get
          {
              if (_cities is null)
              {
                  _cities = new List<City>();
              }
              return _cities;
          }
          set
          {
              _cities = value;
              foreach (City city in _cities)
              {
                  city.Country = this;
              }
          }
      }

      public static List<Country> GetCountries()
      {
          XmlSerializer xs = new XmlSerializer(typeof(List<Country>));
          XmlReader xr = XmlReader.Create("CountryCityConfig.xml");
          return (List<Country>)xs.Deserialize(xr);

      }
  }

  public class City
  {
      public City() { }
      public City(string name)
      {
          CityName = name;
      }
      public string CityName { get; set; }

      [XmlIgnore]
      public Country Country { get; set; }
  }
  }
Create an
ImageListand add the images displayed with theSplitButtonitems.//Get the data to bind to country combobox Countries = Country.GetCountries(); imgList = new ImageList(); //create imagelist for (int i = 0; i < Countries.Count; i++) { Country c = Countries[i]; Image img = (Image)resource.GetObject(c.ISO2Name); if (img is null) continue; imgList.Images.Add(c.Name, img); } string[] offices = Resources.Offices.Split(','); foreach (string item in offices) { SplitButtonItem sbtn = new SplitButtonItem(); sbtn.Text = item; sbtn.Click += Sbtn_Click; splitBtnCountry.Items.Add(sbtn); splitBtnCountry.TextAlign = ContentAlignment.MiddleLeft; }Configure
btnSelectPicto open a file-selection dialog when selected. Display the selected image inpicBoxMain.private void btnSelectPic_Click(object sender, EventArgs e) { OpenFileDialog fileDialog = new OpenFileDialog(); fileDialog.Filter = "Image files (*.jpg, *.jpeg, *.jpe, *.jfif, *.png) | *.jpg; *.jpeg; *.jpe; *.jfif; *.png"; if (fileDialog.ShowDialog() == DialogResult.OK) { picBoxMain.Image = Image.FromFile(fileDialog.FileName); } }Configure the drop‑down using the Control property of C1DropDownControl to host the DataGridView.
dataGridView.ColumnHeadersVisible = false;
dataGridView.RowHeadersVisible = false;
dataGridView.DataSource = _profession;
Configure the DropDownControl using the Control property of C1DropDownControl class to host the DataGridView control on the drop-down form.
dropdownControl.Control = dataGridView;
dropdownControl.DroppedDown = false;
Handle the SelectionChanged event of DataGridView and assign the DropDownControl.Text property to the Value of the current cell.
private void dataGridView_SelectionChanged(object sender, EventArgs e)
{
    dropdownControl.Text = dataGridView.CurrentCell.Value.ToString();
}
Run the project to view the travel registration form.
Note: WinForms .NET 5 Edition does not include rich design-time support yet. We will enhance it in future releases.