- FlexReport for WinForms Overview
- Key Features
- FlexReport versus other Reporting Controls
- Core Classes
- Design-Time Support
- Quick Start
- FlexReport Designer
- FlexReportDesigner Control
- Data Binding
- Load Reports
- Create Reports
- Sections of FlexReport
- Fields and Custom Fields
- Modifying the Fields
- Parameters
- VBScripting with ExpressionEditor
- Filtering Data
- Grouping Data
- Sorting Data
- Customize Reports
- Styling the Reports
- Export Reports
- Preview and Print Reports
- Deployment
- FlexViewer
Alternating Background
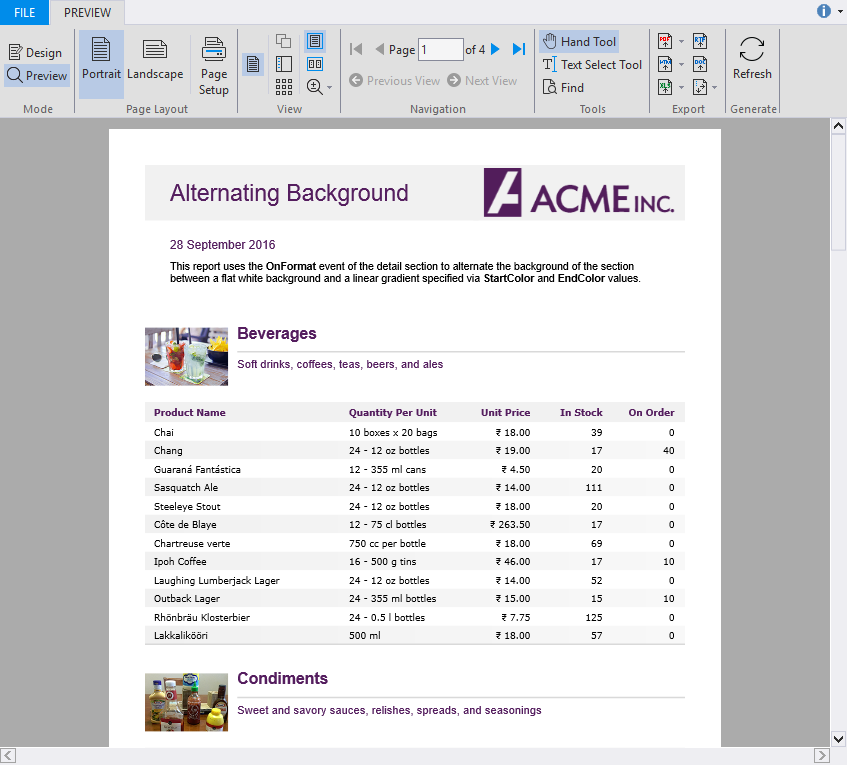
The "Alternating background" feature of FlexReport lets you demonstrate how to change the background color of alternate rows in a section of report.
By default, rows in the details section of a report have the same background color. However, the background color of the alternate rows can be set to enhance the readability of the records in a report. You can set the background color of the alternating rows in the detail section using its OnFormat event.
In this report, the background color is applied to the alternate rows of Detail section on the basis of the script added to it's OnFormat property. The background color of the odd numbered rows is set to white and the even numbered rows is set to a linear gradient using StartColor and EndColor values.
To create a report with alternating background, perform the steps below:
Step 1: Create a report
Open the FlexReportDesigner and go to FILE | New.
Click New Report drop down from the Reports tab and select Empty Report to create a report.
Step 2: Connect the report to a data source
Switch to the Data tab, right-click the Main data source and choose Edit to open and the Data Sources Wizard and start editing.
Select OLEDB Data Provider from the Data provider drop-down and click the ellipsis button next to the Connection string textbox to select the C1NWind.mdb file.
Specify the following Sql statement in the Sql statement tab:
SELECT Categories.*, Products.*
FROM Categories INNER JOIN Products
ON Categories.CategoryID = Products.CategoryID
Step 3: Add background color to alternate rows
Click Groups in Home tab and add a group named CategoryName.
In the Groups wizard, set the following properties for the CategoryName group:
Property
Value
GroupBy
CategoryName
Keep Together
KeepFirstDetail
Sort
Ascending
ShowGroupFooter
True
ShowGroupHeader
True
OutlineLabel
=CategoryName
Click OK to close the Groups wizard.
Right-click CategoryName_Header group and select Add SubSection from the context menu.
Add two SubSections to the group header.
In CategoryName_Header/<B> subsection, add one ImageField and two TextFields and set the following properties:
Property
Value
Image.Picture
Picture
Image.PictureAlign
Scale
Image.PictureScale
Scale
TextField1.Text
=CategoryName
TextField2.Text
=Description
In CategoryName_Header/<C> subsection, add five TextFields, Product Name, Quantity Per Unit, Unit Price, In Stock, On Order.
In the Details section, add five TextFields corresponding to the TextFields in CategoryName_Header/<C>, and set the following properties:
Property
Value
TextField8.Text
=ProductName
TextField9.Text
=QuantityPerUnit
TextField10.Text
=UnitPrice
TextField11.Text
=UnitsInStock
TextField12.Text
=UnitsOnOrder
Select the report from the drop-down list on the top of the Properties window.
Go to the OnOpen property of the report and enter cnt = 0. This initializes the 'cnt' variable.
Select Detail section from the drop-down list above the Properties window or from the design area.
Go to the OnFormat property and then click the ellipsis button. In the VBScript Editor, enter the following expression in the editor and click Done. Here, "cnt" checks if the row is even or odd.
cnt = cnt + 1
if cnt mod 2 = 0 then
  Detail.Background.StartColor = Rgb(238, 214, 200)
  Detail.Background.EndColor = Rgb(238, 200, 177)
else
  Detail.Background.StartColor = vbWhite
  Detail.Background.EndColor = vbWhite
endif
Step 4: View the report
Preview the report with alternating background.

Note: For the complete report, see report 'Alternating Background' in the FlexCommonTasks.flxr report definition file, which is available in the ComponentOne Samples\Winforms\C1FlexReport\CS\FlexCommonTasks folder. The data base used is C1NWind.mdb which is also available in the ComponentOne Samples folder.


