This quick start topic provides step-by-step instructions for adding a TreeMap chart to UWP application, and show hierarchical data in it. In this topic, we consider an example where user wants to compare sales of books, music, videos, and gadgets (like computers and tablets) in XYZ city in a particular year.
The steps to display hierarchical data in TreeMap control are as follows:
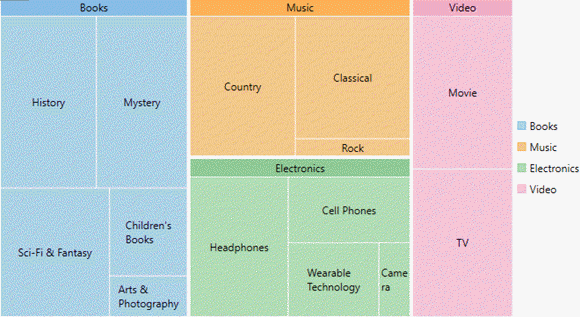
The following image exhibits and compares sales of different varieties of books, music, videos, and gadgets (like computers and tablets) in XYZ city in a particular year.
Back to Top
You need to set the ItemsSource property, of FlexChartBase class, to point to the collection of objects that contain data points to be plotted on the chart. To generate data items and display them in TreeMap chart, set BindingName and Binding properties. Set the BindingName property to the string value that specifies the name of the data item to display as chart rectangles, and Binding property to the string value that specifies the name of property of chart items that contain chart values (numeric values that help calculate the size of tree nodes).
To specify the level of hierarchical items to drill down and display in the chart set the MaxDepth property. Also, the display layout of the TreeMap is specified through its ChartType property. Additionally, color palette can be used to stylize the control and change its appearance.
Step 1: Add TreeMap to project
- Create a Universal Windows application in Visual Studio.
- Drag and drop C1TreeMap control from Toolbox to page.
The following DLLs get added to your application:
- C1.UWP.dll
- C1.UWP.DX.dll
- C1.UWP.FlexChart.dll
Back to Top
Step 2: Create a hierarchical data source
Switch to the code view and add the following code to generate sales data of Books, Music, Electronic items, Videos, and Computers and tablets.
Private rnd As New Random()
Private Function rand() As Integer
Return rnd.[Next](10, 100)
End Function
Public ReadOnly Property Data() As Object()
Get
Dim data__1 = New Object() {New With {
.type = "Music",
.items = New () {New With {
.type = "Country",
.items = New () {New With {
.type = "Classic Country",
.sales = rand()
}}
}, New With {
.type = "Rock",
.items = New () {New With {
.type = "Funk Rock",
.sales = rand()
}}
}, New With {
.type = "Classical",
.items = New () {New With {
.type = "Symphonies",
.sales = rand()
}}
}}
}, New With {
.type = "Books",
.items = New () {New With {
.type = "Arts & Photography",
.items = New () {New With {
.type = "Architecture",
.sales = rand()
}}
}, New With {
.type = "Children's Books",
.items = New () {New With {
.type = "Beginning Readers",
.sales = rand()
}}
}, New With {
.type = "History",
.items = New () {New With {
.type = "Ancient",
.sales = rand()
}}
}, New With {
.type = "Mystery",
.items = New () {New With {
.type = "Thriller & Suspense",
.sales = rand()
}}
}, New With {
.type = "Sci-Fi & Fantasy",
.items = New () {New With {
.type = "Fantasy",
.sales = rand()
}}
}}
}, New With {
.type = "Electronics",
.items = New () {New With {
.type = "Wearable Technology",
.items = New () {New With {
.type = "Activity Trackers",
.sales = rand()
}}
}, New With {
.type = "Cell Phones",
.items = New () {New With {
.type = "Accessories",
.sales = rand()
}}
}, New With {
.type = "Headphones",
.items = New () {New With {
.type = "Earbud headphones",
.sales = rand()
}}
}, New With {
.type = "Camera",
.items = New () {New With {
.type = "Digital Cameras",
.sales = rand()
}}
}}
}, New With {
.type = "Video",
.items = New () {New With {
.type = "Movie",
.items = New () {New With {
.type = "Children & Family",
.sales = rand()
}}
}, New With {
.type = "TV",
.items = New () {New With {
.type = "Comedy",
.sales = rand()
}}
}}
}}
Return data__1
End Get
End Property
static Random rnd = new Random();
static int rand()
{
return rnd.Next(10, 100);
}
public static object[] Data
{
get
{
var data = new object[] { new {
type = "Music",
items = new [] { new {
type = "Country",
items= new [] { new {
type= "Classic Country",
sales = rand()
}}
}, new {
type= "Rock",
items= new [] { new {
type= "Funk Rock",
sales= rand()
} }
}, new {
type= "Classical",
items= new [] { new {
type= "Symphonies",
sales= rand()
} }
}}
}, new {
type= "Books",
items= new [] { new {
type= "Arts & Photography",
items= new [] { new {
type= "Architecture",
sales= rand()
}}
}, new {
type= "Children's Books",
items= new [] { new {
type= "Beginning Readers",
sales= rand()
} }
}, new {
type= "History",
items= new [] { new {
type= "Ancient",
sales= rand()
} }
}, new {
type= "Mystery",
items= new [] { new {
type= "Thriller & Suspense",
sales= rand()
} }
}, new {
type= "Sci-Fi & Fantasy",
items= new [] { new {
type= "Fantasy",
sales= rand()
}}
} }
}, new {
type= "Electronics",
items= new [] { new {
type= "Wearable Technology",
items= new [] { new {
type= "Activity Trackers",
sales= rand()
}}
}, new {
type= "Cell Phones",
items= new [] { new {
type= "Accessories",
sales= rand()
} }
}, new {
type= "Headphones",
items= new [] { new {
type= "Earbud headphones",
sales= rand()
} }
}, new {
type= "Camera",
items= new [] { new {
type= "Digital Cameras",
sales= rand()
} }
} }
}, new {
type= "Video",
items= new [] { new {
type= "Movie",
items= new [] { new {
type= "Children & Family",
sales= rand()
} }
}, new {
type= "TV",
items= new [] { new {
type= "Comedy",
sales= rand()
} }
} }
} };
return data;
}
}
Back to Top
Step 3: Bind the TreeMap to data source
To bind the TreeMap control to the data source, use the following code.
XAML |
Copy Code
|
<Page
xmlns="http://schemas.microsoft.com/winfx/2006/xaml/presentation"
xmlns:x="http://schemas.microsoft.com/winfx/2006/xaml"
xmlns:local="using:UwpTreeMapCS"
xmlns:d="http://schemas.microsoft.com/expression/blend/2008"
xmlns:mc="http://schemas.openxmlformats.org/markup-compatibility/2006"
xmlns:Chart="using:C1.Xaml.Chart"
x:Class="UwpTreeMapCS.QuickStart"
mc:Ignorable="d"
DataContext="{Binding RelativeSource={RelativeSource Mode=Self}}">
<Grid Background="{ThemeResource ApplicationPageBackgroundThemeBrush}">
<Chart:C1TreeMap Binding="sales"
BindingName="type"
ChildItemsPath="items"
ItemsSource="{Binding DataContext.Data}"
MaxDepth="2">
<Chart:C1TreeMap.DataLabel>
<Chart:DataLabel Content="{}{name}"
Position="Center">
<Chart:DataLabel.Style>
<Chart:ChartStyle/>
</Chart:DataLabel.Style>
</Chart:DataLabel>
</Chart:C1TreeMap.DataLabel>
</Chart:C1TreeMap>
</Grid>
</Page>
|
Back to Top
Step 4: Build and run the project
- Click Build | Build Solution to build the project.
- Press F5 to run the project.
Back to Top