- Data Connectors Overview
- Free and Open Source Software (FOSS) License
- Redistributable Files
- OAuth Authorization
- Licensing
- ADO.NET provider for CSV
- ADO.NET provider for Dynamics 365 Sales
- ADO.NET provider for Google Analytics
- ADO.NET provider for JSON
- ADO.NET provider for Kintone
- ADO.NET provider for OData
- ADO.NET provider for QuickBooks Online
- ADO.NET provider for Salesforce
- ADO.NET provider for ServiceNow
- ADO.NET provider for Magento
- ADO.NET provider for Snowflake
- SQL Compliance
- Incremental Caching
- Proxy Server
- Logging
- Scaffolding
- DbFactory Support
- Visual Studio Integration
- Walkthrough
Consume Web API to perform CRUD operations on FlexGrid using Javascript
In this section, you learn how to consume the Web API in javascript to perform CRUD operations on FlexGrid control.
Create a View
To begin with, you create a view containing the FlexGrid control and other buttons, using which the end user can perform database operations. Here, you create this view by adding an HTML page named "index.html" to the Web API project. Then, add this page under wwwroot folder, by creating the folder in the project. This helps you to access the page from the browser by adding the following line of code in Configure method of Startup.cs file.
//Adding Static Files Middleware to serve the static files
app.UseStaticFiles();
And reset the launchUrl attribute in Properties\launchSettings.json, from "api/CustomerCs" to "index.html".
Add and configure FlexGrid
Add the Wijmo references required for working with FlexGrid control in the <HEAD> section of index.html as described below:
<!-- Wijmo -->
<link href="https://cdn.mescius.com/wijmo/5.latest/styles/wijmo.min.css" rel="stylesheet" />
<script src="https://cdn.mescius.com/wijmo/5.latest/controls/wijmo.min.js"></script>
<script src="https://cdn.mescius.com/wijmo/5.latest/controls/wijmo.grid.min.js"></script>
<script src="https://cdn.mescius.com/wijmo/5.latest/controls/wijmo.input.min.js"></script>
In the <BODY> section of index.html, add elements to host the create, update, delete buttons, the FlexGrid control and the Pager control.
<button onclick="create()">Create</button>
<button onclick="update()">Update</button>
<button onclick="deleteRec()">Delete</button>
<div id="flexGrid" style="height: 300px;"></div>
<div id="thePager"></div>
At the end of the <HEAD> section of index.html, add the following JavaScript code to generate CollectionView and the FlexGrid control.
<script>
var cv = new wijmo.collections.CollectionView();
var flexGrid = new wijmo.grid.FlexGrid('#flexGrid');
flexGrid.itemsSource = cv;
cview.trackChanges = true;
flexGrid.allowAddNew = true;
flexGrid.allowDelete = true;
</script>
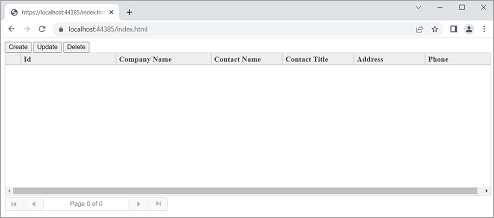
Since, the CollectionView has not been populated with some actual data yet, an empty FlexGrid control, the pager control and the "Create", "Update" and "Delete" buttons appear on the index page, when you run the project. The screenshot below depicts the same:
Populate data in FlexGrid using the GET method
In this step, you read the data from the database and populate the CollectionView. Later, you need to bind the CollectionView to FlexGrid using the itemSource property to populate the FlexGrid with data.
There are different methods used to call the Web API (to send an HTTP request) such as jQuery's ajax function or XMLHttpRequest, but here, we use Wijmo's wijmo.httpRequest method. This method allows you to send HTTP requests by using much simpler code than XMLHttpRequest, even if you are not using jQuery.
Add the following JavaScript code to send a GET request to the Web API. When the request is successful, it converts the loaded JSON data to a JavaScript array object and sets it to the CollectionView, which is then set as the itemsSource for FlexGrid.
The code below enables paging by setting the pageSize property of CollectionView to 6 and assign the CollectionView to the pager control as well.
<script>
var cview;
window.onload = function () {
cview = new wijmo.collections.CollectionView();
wijmo.httpRequest('/api/CustomerCs', {
success: function (xhr) {
// create a paged CollectionView with 6 data items per page
cview.sourceCollection = JSON.parse(xhr.response);
cview.pageSize = 6;
// navigate the pages
new wijmo.input.CollectionViewNavigator('#thePager', {
byPage: true,
headerFormat: 'Page {currentPage:n0} of {pageCount:n0}',
cv: cview
});
}
});
var flexGrid = new wijmo.grid.FlexGrid('#flexGrid', {
autoGenerateColumns: false,
columns: [
{ binding: 'id', header: 'Id', width: '2*' },
{ binding: 'contactNameC', header: 'Contact Name', width: '*' },
{ binding: 'countryC', header: 'Country', width: '*' }
],
itemsSource: cview
});
}
</script>
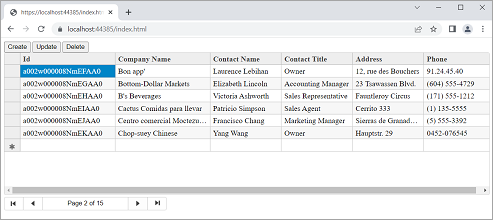
On executing the project, the paged FlexGrid control gets populated with data. You can navigate through the pages using the Pager control displayed below the FlexGrid control as depicted in the screenshot below:
Insert new records using POST method
To insert new records to the database, you must first add the new row to FlexGrid. To accomplish the same, you need to set the allowAddNew property of FlexGrid to true as depicted in Add and configure FlexGrid section above. This property adds an empty row to the end of FlexGrid with an asterisk symbol as depicted in the screenshot below:
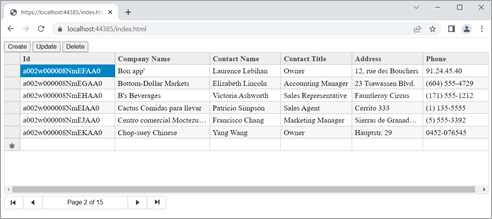
One can directly edit this new row to add a new data populated row to the FlexGrid.
Next, we add the following JavaScript code to the click event of Create button. This code gets a list of added data using the itemsAdded property of CollectionView and sends a POST request to the Web API. In the POST request, specify the added data in the data parameter.
function create()
{
alert("Create begins \nNew items count: " + cview.itemsAdded.length);
for (var i = 0; i < cview.itemsAdded.length; i++)
{
wijmo.httpRequest('/api/CustomerCs/', {
method: 'POST',
data: cview.itemsAdded[i]
});
}
alert("Record created !!!");
}
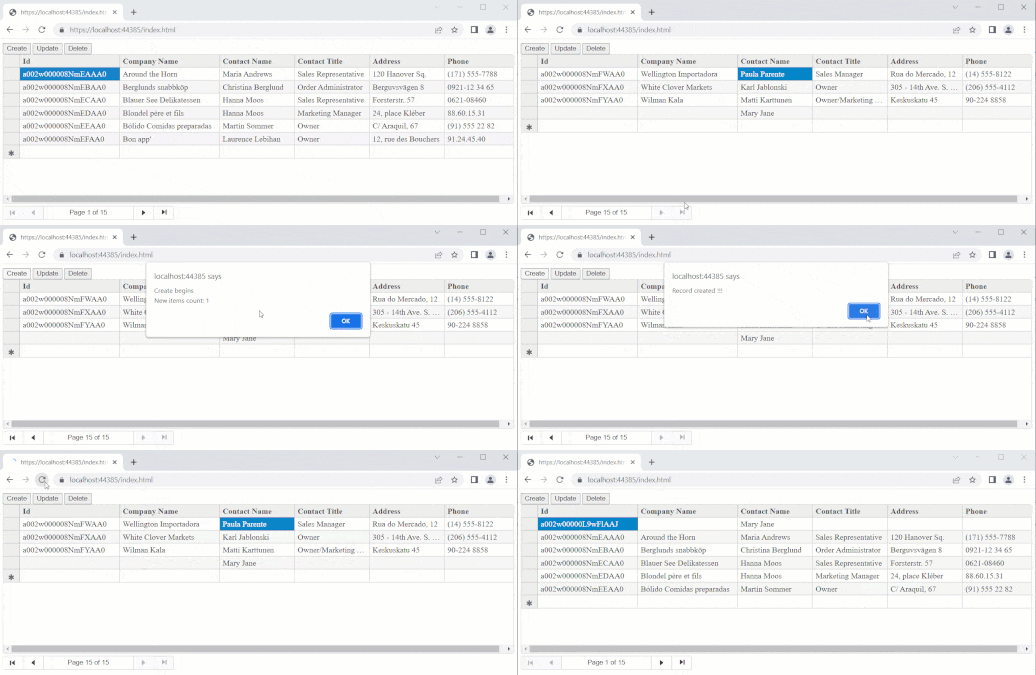
Run the project, add a new data record, and click the Create button to add the record to database. When you reload the page, you can see the added data records in the database.
The GIF below depicts the Create/Insert operation in action:
Update records using PUT method
Next, update the database with the data edited in FlexGrid.
Here, we are using a batch update, where multiple edits are updated in the database in one go instead of the normal update mode where the database is updated every time a data record is edited. In order to perform a batch update, it is necessary to keep track of data that is changed and manage a list of changes. The CollectionView can automatically handles such operations when setting the trackChanges property of CollectionView to true, as depicted in Add and configure FlexGrid section above.
Add the following JavaScript code to the click event of Update button. This code gets a list of updated data using the itemsEdited property of CollectionView and sends a PUT request to the Web API. In the PUT request, we specify the ID of the updated data in the URL and data to be sent in the data parameter.
function update()
{
alert("Update begins \nEdited items count: " + cview.itemsEdited.length + "\n Edited item accountid: " + cview.itemsEdited[0].id);
for (var i = 0; i < cview.itemsEdited.length; i++)
{
wijmo.httpRequest('/api/CustomerCs/' + cview.itemsEdited[i].id, {
method: 'PUT',
data: cview.itemsEdited[i]
});
}
alert("Record updated !!!");
}
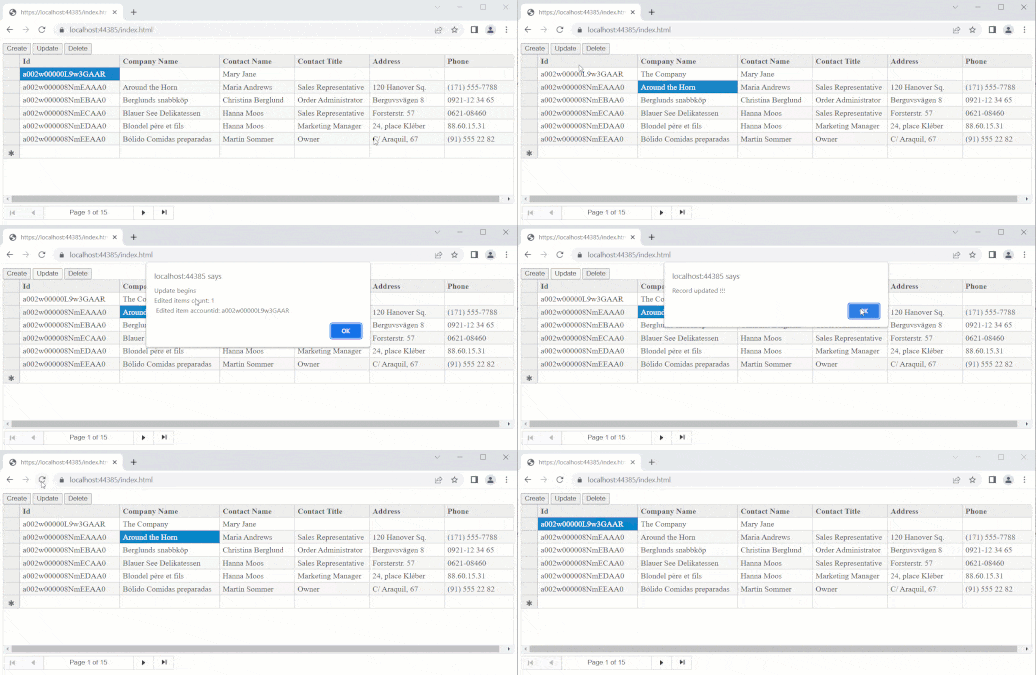
Run the project, edit data records, and press the Update button. When you reload the page, you can see the updated data in the database. The GIF below depicts the UPDATE operation in action:
Delete records using DELETE method
Lastly, you learn how to reflect the data deleted from FlexGrid to the database. To accomplish the same, set the allowDelete property of FlexGrid to true as depicted in Add and configure FlexGrid section above. This would enable the user to delete a row by selecting the row and hitting the DELETE key on the keyboard.
Add the following JavaScript code to the click event of Delete button. This code gets a list of the deleted data using the itemsRemoved property of CollectionView and sends a DELETE request to the Web API. In the DELETE request, specify the ID of the deleted data in the URL.
flexGrid.allowDelete = true;
function deleteRec()
{
alert("Delete begins \nDeleted items count: " + cview.itemsRemoved.length);
for (var i = 0; i < cview.itemsRemoved.length; i++)
{
wijmo.httpRequest('/api/CustomerCs/' + cview.itemsRemoved[i].id, {
method: 'DELETE'
});
}
alert("Record deleted !!!");
}
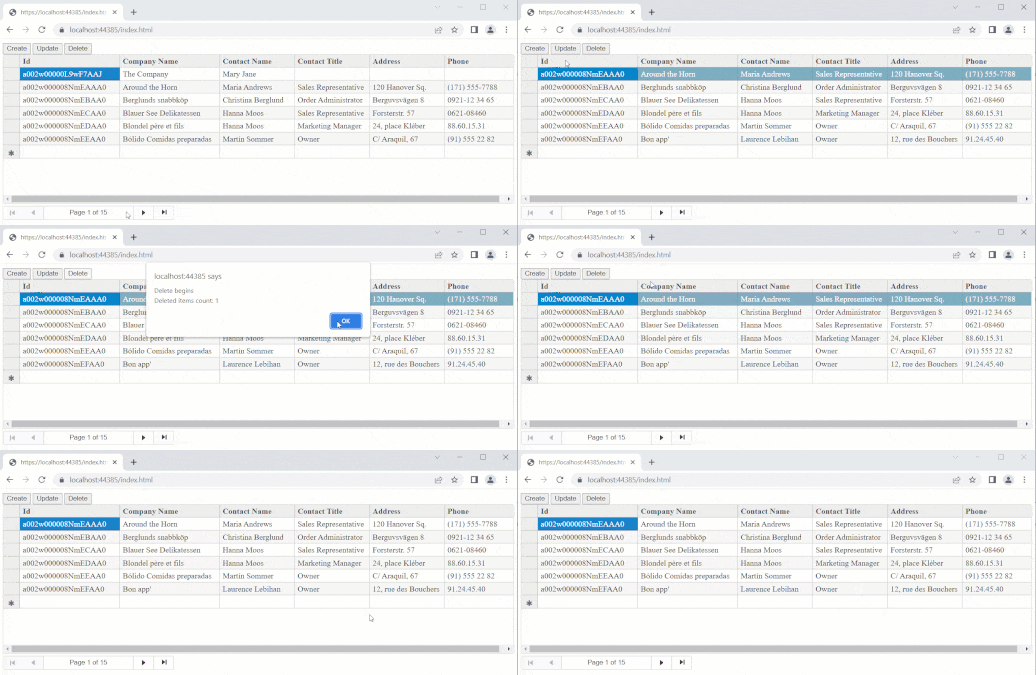
Run the project, delete a record and press the Delete button. When you reload the page, you can see the data record have been deleted from the database. The GIF below depicts the DELETE operation in action:
With the above implementation, we executed the database CRUD operations on FlexGrid using JavaScript and Web API.


