
- ASP.NET MVC
- Getting Started
- Configuring your MVC Application
- Adding NuGet Packages to your App
- Adding Controls
- Client-Side Support
- Globalization
- Working with Controls
- Styling
- ASP.NET MVC Samples
- Release History
Excel Export
The PivotGrid control extends the FlexGrid control, so you can export it to any of the formats supported by the extension modules provided with the FlexGrid. The list of the supported formats includes XLSLX, CSV, and PDF. In the example below, it exports the excel file with two sheets: the current view and a transposed version of the current view.
The image below shows how the OLAP control appears after you implement the code below.
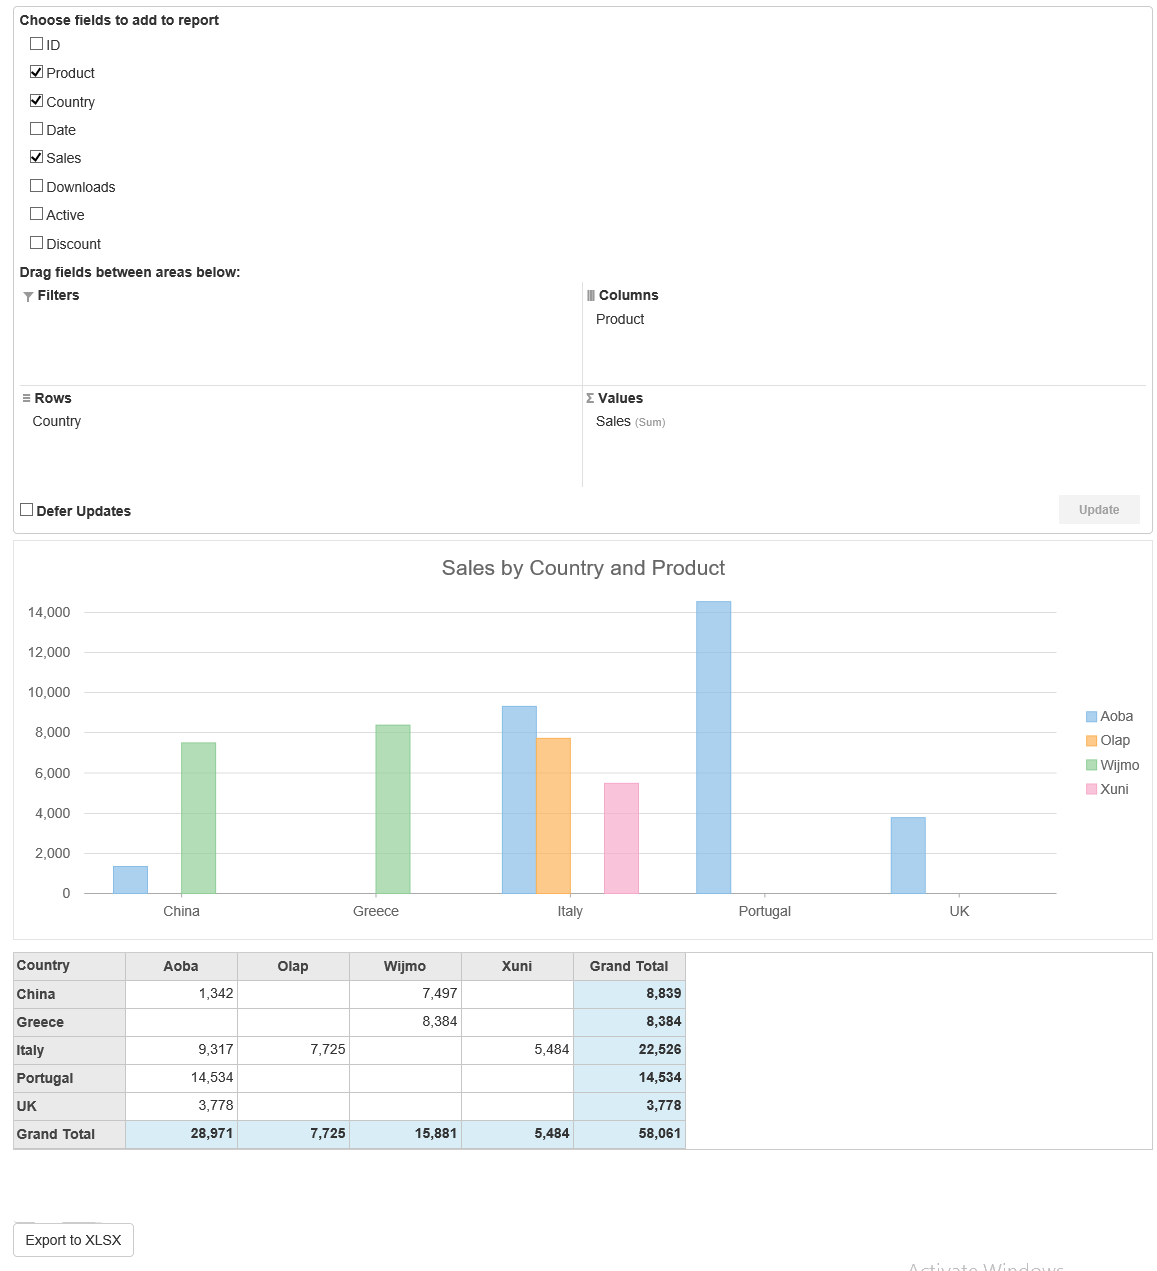
OLAP Export
The following code examples demonstrate how export OLAP data to excel file. This example uses the sample created in the Quick Start topic.
In Code (Index.cshtml)
@using OlapSample.Models;
@model IEnumerable<ProductData>
<br />
@(Html.C1().PivotEngine().Id("indexEngine").Bind(Model)
    .RowFields(pfcb => pfcb.Items("Country"))
    .ColumnFields(cfcb => cfcb.Items("Product"))
    .ValueFields(vfcb => vfcb.Items("Sales")))
@Html.C1().PivotPanel().ItemsSourceId("indexEngine")
@Html.C1().PivotChart().ItemsSourceId("indexEngine")
@Html.C1().PivotGrid().Id("indexGrid").ItemsSourceId("indexEngine")
<button type="button" class="btn btn-default" onclick="excelExport()">Export to XLSX</button>
@section Scripts{
    <script src="http://cdnjs.cloudflare.com/ajax/libs/jszip/2.5.0/jszip.min.js"></script>
    <script type="text/javascript">
         function excelExport() {
            var pivotGrid = wijmo.Control.getControl('#indexGrid');
            // create book with current view
            var book = wijmo.grid.xlsx.FlexGridXlsxConverter.save(pivotGrid, {
                includeColumnHeaders: true,
                includeRowHeaders: true
            });
            book.sheets[0].name = 'Main View';
            addTitleCell(book.sheets[0], getViewTitle(pivotGrid.engine));
            // add sheet with transposed view
            transposeView(pivotGrid.engine);
            var transposed = wijmo.grid.xlsx.FlexGridXlsxConverter.save(pivotGrid, {
                includeColumnHeaders: true,
                includeRowHeaders: true
            });
            transposed.sheets[0].name = 'Transposed View';
            addTitleCell(transposed.sheets[0], getViewTitle(pivotGrid.engine));
            book.sheets.push(transposed.sheets[0]);
            transposeView(pivotGrid.engine);
            // save the book
            book.save('wijmo.olap.xlsx');
        }
        // build a title for the current view
        function getViewTitle(ng) {
            var title = '';
            for (var i = 0; i < ng.valueFields.length; i++) {
                if (i > 0) title += ', ';
                title += ng.valueFields[i].header;
            }
            title += ' by ';
            if (ng.rowFields.length) {
                for (var i = 0; i < ng.rowFields.length; i++) {
                    if (i > 0) title += ', ';
                    title += ng.rowFields[i].header;
                }
            }
            if (ng.rowFields.length && ng.columnFields.length) {
                title += ' and by ';
            }
            if (ng.columnFields.length) {
                for (var i = 0; i < ng.columnFields.length; i++) {
                    if (i > 0) title += ', ';
                    title += ng.columnFields[i].header;
                }
            }
            return title;
        }
        function transposeView(ng) {
            ng.deferUpdate(function () {
                // save row/col fields
                var rows = [],
                    cols = [];
                for (var r = 0; r < ng.rowFields.length; r++) {
                    rows.push(ng.rowFields[r].header);
                }
                for (var c = 0; c < ng.columnFields.length; c++) {
                    cols.push(ng.columnFields[c].header);
                }
                // clear row/col fields
                ng.rowFields.clear();
                ng.columnFields.clear();
                // restore row/col fields in transposed order
                for (var r = 0; r < rows.length; r++) {
                    ng.columnFields.push(rows[r]);
                }
                for (var c = 0; c < cols.length; c++) {
                    ng.rowFields.push(cols[c]);
                }
            });
        }
        //adds a title cell into an xlxs sheet
        function addTitleCell(sheet, title) {
            // create cell
            var cell = new wijmo.xlsx.WorkbookCell();
            cell.value = title;
            cell.style = new wijmo.xlsx.WorkbookStyle();
            cell.style.font = new wijmo.xlsx.WorkbookFont();
            cell.style.font.bold = true;
            // create row to hold the cell
            var row = new wijmo.xlsx.WorkbookRow();
            row.cells[0] = cell;
            // and add the new row to the sheet
            sheet.rows.splice(0, 0, row);
        }
    </script>
}