


Setting Up the Rows and Columns of the Register
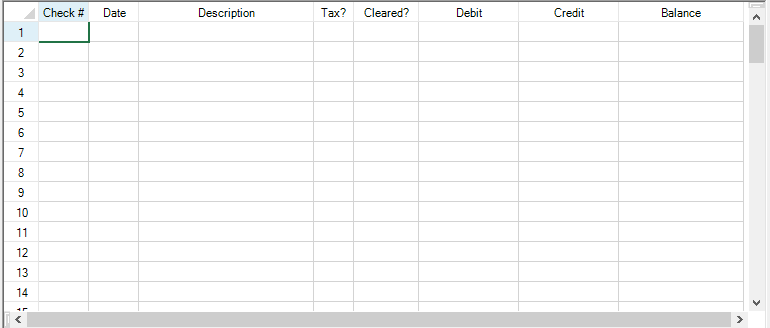
The Spread control on your form already has a sheet, ready for you to configure. In this step, you are going to set up the columns and cells in the sheet to resemble a checkbook register.
Using Code
Double-click on the form in your project to open the code window.
In the Form Load event, type the following code:
This code sets up the control to be 300 pixels high and 763 pixels wide, and the sheet to have 8 columns and 100 rows.
Example
// Set up control and rows and columns in sheet.
fpSpread1.Height = 330;
fpSpread1.Width = 765;
fpSpread1.Sheets[0].ColumnCount = 8;
fpSpread1.Sheets[0].RowCount = 100;
' Set up control and rows and columns in sheet. fpSpread1.Height = 330 fpSpread1.Width = 765 fpSpread1.Sheets(0).ColumnCount = 8 fpSpread1.Sheets(0).RowCount = 100Next set up the columns to add custom headings. Add the following code below the code you added in Step 2:
Example
// Add text to column heading.
fpSpread1.Sheets[0].ColumnHeader.Cells[0, 0].Text = "Check #";
fpSpread1.Sheets[0].ColumnHeader.Cells[0, 1].Text = "Date";
fpSpread1.Sheets[0].ColumnHeader.Cells[0, 2].Text = "Description";
fpSpread1.Sheets[0].ColumnHeader.Cells[0, 3].Text = "Tax?";
fpSpread1.Sheets[0].ColumnHeader.Cells[0, 4].Text = "Cleared?";
fpSpread1.Sheets[0].ColumnHeader.Cells[0, 5].Text = "Debit";
fpSpread1.Sheets[0].ColumnHeader.Cells[0, 6].Text = "Credit";
fpSpread1.Sheets[0].ColumnHeader.Cells[0, 7].Text = "Balance";
' Add text to column heading. fpSpread1.Sheets(0).ColumnHeader.Cells(0, 0).Text = "Check #" fpSpread1.Sheets(0).ColumnHeader.Cells(0, 1).Text = "Date" fpSpread1.Sheets(0).ColumnHeader.Cells(0, 2).Text = "Description" fpSpread1.Sheets(0).ColumnHeader.Cells(0, 3).Text = "Tax?" fpSpread1.Sheets(0).ColumnHeader.Cells(0, 4).Text = "Cleared?" fpSpread1.Sheets(0).ColumnHeader.Cells(0, 5).Text = "Debit" fpSpread1.Sheets(0).ColumnHeader.Cells(0, 6).Text = "Credit" fpSpread1.Sheets(0).ColumnHeader.Cells(0, 7).Text = "Balance"Now set up the column widths to properly display the headings and the data you will add. Add the following code below the code you added in Step 3:
Example
// Set column widths.
fpSpread1.Sheets[0].Columns[0].Width = 50;
fpSpread1.Sheets[0].Columns[1].Width = 50;
fpSpread1.Sheets[0].Columns[2].Width = 175;
fpSpread1.Sheets[0].Columns[3].Width = 40;
fpSpread1.Sheets[0].Columns[4].Width = 65;
fpSpread1.Sheets[0].Columns[5].Width = 100;
fpSpread1.Sheets[0].Columns[6].Width = 100;
fpSpread1.Sheets[0].Columns[7].Width = 125;
' Set column widths. fpSpread1.Sheets(0).Columns(0).Width = 50 fpSpread1.Sheets(0).Columns(1).Width = 50 fpSpread1.Sheets(0).Columns(2).Width = 175 fpSpread1.Sheets(0).Columns(3).Width = 40 fpSpread1.Sheets(0).Columns(4).Width = 65 fpSpread1.Sheets(0).Columns(5).Width = 100 fpSpread1.Sheets(0).Columns(6).Width = 100 fpSpread1.Sheets(0).Columns(7).Width = 125Save your project, then click the Start button in the toolbar to run your project.
Your form should look similar to the following picture.
Go to Setting the Cell Types of the Register to continue the tutorial.