


-
Spread for ASP.NET Product Documentation
-
Developer's Guide
- Getting Started
- Understanding the Product
- Namespaces Overview
- Working with the Spread Designer
-
Customizing User Interaction
- Customizing Interaction with the Overall Component
- Working with AJAX
- Customizing the Toolbars
- Customizing Interaction with Rows and Columns
- Managing Filtering of Rows of User Data
- Customizing Grouping of Rows of User Data
- Customizing Sorting of Rows of User Data
- Customizing Interaction with Cells
- Customizing Selections of Cells
- Managing Printing
- Customizing the Appearance
- Customizing with Cell Types
- Managing Data Binding
- Managing Data in the Component
- Managing Formulas
- Managing File Operations
- Using Sheet Models
- Maintaining State
- Working with the Chart Control
- Using Touch Support with the Component
- Assembly Reference
- Client-Side Scripting Reference
- Import and Export Reference
-
Developer's Guide
Using Grouping
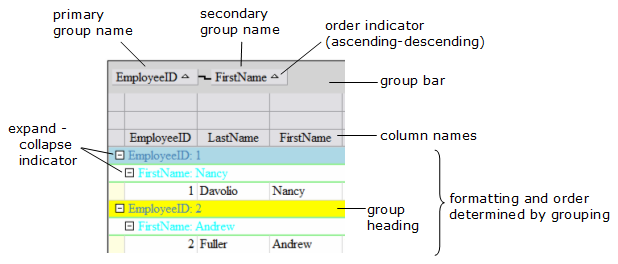
You can set up the display to allow Outlook-style grouping of rows. For large amounts of data, this is helpful to display the data in the order the user needs. The user selects columns by which to sort and the component then organizes and displays the data in a hierarchy with rows organized accordingly. To select a column by which to group and display that data, either double-click on the header of that column or click and drag that column into the grouping bar at the top of the page. See the figure below for an example of the terms used with grouping.
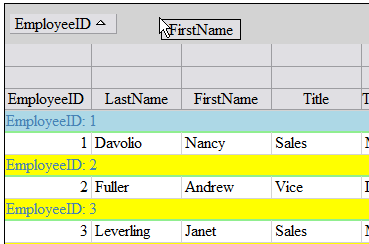
You can provide grouping to allow users to sort the data with multiple levels of groups by dragging additional column headers into the grouping area. An example of the process of setting up two levels of grouping is shown in the following figure.
You can expand or collapse groups by clicking the expand (+) or collapse (-) indicators.
Before secondary grouping: dragging the column header into the grouping bar. | After secondary grouping: now a second level of hierarchy is shown. |
|---|---|
|
|
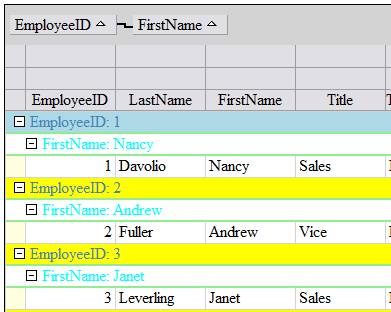
When more than one level is chosen, the higher level is called the parent group and the lower level is called the child group. In the picture above with secondary grouping, the Employee ID is the parent group and the First Name is the child group.