
-
Spread for ASP.NET Product Documentation
-
Developer's Guide
- Getting Started
- Understanding the Product
- Namespaces Overview
- Working with the Spread Designer
- Customizing User Interaction
- Customizing the Appearance
- Customizing with Cell Types
- Managing Data Binding
- Managing Data in the Component
- Managing Formulas
- Managing File Operations
- Using Sheet Models
- Maintaining State
- Working with the Chart Control
- Using Touch Support with the Component
- Assembly Reference
- Client-Side Scripting Reference
- Import and Export Reference
-
Developer's Guide
Customizing the Outline of the Component
You can set several aspects of the outline (or border) of the component. These aspects include:
the color of the outline
the line style of the outline
the width (or thickness) of the outline
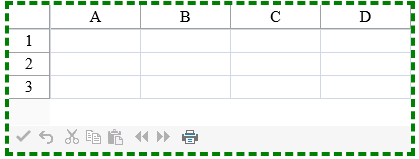
Here is a picture of an example of the outline of the component changed to be a thick dashed green outline. The example below shows the code for these customizations.
Using the Properties Window
Set the border at design time with the Properties window of Visual Studio .NET.
Select the component.
With the Properties window open, in the Appearance category, select the BorderColor property, the BorderStyle property, or the BorderWidth property. For the BorderColor and BorderStyle properties, select a value from the drop-down list. For the BorderWidth, type in a value; the unit is pixels. Press Enter. The new property is now set.
Refer to the Microsoft .NET Framework documentation for setting the units to something other than the default, which is pixels.
Using Code
Add a line of code that sets the specific border property. The default for the unit of thickness is pixels. For more information, refer to the BorderColor, BorderStyle, and BorderWidth properties in the Border class.
Example
This example shows how to create a green dashed outline that is four pixels thick around the entire component. To see the results, see the figure above.
FpSpread1.BorderColor = Drawing.Color.Green;
FpSpread1.BorderStyle = BorderStyle.Dashed;
FpSpread1.BorderWidth = System.Web.UI.WebControls.Unit.Pixel(4);
FpSpread1.BorderColor = Drawing.Color.Green
FpSpread1.BorderStyle = BorderStyle.Dashed
FpSpread1.BorderWidth = System.Web.UI.WebControls.Unit.Pixel(4)