- Getting Started with WPF Edition
- End-User License Agreement
- Free and Open Source Software (FOSS) License
- Licensing Information
- Technical Support
- Redistributable Files
- About this Documentation
- Theming
- XAML and XAML Namespaces
- Creating a Microsoft Blend Project
- Creating a WPF Project in Visual Studio
- Adding NuGet Packages to your App
- Adding the WPF Edition Components
- Localization
- UI Automation and Accessibility
- VS Suggested Actions
- Section 508 Compliance
Adding NuGet Packages to your App
ComponentOne control references are available through NuGet, a Visual Studio extension that automatically adds libraries and references to your project. All ComponentOne WPF packages contain the prefix “C1.” but some differences exist between .NET Framework and .NET Core package names.
C1.WPF.*: packages for .NET 6+
C1.Xaml.WPF.*: packages for .NET Framework
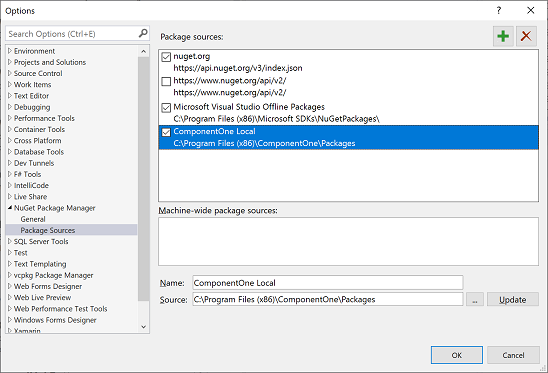
NuGet packages for ComponentOne WPF Edition can be installed from https://www.nuget.org/ or locally from C:\Program Files (x86)\ComponentOne\Packages. This “ComponentOne Local” package source is configured in Visual Studio on installing WPF Edition.
How to Configure the NuGet Package Source
ComponentOne NuGet packages are installed to C:\Program Files (x86)\ComponentOne\Packages. Referencing these packages will ensure that the packages are not updated beyond your subscription. This local package source is configured in Visual Studio upon installing any ComponentOne Edition. Otherwise, you need to manually add this NuGet source URL to Package Sources in Visual Studio.
Complete the following steps to manually add a local NuGet package source in Visual Studio.
From the Tools menu, select NuGet Package Manager | Package Manager Settings. The Options dialog box appears.
In the left pane, select Package Sources.
Click the button in the top right corner. A new source is added under Available Package Sources.
Set a Name of the new package source to “ComponentOne Local” and the Source as C:\Program Files (x86)\ComponentOne\Packages.


