Using a Hierarchical Data Template
This topic will demonstrate advanced binding scenarios using the DataTemplateSelector and HierarchicalDataTemplate classes.
From the Visual Studio File menu select New and choose Project.
In the New Project dialog box choose a language in the left-side menu, choose .NET 6.0 in the Framework drop-down list, and enter OrgChart as a name for the project.
In the Solution Explorer, right-click the project name and choose Add Reference. In the Add Reference dialog box, locate and select the following assemblies and click OK to add references to your project:
C1.Silverlight
C1.Silverlight.OrgChart
Add the xmlns:c1="http://schemas.componentone.com/winfx/2006/xaml" namespace to your namespace declarations in the
_<Window>_tag. This is a more general namespace that will work with most of the WPF Edition controls.Add the following XAML markup below the namespace declarations to create the Data Templates:
<UserControl.Resources>
        <!-- template for Team objects -->
        <DataTemplate x:Key="TeamTemplate" >
            <Border Background="LightBlue" Padding="4" >
                <TextBlock FontStyle="Italic" Text="{Binding Path=Name}" />
            </Border>
        </DataTemplate>
        <!-- template for Division objects -->
        <sdk:HierarchicalDataTemplate x:Key="DivisionTemplate"
            ItemsSource="{Binding Path=Teams}"
            ItemTemplate="{StaticResource TeamTemplate}">
            <Border Background="Gold" >
                <TextBlock Text="{Binding Path=Name}" FontWeight="Bold" HorizontalAlignment="Center" VerticalAlignment="Center" Padding="20" />
            </Border>
        </sdk:HierarchicalDataTemplate>
        <!-- template for League objects -->
        <sdk:HierarchicalDataTemplate x:Key="LeagueTemplate"
            ItemsSource="{Binding Path=Divisions}"
            ItemTemplate="{StaticResource DivisionTemplate}">
            <Border Background="LightCoral" >
                <TextBlock Text="{Binding Path=Name}" FontWeight="Bold" HorizontalAlignment="Center" VerticalAlignment="Center" Padding="40" />
            </Border>
        </sdk:HierarchicalDataTemplate>
</UserControl.Resources>
Insert the XAML markup below to create your Grid layout, the C1OrgChart control, and the ScrollViewer control:
<Grid.RowDefinitions>
            <RowDefinition Height="Auto" />
            <RowDefinition Height="118*" />
            <RowDefinition Height="158*" />
        </Grid.RowDefinitions>
        <!-- sample title -->
        <StackPanel Orientation="Horizontal" >
            <TextBlock Text="C1OrgChart: HierarchicalDataTemplate" FontSize="16" VerticalAlignment="Bottom" />
            <TextBlock Name="_tbTotal" VerticalAlignment="Bottom" />
        </StackPanel>
        <ScrollViewer Grid.Row="1" HorizontalScrollBarVisibility="Auto" VerticalScrollBarVisibility="Auto" Padding="0" >
            <c1:C1OrgChart
                Name="_chart" ItemTemplate="{StaticResource LeagueTemplate}"
                ConnectorDashArray="1 2" ConnectorStroke="Gray"
                HorizontalAlignment="Center" VerticalAlignment="Center" />
        </ScrollViewer>
Locate a general TreeView control in your ToolBox and add that to your application below the
_<ScrollViewer></ScrollViewer>_tags. Insert the following into the_<sdk:TreeView>_tag:Name="_tree" Grid.Row="2" ItemTemplate="{StaticResource LeagueTemplate}"Switch to your code view by right-clicking your application and selecting View Code from the list.
Add the following code directly below the InitializeComponent() method:
' create data object
        Dim league__1 = League.GetLeague()
        ' show it in C1OrgChart
        _chart.Header = league__1
        ' this has the same effect:
        '_chart.ItemsSource = new object[] { league };
        ' show it in TreeView
        _tree.ItemsSource = New Object() {league__1}
// create data object var league = League.GetLeague(); // show it in C1OrgChart _chart.Header = league; // this has the same effect: //_chart.ItemsSource = new object[] { league }; // show it in TreeView _tree.ItemsSource = new object[] { league }; } }Insert the following code to create the teams, Leagues, and Divisions that will appear in the C1OrgChart and in the TreeView control:
Public Class League
        Public Property Name() As String
            Get
                Return m_Name
            End Get
            Set(value As String)
                m_Name = Value
            End Set
        End Property
        Private m_Name As String
        Public Property Divisions() As List(Of Division)
            Get
                Return m_Divisions
            End Get
            Set(value As List(Of Division))
                m_Divisions = Value
            End Set
        End Property
        Private m_Divisions As List(Of Division)
        Public Shared Function GetLeague() As League
            Dim league = New League()
            league.Name = "Main League"
            league.Divisions = New List(Of Division)()
            For Each div In "North,South,East,West".Split(","c)
                Dim d = New Division()
                league.Divisions.Add(d)
                d.Name = div
                d.Teams = New List(Of Team)()
                For Each team In "t1,t2,t3,t4".Split(","c)
                    Dim t = New Team()
                    d.Teams.Add(t)
                    t.Name = String.Format("{0} {1}", team, div)
                Next
            Next
            Return league
        End Function
    End Class
public class League
{
public string Name { get; set; }
public List<Division> Divisions { get; set; }
public static League GetLeague()
{
var league = new League();
league.Name = "Main League";
league.Divisions = new List<Division>();
foreach (var div in "North,South,East,West".Split(','))
{
var d = new Division();
league.Divisions.Add(d);
d.Name = div;
d.Teams = new List<Team>();
foreach (var team in "t1,t2,t3,t4".Split(','))
{
var t = new Team();
d.Teams.Add(t);
t.Name = string.Format("{0} {1}", team, div);
}
}
return league;Add the code below to create the Public Class that will Get and Set the values for the Teams, Divisions, and Leagues:
Public Class Division
        Public Property Name() As String
            Get
                Return m_Name
            End Get
            Set(value As String)
                m_Name = Value
            End Set
        End Property
        Private m_Name As String
        Public Property Teams() As List(Of Team)
            Get
                Return m_Teams
            End Get
            Set(value As List(Of Team))
                m_Teams = Value
            End Set
        End Property
        Private m_Teams As List(Of Team)
    End Class
    Public Class Team
        Public Property Name() As String
            Get
                Return m_Name
            End Get
            Set(value As String)
                m_Name = Value
            End Set
        End Property
        Private m_Name As String
    End Class
public class Division
{
public string Name { get; set; }
public List<Team> Teams { get; set; }
}
public class Team
{
public string Name { get; set; }
}
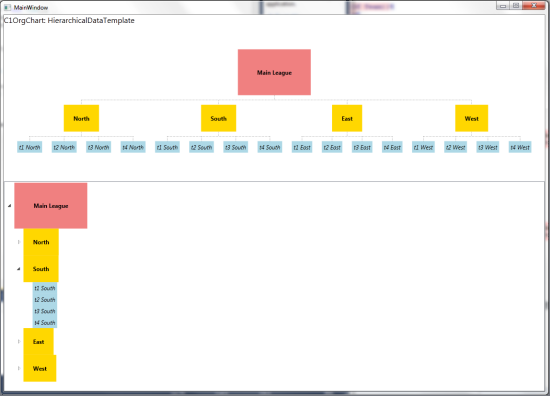
}Run your application. Your application should resemble the following image: