
QuickStart
This quick start guides you through the steps of adding the DragDropManager in an application to manage user interactions.
Create an Application
To set up and add controls to your application, complete the following steps:
In Visual Studio, select File | New | Project.
In the New Project dialog box, select WPF Application.
Enter a Name and Location for your project and click OK to create the new application.
In the XAML window of the project, place the cursor between the <Grid> </Grid> tags.
Add the following XAML markup between the <Grid></Grid> tags in the MainPage.xaml file:
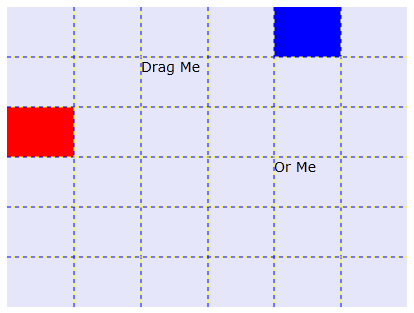
<TextBlock Text="Drag Me" FontSize="14" Grid.Row="1" Grid.Column="2" />
<TextBlock Text="Or Me" FontSize="14" Grid.Row="3" Grid.Column="4" />
<Rectangle Fill="Red" Grid.Row="2" Grid.Column="0"/>
<Rectangle Fill="Blue" Grid.Row="0" Grid.Column="4"/>
This markup creates a grid with TextBlock and Rectangle controls in separate regions.
Add DragDropManager to the Application
In the last step you had set up the application, now to add the drag-and-drop functionality, complete the following steps to add the DragDropManager.
Navigate to the Solution Explorer, right-click MainPage.xaml file or the MainWindow.xaml file, and select View Code to switch to Code view.
Add code to the MainPage.xaml.cs (or .vb) file or the MainWindow.xaml.cs (or .vb) file in the page constructor so it looks similar to the following:
public MainPage()
 {
   InitializeComponent();
   // Initialize the C1DragDropManager
   C1DragDropManager dd = new C1DragDropManager();
   dd.RegisterDropTarget(_ddGrid, true);
   foreach (UIElement e in _ddGrid.Children)
   {
     dd.RegisterDragSource(e, DragDropEffect.Move, ModifierKeys.None);
   }
   dd.DragDrop += dd_DragDrop;
 }
Public Sub New() InitializeComponent() ' Initialize the C1DragDropManager Dim dd As New C1DragDropManager() dd.RegisterDropTarget(_ddGrid, True) For Each e As UIElement In _ddGrid.Children dd.RegisterDragSource(e, DragDropEffect.Move, ModifierKeys.None) Next AddHandler dd.DragDrop, AddressOf dd_DragDrop End Sub
The code initiates a new instance of C1DragDropManager. It then calls the RegisterDropTarget method to indicate that the grid should act as a drop target by default. Further, it calls the RegisterDragSource method to indicate that users should be allowed to drag the elements in the grid. Finally, the code attaches an event handler to the DragDrop event so that the application can receive a notification and move the element being dragged into its new position.
Add the following event handler to the MainPage.xaml.cs (or .vb):
private void dd_DragDrop(object source, DragDropEventArgs e)
 {
   // Get mouse position
   Point pMouse = e.GetPosition(_ddGrid);
   // Translate into grid row/col coordinates
   int row, col;
   Point pGrid = new Point(0, 0);
   for (row = 0; row < _ddGrid.RowDefinitions.Count; row++)
     {
       pGrid.Y += _ddGrid.RowDefinitions[row].ActualHeight;
       if (pGrid.Y > pMouse.Y)
       break;
     }
   for (col = 0; col < _ddGrid.ColumnDefinitions.Count; col++)
   {
     pGrid.X += _ddGrid.ColumnDefinitions[col].ActualWidth;
     if (pGrid.X > pMouse.X)
     break;
   }
   // Move the element to the new position
   e.DragSource.SetValue(Grid.RowProperty, row);
   e.DragSource.SetValue(Grid.ColumnProperty, col);
 }
Private Sub dd_DragDrop(source As Object, e As DragDropEventArgs)
' Get mouse position
Dim pMouse As Point = e.GetPosition(_ddGrid)
' Translate into grid row/col coordinates
Dim row As Integer, col As Integer
Dim pGrid As New Point(0, 0)
For row = 0 To _ddGrid.RowDefinitions.Count - 1
pGrid.Y += _ddGrid.RowDefinitions(row).ActualHeight
If pGrid.Y > pMouse.Y Then
Exit For
End If
Next
For col = 0 To _ddGrid.ColumnDefinitions.Count - 1
pGrid.X += _ddGrid.ColumnDefinitions(col).ActualWidth
If pGrid.X > pMouse.X Then
Exit For
End If
Next
' Move the element to the new position
e.DragSource.SetValue(Grid.RowProperty, row)
e.DragSource.SetValue(Grid.ColumnProperty, col)
End SubThe event handler starts by converting the mouse coordinates into row/column values. Then, it uses the SetValue method to update the Grid.RowProperty and Grid.ColumnProperty values on the element that was dragged.
Run the Application
Now that you've created an application and added code to add drag-drop functionality to the application, the only thing left to do is run your application. To observe your application's run-time interactions, complete the following steps:
Execute the application, and observe the ouput.
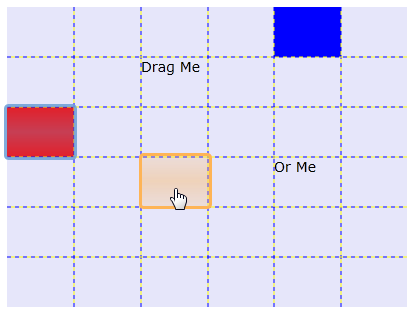
Click the red Rectangle and drag it to another square in the grid. Notice that as the drag process is in action, an extra border appears around the item you are dragging and a transparent rectangle is moved with the mouse to indicate where the item will be dropped:
What You've Accomplished
Congratulations, you've completed the DragDropManager quick start! You've created a simple application that uses DragDropManager to move items in a grid.