Quick Start
The following quick start guides you how to create a simple application using the MultiColumnCombo control. In this quick start, you'll create a new project in Visual Studio, add the MultiColumnCombo control to your application, configure it and bind it to the data.

Set Up the Application
- Create a new Windows Forms App.
- Configure your project and set the Framework to .NET 6.0.
- Install C1.Win.Input.MultiColumnCombo package using the NuGet Package Manager. The C1MultiColumnCombo control gets added to the Toolbox once the package gets installed.
- Drag and drop the C1MultiColumnCombo control from the Toolbox onto the form.
Configure MultiColumnCombo
- Click the C1MultiColumnCombo smart tag to open C1MultiColumnCombo Tasks panel and select Edit Columns. Alternatively, you can navigate to the Column property in the Properties window and click the ellipsis button next to it.
This opens DisplayColumn Collection Editor. - In the DisplayColumn Collection Editor, click Add button to add a column to the dropdown. Then, set the Name and Caption properties of the added column. In this example, we set the Name as pname and Caption as Name.
- Click Add button twice to add two more columns to the C1MultiColumnCombo control. Then, set their Name property as pcolor and pline along with the Caption property as Color and Line, respectively.
- Click OK to close the editor.
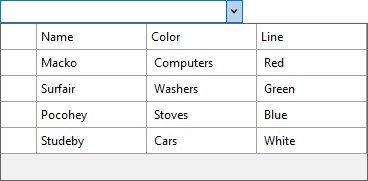
This adds three columns to the MultiColumnCombo dropdown.
Populate MultiColumnCombo with Data
Switch to the code view and add the following code to add items to the MultiColumnCombo control using AddItem method of the C1MultiColumnCombo class. This example adds data to the previously created columns.
c1MultiColumnCombo1.AddItem("Macko, Computers, Red");
c1MultiColumnCombo1.AddItem("Surfair, Washers, Green");
c1MultiColumnCombo1.AddItem("Pocohey, Stoves, Blue");
c1MultiColumnCombo1.AddItem("Studeby, Cars, White");


