ComponentOne Menu for ASP.NET Web Forms
Quick Start / Step 2 of 3: Populating the Menu with a SiteMap
In This Topic
    Step 2 of 3: Populating the Menu with a SiteMap
    In This Topic

    In this section of the quick start, you'll learn how to bind C1Menu to a SiteMapDataSource.

    To create an XML file and bind it to C1Menu, add the XMLDataSource component to the Web site, and then assign it to the C1Menu control.

    1. Start a new AJAX 1.0-Enabled ASP.NET 2.0 Web Site project.
    2. Right-click on the App_Data in the Solution Explorer and select Add New Item. The Add New Item dialog box appears.
    3. Select the XML File and rename it "Menu.xml".
    4. Click on the Add button in the Add New Item dialog box.
    5. Switch to the XML view and add the following data to Menu.xml:

      To write code in Source View

      <root>
        <menuitem Text="Home">
        </menuitem>
        <menuitem Text="Products">
          <menuitem Text="Hardware">
          </menuitem>
          <menuitem Text="Software">
          </menuitem>
        </menuitem>
        <menuitem Text="Services">
          <menuitem Text="Training">
          </menuitem>
          <menuitem Text="Consulting">
        </menuitem>
      </root>
    6. Switch back to the .aspx page and select the Design tab to switch to the design view.
    7. Expand the Data node in the Visual Studio Toolbox and double-click on the XmlDataSource component to add it to the Web page.
    8. Select the XmlDataSource1 on the Web Page and navigate to the Properties window.
    9. Click on the ellipsis button next to the DataFile property to open the Select XML File dialog box. Select App_Data and click Menu.xml file. Click OK to add it to the XmlDataSource1.DataFile property.
    10. Set the XmlDataSource1.Xpath property to root/menuitem.
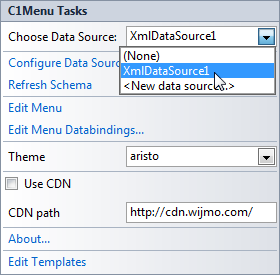
    11. Click the smart tag to open the C1Menu Tasks menu and select XmlDataSource1 from the Choose Data Source drop-down listbox

    In the next step, you'll run the program and observe how the XML file populates the menu.