
Using Standard Visual Studio Web API Template
To use DataEngine WebApi using Visual Studio, complete the following steps:
- Step 1: Create a WebApi Application
- Step 2: Install DataEngine Nuget package
- Step 3: Create a Model
- Step 4: Add Startup file for your application
- Step 5: Register data source
- Step 6: Configure Web.config
- Step 7: Build and Run the Project
Step 1: Create a new WebApi Application
- In Visual Studio, Select File | New | Project.
- From All Project Types drop-down, select Web and then select ASP.NET Web Application (.NET Framework). Make sure your application .NET Framework version is 4.5 or above.
- Set a Name and Location for your application and click Create. This opens Create a new ASP.NET Web Application dialog.
- In the Create a new ASP.NET Web Application dialog, select the Empty template and select the Web API option from the Add folders & core references section.
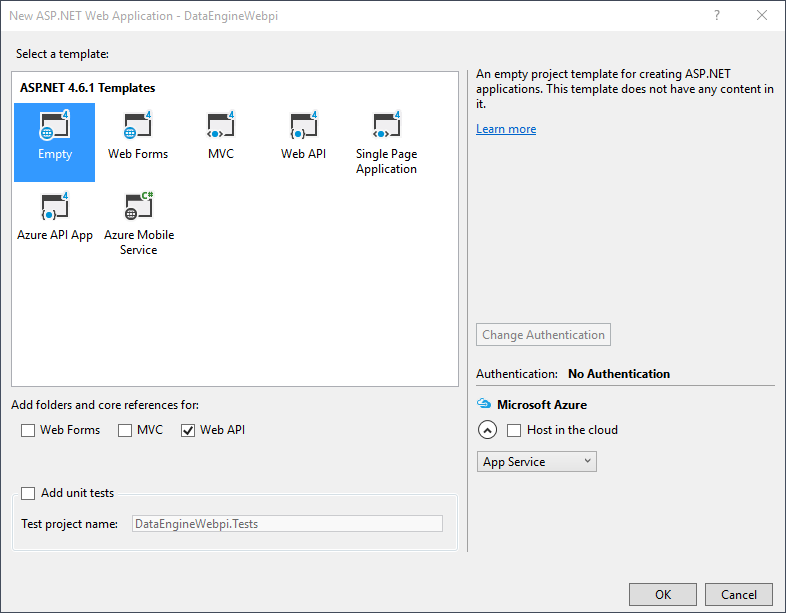
- Click Create to create WebAPI Application.
Step 2: Install C1.Web.Api.DataEngine Nuget package
- Add the C1.Web.Api.DataEngine reference to the project.
- In the Solution Explorer, right click References and select Manage NuGet Packages.
- In NuGet Package Manager, select nuget.org as the Package source. Search for the following packages, and click Install.
- C1.AspNetCore.Api
- C1.DataEngine.Standard
- C1.AspNetCore.Api.DataEngine
type=note
Note:
- To execute Startup1.cs class along with your application, install “Microsoft.Owin.Host.SystemWeb" Nuget package in your Visual Studio application.
"C1.Web.Api.DataEngine"gets added under the "dependencies" within project.json file of your project once you restore the packages.
Step 3: Create ProductData.cs Model
Create a new class inside the Models folder to create data source for the Olap control.
Add a new class to the folder Models (for example:
ProductData.cs). For more information about how to add a new model, see Adding controls.Add the following code to the model to define the data for Olap.
csharpusing System; using System.Collections.Generic; using System.Data; using System.Linq; using System.Web; namespace DataEngineWebpi.Models { public class ProductData { private static Random r = new Random(); public int ID { get; set; } public string Product { get; set; } public string Country { get; set; } public DateTime Date { get; set; } public int Sales { get; set; } public int Downloads { get; set; } public bool Active { get; set; } public double Discount { get; set; } private static int randomInt(int max) { return (int)Math.Floor(r.NextDouble() * (max + 1)); } public static IEnumerable<ProductData> GetData(int cnt) { string[] countries = "China,India,Russia,US,Germany,UK,Japan,Italy,Greece,Spain,Portugal".Split(','); string[] products = "Wijmo,Aoba,Xuni,Olap".Split(','); List<ProductData> result = new List<ProductData>(); for (var i = 0; i < cnt; i++) { result.Add(new ProductData { ID = i, Product = products[randomInt(products.Length - 1)], Country = countries[randomInt(countries.Length - 1)], Date = new DateTime(2015, randomInt(5) + 1, randomInt(27) + 1), Sales = randomInt(10000), Downloads = randomInt(10000), Active = randomInt(1) == 1 ? true : false, Discount = r.NextDouble() }); } return result; } } }
Step 4: Add Startup.cs for your application
- In Solution Explorer, select a target project.
- On the Project menu, click Add New Item option.
- In the Add New Item dialog, select Web and then select OWIN Startup class template from the list on right.
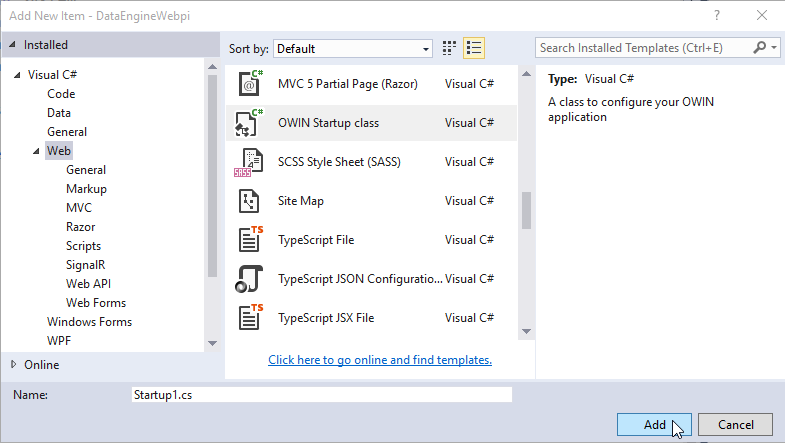
- Click Add. Startup1.cs file is added to the application.
Step 5: Register data source in Startup1.cs
Select and Open Startup1.cs file from Solution Explorer.
Replace the code inside Startup1 class.
using System;
using System.Threading.Tasks;
using Microsoft.Owin;
using Owin;
using System.IO;
using C1.DataEngine;
using C1.Web.Api;
using DataEngineWebpi.Models;
[assembly: OwinStartup(typeof(DataEngineWebpi.Startup1))]
namespace DataEngineWebpi
{
    public class Startup1
    {
        private static string DATAPATH = Path.Combine(System.Web.HttpRuntime.AppDomainAppPath, "Data");
        public void Configuration(IAppBuilder app)
        {
            app.UseDataEngineProviders()
                .AddDataEngine("complex10", () =>
                {
                    return ProductData.GetData(100000);
                })
                .AddDataEngine("complex50", () =>
                {
                    return ProductData.GetData(500000);
                })
                .AddDataEngine("complex100", () =>
                {
                    return ProductData.GetData(1000000);
                })
                .AddDataSource("dataset10", () => ProductData.GetData(100000).ToList())
                .AddDataSource("dataset50", () => ProductData.GetData(500000).ToList())
                .AddDataSource("dataset100", () => ProductData.GetData(1000000).ToList());
        }
    }
}
Once you have added the above code in Startup1.cs, you can register the DataEngine data and the memory data by the extended methods RegisterDataEngine and RegisterDataSet.
type=note
Note: If you want your WebAPI server to support cross domain requests, you can add the following code in the Configuration method of Startup1.cs file.
_app.UseCors(CorsOptions.AllowAll);_
Step 6: Configure Web.config
Open the Web.config file and ensure that the WebDAVModule and the WebDAV handler are removed from <system.webServer> as shown below:
<system.webServer>
<modules>
      <remove name="WebDAVModule" />
    </modules>
<handlers>
      <remove name="WebDAV" />
      .........
    </handlers>
</system.webServer>
Step 7: Build and Run the Project
- Click Build | Build Solution to build the project.
- Press F5 to run the project.
type=note
Append the URL path (for example: http://localhost:1234/api/dataengine/complex/fields) in the address bar of the browser to see the output.