- Introduction
- Report Readers
- Report Authors
- DevOps
-
Developers
- Quick Start
- Breaking Changes
- ActiveReports Version Compatibility and Migration
- License ActiveReports
- Configure ActiveReports Using Code
- Work with Reports using Code
- Report Parts
-
Create Designer and Viewer Applications
- .NET Viewer Application
- Web Viewer and Web Designer Middlewares
- Js Viewer Application
- ASP.NET WebViewer Application
- Blazor Viewer Application
- WebDesigner Application
- Blazor WebDesigner Application
- End User Report Designer in WinForms Application
- Themes in WebDesigner and Js Viewer Components
- Role Based Authorization with JWT
- Extensibility in ActiveReports
- External Customizations in ActiveReports
- Export Reports
- Print Reports
- Plugins Development
- Samples
- Troubleshooting
Customize the WPF Viewer
Let us see how we can customize different elements of WPF Viewer.
Add the Customization Template to the WPF Project
The ActiveReports WPF Viewer is a customizable control. You can easily change the look of the WPF Viewer and its elements, such as the error panel, search panel, sidebar and toolbar by modifying properties in the default WPF Viewer template (DefaultWPFiewerTemplates.xaml).
Once you copy the template, you can modify the default style and apply it to your viewer by creating the desired style and setting its Template property.
Note that while modifying the template, do not remove the required template parts. The required parts are usually marked with the prefix "PART_".
The template allows you to customize the appearance of viewer and take advantage of XAML-based styling.
Open your WPF project.
In Solution Explorer, select the YourProjectName node.
On the Visual Studio Project menu, click Add Existing Item.
In the dialog that appears, locate and select DefaultWPFViewerTemplates.xaml and click OK. You can find DefaultWPFViewerTemplates.xaml at C:\Program Files\MESCIUS\ActiveReports 20\Deployment\WPF\Templates folder (on a 64-bit Windows operating system, this file is located in C:\Program Files (x86)\MESCIUS\ActiveReports 20\Deployment\WPF\Templates.
On MainWindow.xaml before the opening <Grid> tag, add the following code.
<Window.Resources>
    <ResourceDictionary Source="DefaultWPFViewerTemplates.xaml" />
</Window.Resources>
Customize the WPF Viewer Sidebar
Modify Thumbnails
In Solution Explorer, double-click DefaultWPFViewerTemplates.xaml.
In the file that opens, search for "thumbnails tab".
In the GroupBox Header property of <!-- thumbnails tab -->, remove "{Binding Sidebar.ThumbnailsPane.Text}" and type "THUMBNAILS".

Modify Background Color of the Sidebar
Search for "TabControl x:Name="Sidebar".
Add Background="Yellow" after TabControl x:Name="Sidebar".

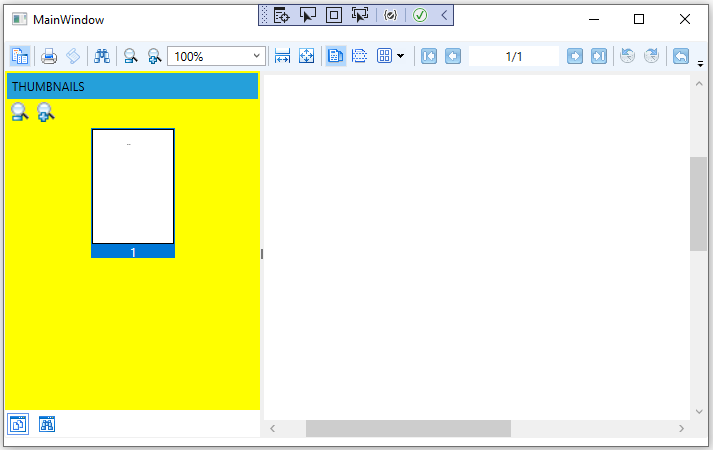
Press F5 to see the customized viewer sidebar.
Add a customized button to the WPF Viewer toolbar
In Solution Explorer, select the YourProjectName node.
On the Visual Studio Project menu, select Add New Item.
In the Add New Item dialog that appears, select Class, rename it to MyCommand and click Add.
In the MyCommand.cs/vb that opens, add the following code to implement a command.
Implements ICommand
Public Function CanExecute(ByVal parameter As Object) As Boolean Implements System.Windows.Input.ICommand.CanExecute
    Return True
End Function
Public Event CanExecuteChanged(ByVal sender As Object, ByVal e As System.EventArgs) Implements System.Windows.Input.ICommand.CanExecuteChanged

Public Sub Execute(ByVal parameter As Object) Implements System.Windows.Input.ICommand.Execute
    MessageBox.Show("MESCIUS is the world's largest component vendor.", "About Us", MessageBoxButton.OK)
End Sub
using System.Windows.Input; using System.Windows;public class MyCommand : ICommand { public bool CanExecute(object parameter) { return true; } public void Execute(object parameter) { MessageBox.Show("MESCIUS is the world's largest component vendor.", "About Us", MessageBoxButton.OK); } public event EventHandler CanExecuteChanged; }In Solution Explorer, double-click DefaultWpfViewerTemplates.xaml.
In the file that opens, add the following code.
<ResourceDictionary>
 ...
xmlns:YourProjectName="clr-namespace:YourProjectName">
<YourProjectName:MyCommand x:Key="MyCommand" />
...
</ResourceDictionary>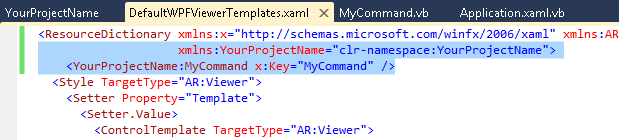
In the same file, add the following code to add a button.
<Button Command="{StaticResource MyCommand}" Content="About Us" />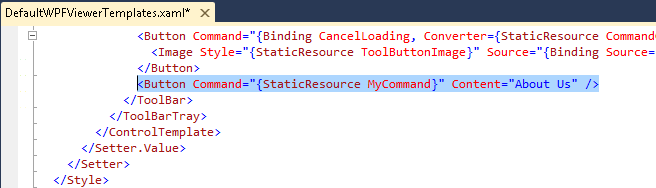
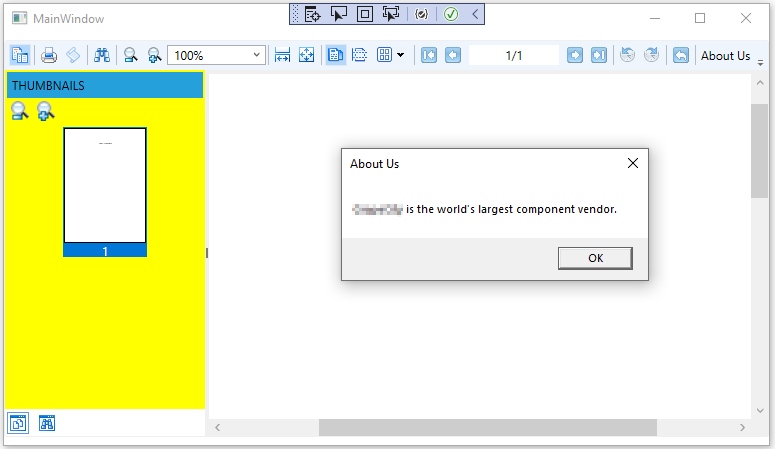
Press F5 to see the new customized button About Us in the Viewer toolbar.
Remove the Refresh button from the WPF Viewer toolbar
In Solution Explorer, double-click DefaultWpfViewerTemplates.xaml.
In the file that opens, search for "<!--Refresh btn-->".
Replace the existing content in Visiblity="..." with the following.
<Button Command=... Visibility="Collapsed">