Data Binding
Data binding connects your report to the data it shows. ActiveReportsJS lets you easily link to many data sources with simple setup tools when you're designing your report. It also has a powerful API that allows supplying data in the code for advanced scenarios. Here, we’ll explain the basics of how data binding works in ActiveReportsJS and give you step-by-step guides for common tasks.
Configuring Data Source
Data Binding in ActiveReportsJS starts with adding a data source. ActiveReportsJS supports CSV and JSON data formats. In addition, there are two source types:
Remote – you can use it at design-time to bind a report to various data endpoints, such as REST API.
Embedded – you can use it to keep the data within the report. This approach is useful when you have to supply the data for a report programmatically.
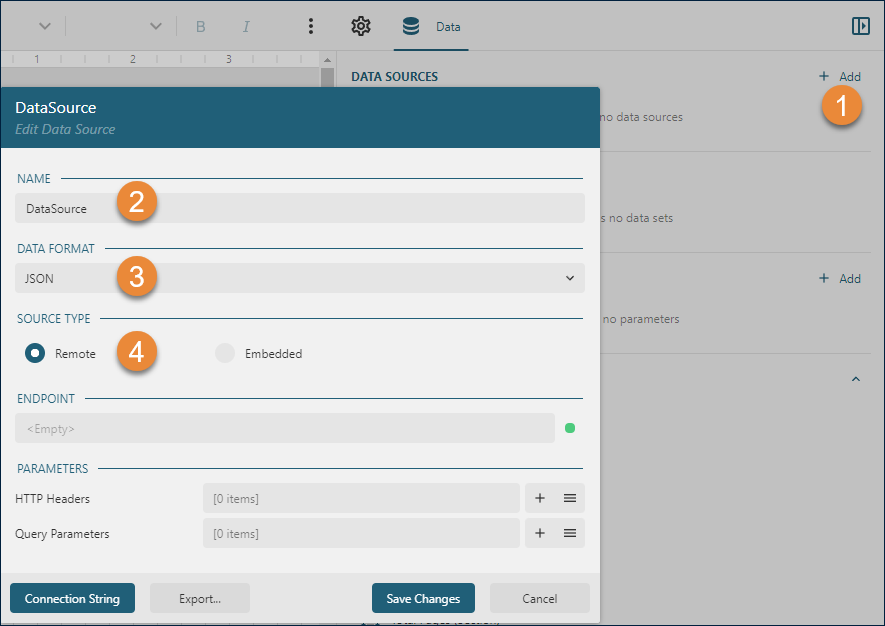
To integrate a data source into your report using the ActiveReportsJS standalone designer, execute the following steps:
Access the
Datatab on the property inspector located on the right side of the interface and click theAddbutton.In the pop-up
Data Source dialog, assign a meaningful name to the new data source.From the
DATA FORMATdropdown, choose eitherJSONorCSVdepending on the format of your dataset.Set the
SOURCE TYPEas eitherRemoteorEmbeddedby clicking the corresponding radio button. TheEmbeddedoption is particularly useful for embedding static data within the report or for testing purposes, ensuring the report's design aligns with the data structure and content.
Configuring Remote Data Source
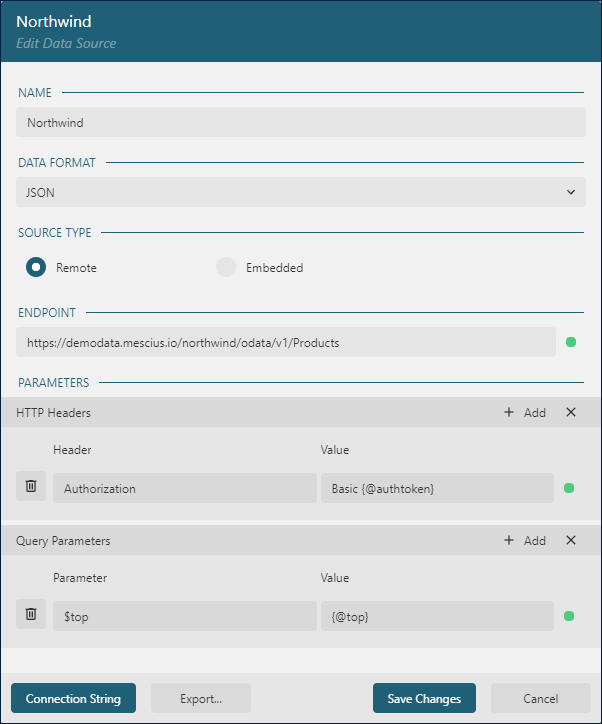
When setting up a remote data source in ActiveReportsJS, you can define the following properties.
ENDPOINT – At its most basic, this property is the URL that points directly to the data source. For example,
https://demodata.mescius.io/northwind/api/v1/Productsfetches a product list in JSON format. For more complex requirements, theENDPOINTcan be a Root URL. This acts as the base URL to which additional endpoint paths are appended, usually via data sets, which are covered in more detail later on. For instance, setting theENDPOINTtohttps://demodata.mescius.io/northwind/api/v1creates a base path for endpoints such as/Products,/Categories, and others found in the Northwind REST API. It's also possible to leave theENDPOINTblank, which is common when you define the connection properties within a data set.HTTP Headers - This property involves specifying a set of HTTP Header fields that are sent with the request. You can dynamically set the value of these fields using Expressions that are evaluated when the report is run. For instance, the Authorization header can be linked to a report parameter that gets populated by your application's backend, contingent on the logged-in user's context. For detailed guidance on dynamically setting report parameters, see the Parameters Usage documentation.
Query Parameters – These are the (name, value) pairs that form the Query String of a URL, used to filter and refine the data requests. Each parameter's value can be dynamically determined by an Expression that's evaluated at the time the report is run. For example, you can link a query parameter to the value of a report parameter, enabling the filtering of data on-the-fly based on user input or other runtime conditions.
Here is the example of the complete configuration for Northwind Products OData endpoint.
Configuring Embedded Data Source
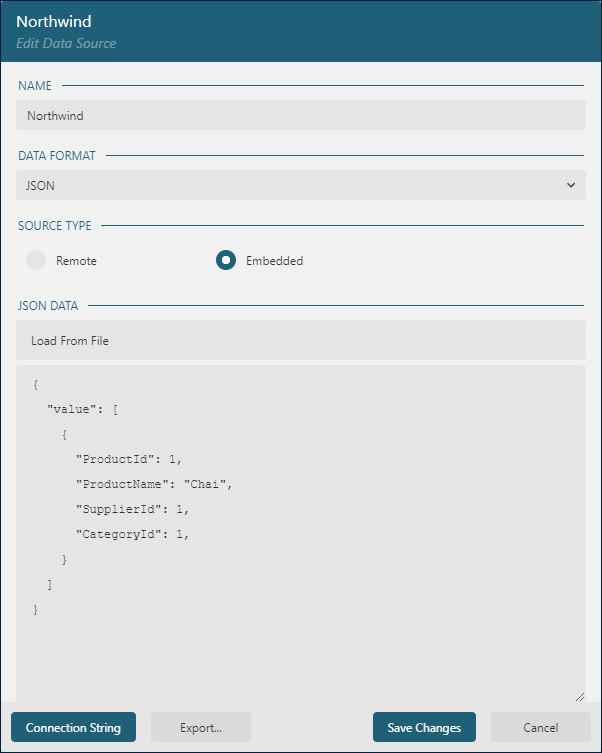
Embedded data sources in ActiveReportsJS are directly included within the report. Although you might provide the actual data at runtime, it's essential to define placeholder data during design-time. This "dummy data" allows ActiveReportsJS to discern the structure and field names expected in the actual dataset.
For instance, to prepare for embedding the Northwind Products list into your report, you would configure the data source at design-time using placeholder data that mimics the structure of the Northwind data. This can be accomplished by either loading a sample file or entering the data manually, as shown below:
Configuring Data Set
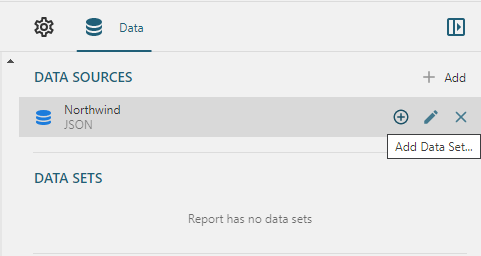
Each data source may contain one or more data sets. After saving changes in the Data Source dialog, you can click the + icon near the data source name in the Data tab of the property inspector to add the data set.
General DataSet Configuration
The general configuration for both JSON and CSV data sets allows specifying the following properties.
Uri/path - the value depends on the configuration of the parent data source:
If Data Source's
ENDPOINTis the full URL, likehttps://demodata.mescius.io/northwind/api/v1/Products, then the data set'sUri/pathshould be empty.If the Data Source's
ENDPOINTis the base URL, likehttps://demodata.mescius.io/northwind/api/v1then the data set'sUri/pathshould contain the endpoint path, for example,/Productsor/CategoriesIf the Data Source's
ENDPOINTis empty, then the data set'sUri/pathshould contain the full URL of the data endpoint.If the DataSource's type is
Embedded JSON, then the data set'sUri/pathshould be empty.
Method - specifies the request method. Supported methods are
GETandPOST. This property is only applicable to theRemote JSONdata source type.Post body - specifies the body for a POST request. You can use this property to connect the data set to a GraphQL endpoint. The Post body could be an Expression that evaluates at runtime.
Parameters and Headers - the purpose of these properties is the same as one of Query Parameters and HTTP Headers properties of the data source. You can set up parameters and headers on the data set level if the
ENDPOINTof the parent data source is the base URL or empty value. These properties are only applicable to theRemote JSONdata source type.
JSON DataSet Configuration
JSON data structures are inherently hierarchical and can be arbitrarily complex. When configuring a JSON Dataset, the Json Path property is a crucial element. It sets the “route” to the targeted data utilizing the JSONPath syntax, which is a powerful expression language for parsing JSON structures. This syntax is particularly useful for pinpointing repeated elements within the data.
Consider the following example from the Northwind Products Data Endpoint, which returns an array of Product Objects:
[
    {
        "productId": 1,
        "productName": "Chai",
        ... the rest of properties
    },
    {
        "productId": 2,
        "productName": "Chang",
    },
    ... the rest of the data
]
To reference these repeated product entries, the JSONPath expressions $.* or $[*] can be employed. These expressions effectively iterate over each item in the array.
In contrast, data returned from the OData Endpoint presents a slightly different structure:
{
    "@odata.context": "https://demodata.mescius.io/northwind/odata/v1/$metadata#Products",
    "value": [
        {
            "ProductId": 1,
            "ProductName": "Chai",
            ... the rest of properties
        },
        {
            "ProductId": 2,
            "ProductName": "Chang",
        },
        ... the rest of the data
    ]
}
For this data format, you would adjust your JSONPath to $.value.* or $.value[*] to access the array of products within the value key.
The JSONPath syntax is versatile, offering a wide range of possibilities to match various data retrieval needs. For a comprehensive list of expressions and detailed examples, refer to the official JSONPath documentation.
CSV DataSet Configuration
The configuration of a CSV Dataset includes the following properties
Heading Row: This property checks if the first row of the CSV file contains column names.
Starting Row: This specifies the row number where the actual data begins. This is particularly helpful when the initial rows contain comments or metadata rather than data.
Column Separator: Defines the character that delimits columns within the data. Common separators include commas (
,), semicolons (;), tabs (\t), or spaces(Merge Column Separators: When set to true, this property combines multiple consecutive column separators into a single one. This can clean up data where additional separators are used for spacing.
Row Separator: Determines the character that separates each data row. Typically, this is a newline character (
\r,\nor\r\n).Merge Row Separators: This property, when enabled, will merge multiple consecutive row separators into a single one, which can be useful for eliminating empty lines or correcting data formatting issues.
Data Set validation
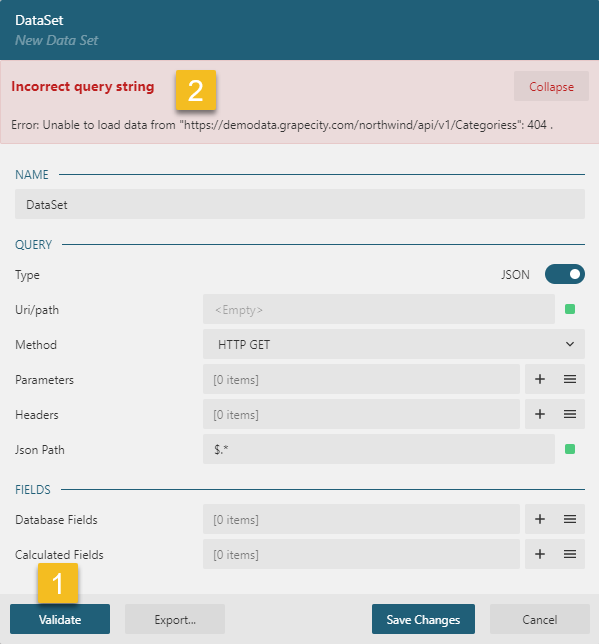
Once you set up the properties mentioned above, the next step is to validate the data set and retrieve the fields list. In the Data Set dialog, click the Validate button that performs both of these actions. If the configuration is invalid, or there are other issues with a data connection, the dialog shows the error message at the top area:
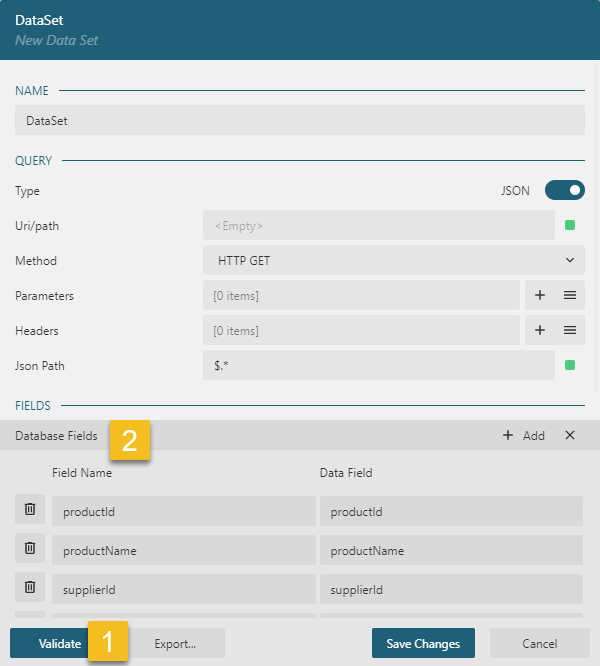
If you set everything correctly, you should see the data fields list - click on the list icon on the right side of the DataBase Fields section to expand the fields list.
Dataset Fields
Datasets contain two categories of fields: Database Fields and Calculated Fields. Database Fields are directly sourced from the dataset, while Calculated Fields are derived by the report author based on the data provided.
When working with Database Fields, the following operations are commonly performed:
Renaming Field Names: The default field name can be replaced with an alternative that may be more concise or descriptive, which is particularly useful if the original Data Field name is lengthy or contains special characters.
Annotating Data Types and Formats: It's important to annotate each Data Field with its corresponding data type and format. This process is critical for fields like
Numbers,Dates, andBooleansin CSV Datasets, and it is especially crucial forDatefields in JSON Datasets since dates are typically represented as strings in JSON format.Adding Calculated fields
Annotating Fields Data Types
Data Annotations are formatted using the syntax FieldName[Type|Format]. The Type specification can be one of the following:
Number: For numeric valuesDate: For date valuesBoolean: For true/false valuesString: For textual data (this is the default type)
The Format part of the annotation is type-specific and should match the nature of the data.
The table below outlines the tokens used to define the Date format within an annotation:
Token | Description |
|---|---|
YYYY or yyyy | The year as a four-digit number |
YY or yy | The year, from 00 to 99 |
M | The month, from 1 through 12 |
MM | The month, from 01 through 12. |
d or D | The day of the month, from 1 through 31 |
dd or DD | The day of the month, from 01 through 31 |
h | The hour, using a 12-hour clock from 1 to 12 |
hh | The hour, using a 12-hour clock from 01 to 12 |
H | The hour, using a 24-hour clock from 0 to 23 |
HH | The hour, using a 24-hour clock from 00 to 23 |
m | The minute, from 0 through 59 |
mm | The minute, from 00 through 59 |
s | The second, from 0 through 59 |
ss | The second, from 00 through 59 |
f | The tenths of a second |
ff | The hundredths of a second |
fff | The milliseconds |
ffff | The ten-thousandths of a second |
fffff | The hundred-thousandths of a second |
ffffff | The millionths of a second |
t or a | The first character of the AM/PM designator |
tt or A | The AM/PM designator |
x | The Unix timestamp in milliseconds |
X | The Unix timestamp in seconds |
zz | Hours offset from UTC, with a leading zero for a single-digit value |
zzz or Z | Hours and minutes offset from UTC |
For instance, if you need to annotate a date field that is presented in the format 10/31/2023 as seen in the dataset, the correct annotation would be OrderDate[Date|MM/DD/YYYY].
Adding Calculated Fields
These are fields within a dataset that are created by performing operations on one or more existing database fields. Calculated fields can encompass various operations, including:
Arithmetic calculations (e.g., sums, averages, or complex mathematical formulas)
String manipulation (e.g., concatenating text or altering string formats)
Logical operations (e.g., condition-based values or boolean logic)
To append a calculated field, click on the + icon on the right side of the Calculated Fields section. Set the Field Name that you will use in the report, then set the Value to an Expression. For example, if the database fields list contains UnitPrice, Quantity, and DiscountPerUnit fields for OrderLine entities, then you can add the calculated field called TotalPrice and set its Value to {(UnitPrice - DiscountPerUnit) * Quantity}
The value of the calculated field will be automatically available for each entity of the original data set.
Data Set filters
We recommend filtering the data that the report will display using the data source capabilities itself, for example, by using $filter feature of OData API. It reduces the traffic between an application and the data source and simplifies data processing on the ActiveReportsJS side.
However, after the data set validation described above successfully finishes, you can also set Filters on the dataset level. Click on the + icon on the right side of the Filters section. Set the Expression to point to the field to use for a filter, for example, =Fields!UnitPrice.Value. Then set the Operator to one of the supported filter operators, for instance >. Finally, set the Value of the filter, for example, 1000. In that case, the report will display the data entities with UnitPrice > 1000 only.
Nested Data Set
The JSON data may represent one-to-many relationships between entities. For example, the following request to the OData Northwind endpoint returns the list of categories where each category contains the list of products.
GET https://demodata.mescius.io/northwind/odata/v1/Categories?$expand=ProductsIf ActiveReportsJS meets such a structure in the retrieved data, then it automatically creates the data sets hierarchy and displays it in the data set dialog:
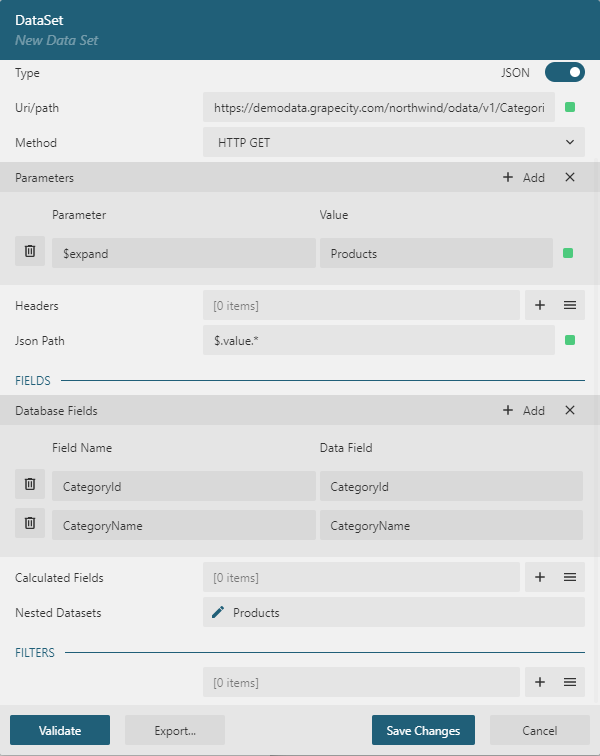
Master-detail reports can display such a structure by using nested data regions, visit the Tutorial and check the Live Demo for more information.
Runtime data binding
If, for some reason, you can't set up the data connection at design time and plan to fetch the data at runtime and feed it to a report in the application's code, then you can use the Embedded JSON data source type as described above. Here is the example of code that fetches the data from the Northwind Products endpoint and passes them in the data source properties.
// Use Fetch API to set up the request https://developer.mozilla.org/en-US/docs/Web/API/Fetch_API
const headers = new Headers();
const dataRequest = new Request(
   "https://demodata.mescius.io/northwind/api/v1/Products",
   {
      headers: headers
   }
);

// fetch the data
const response = await fetch(dataRequest);
const data = await response.json();

// fetch the report definition, it is just a json file
const reportResponse = await fetch("Products.rdlx-json");
const report = await reportResponse.json();

// feed the data to the report
report.DataSources[0].ConnectionProperties.ConnectString = "jsondata=" + JSON.stringify(data);
Then the code could load the report in the viewer or export it to one of the supported formats.
Visit the Live Demo for a code sample.
Related links
Feedback
Submit and View Feedback For
- Configuring Data Source
- Configuring Remote Data Source
- Configuring Embedded Data Source
- Configuring Data Set
- General DataSet Configuration
- JSON DataSet Configuration
- CSV DataSet Configuration
- Data Set validation
- Dataset Fields
- Annotating Fields Data Types
- Adding Calculated Fields
- Data Set filters
- Nested Data Set
- Runtime data binding
- Related links


