-
Spread Windows Forms Product Documentation
- Getting Started
-
Developer's Guide
- Understanding the Product
-
Working with the Component
- Adding NuGet Package in Spread Windows Forms
- Migrate .NET Framework Project to .NET 8 Platform
- Migrate .NET Framework Project to .NET 6 Platform
- Adding a Component to a Visual Studio 2019 or 2022 Project
- Adding a Component to a Visual Studio 2017 Project
- Adding a Component to a Visual Studio 2013 Project
- Setting the Properties
- Adding Support for High DPI Settings
- Spreadsheet Objects
- Ribbon Control
- Sheets
- Rows and Columns
- Headers
- Cells
- Cell Types
- Data Binding
- Customizing the Sheet Appearance
- Customizing Interaction in Cells
- Tables
- Pivot Table
- Understanding the Underlying Models
- Customizing Row or Column Interaction
- Formulas in Cells
- Sparklines
- Keyboard Interaction
- Events from User Actions
- File Operations
- Storing Excel Summary and View
- Printing
- Chart Control
- Enhanced Chart
- Customizing Drawing
- Touch Support with the Component
- Spread Designer Guide
- Assembly Reference
- Import and Export Reference
- Version Comparison Reference
Adding a Component to a Visual Studio 2019 or 2022 Project
Use the following steps to add the component to a project in Visual Studio .NET.
The first step is to create a new project in Visual Studio .NET, and to add a Spread Windows Forms component to the project.
Start Visual Studio .NET.
Click Create a new project in the "Get Started" section that appears on the right to create a new project. Alternatively, you can also go to the File menu, choose New, Project to create a new project.
In the Create a new Project dialog, select a project type depending on the language environment in which you are developing and click Next. For example, choose Windows Forms App (.NET Framework) containing Visual Basic under it.
Now, configure your new project as described in the steps shared below:
- In the Project Name box, type the name of the new project. The default is WindowsApp1 for the first Windows Forms application.
- In the Location box, leave the location path as the designated path, or click the Browse button to change the path to a new directory.
- Click Create.
If your project does not display the Solution Explorer, from the View menu, choose Solution Explorer.
In the Solution Explorer, right-click on the form name, Form1. Choose Rename from the pop-up menu, then type the new form name you prefer for the new form name.
Use the following steps to add the component to the toolbox if the component is not listed in the toolbox.
- If the Toolbox is not displayed, from the View menu choose Toolbox.
- Once the Toolbox is displayed, look in the Spread category (or in any other category if you have installed Spread and placed the toolbox icon in a different category).
- If the Spread component is not in the Toolbox:
Right-click in the Toolbox, and from the pop-up menu choose Choose Items.
In the Choose Toolbox Items dialog, click the .NET Framework Components tab.
In the .NET Framework Components tab, the FpSpread component (in the FarPoint.Win.Spread namespace) should be displayed in the list of components. Select the Spread component check box and click OK. Select fpChart (FarPoint.Win.Chart namespace) for the chart control.
If the Spread component is not displayed in the list of components, click Browse and browse to the installation path for the Spread Windows Forms component. Once there, select the FarPoint.Win.Spread.dll and click Open. The Spread component is now displayed in the list of components. Select it and click OK. Select FarPoint.Win.Chart.dll for the chart control.
You can test that the component has been added by opening a project and inserting the component.
The next step is to add the Spread component to a project.
- With an open project, in the Toolbox under MESCIUS Spread (or whatever category to which you added it), select the FpSpread component.
- On your Windows Forms page, draw a Spread component by dragging a rectangle the size that you would like the initial component or simply double-click on the page. The Spread component appears. The Spread Designer also appears by default. Close the designer.
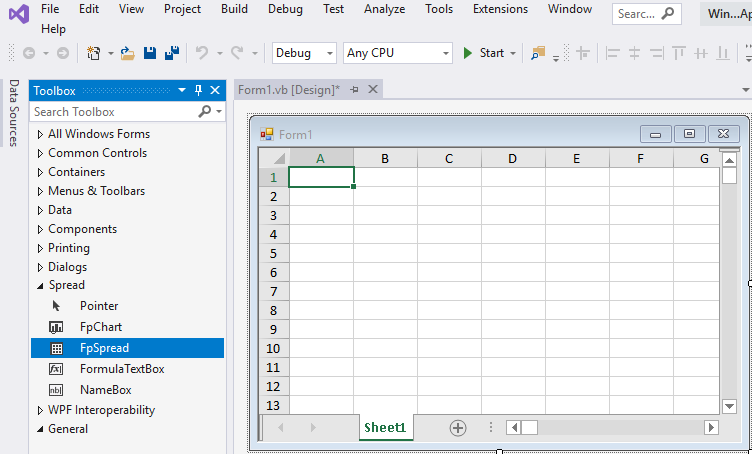
Your project should look similar to the following picture.

You have successfully added the Spread component to the project.


