Getting Started
System Requirements
The DsImaging packages are fully supported on Visual Studio 2017 or later for Windows, Visual Studio for MAC, and Visual Studio Code for Linux and are compatible with the following:
.NET Core 2.x and 3.x
.NET Standard 2.x
.NET Framework 4.6.2 or higher
Setting up an Application
DsImaging references are available through NuGet, a Visual Studio extension that adds the required libraries and references to your project automatically. To work with DsImaging, you need to have following references in your application:
Reference | Purpose |
|---|---|
To use DsImaging in an application, you need to reference (install) just the DS.Documents.Imaging package. It will pull in the required infrastructure packages. | |
DS.Documents.Imaging.Windows provides support for font linking specified in the Windows registry, and access to native Windows imaging APIs, improving performance and adding some features (e.g. reading TIFF-JPEG frames). | |
DS.Documents.DX.Windows is an infrastructure package used by DS.Documents.Imaging.Windows. You do not need to reference it directly. | |
Skia represents a rendering engine based on SkiaSharp and is used for drawing text and graphics. You can optionally install this package for rendering quality graphics across various platforms. For more information, see Render using Skia Library. |
Note: With v7.0, GrapeCity.Documents.Imaging (GcImaging) package is renamed to DS.Documents.Imaging (DsImaging). The namespaces and classes within DS.Documents.Imaging remain the same, which provide the same functionality and are backwards compatible with GrapeCity.Documents.Imaging, ensuring minimal impact on your existing projects.
To upgrade GcImaging package to DsImaging package in your existing projects, follow one of the below options:
Update package using Migration tool:
The migration tool is present in the package downloaded from the website. Follow the instructions on the tool for a seamless migration from GcImaging to DsImaging.
Update package manually from NuGet package manager:
In Solution Explorer, right-click either Dependencies or a project and select Manage NuGet Packages.
In Installed tab, click on GrapeCity.Documents.Imaging package and click Uninstall to remove it and its dependencies from the project.
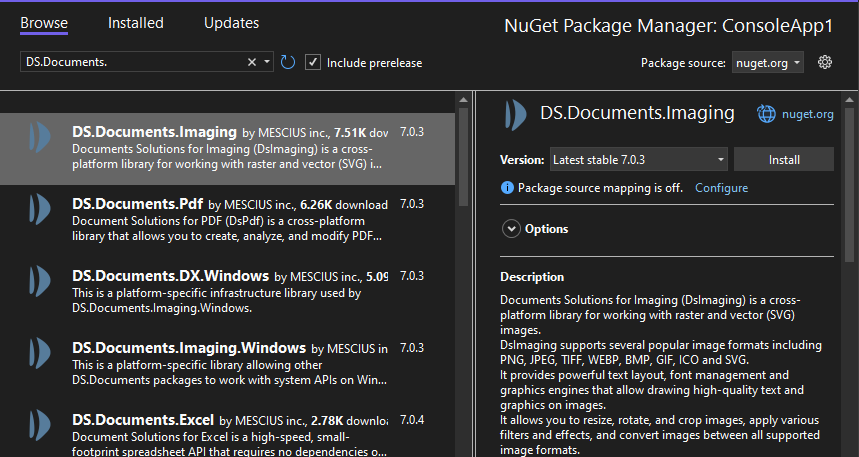
In Browse tab, type "ds.documents" or "DS.Documents" in the search text box at the top and find the package "DS.Documents.Imaging".
Click Install to add the DS.Documents.Imaging package and its dependencies into the project.
Add reference to DsImaging in your application from NuGet.org
In order to use DsImaging in a .NET Core, ASP.NET Core, .NET Framework application (any target that supports .NET Standard 2.0), install the NuGet packages in your application using the following steps:
Visual Studio for Windows
Open Visual Studio.
Create any application (any target that supports .NET Standard 2.0).
Right-click the project in Solution Explorer and choose Manage NuGet Packages.
In the Package source on top right, select nuget.org.
Click Browse tab on top left and search for "DS.Documents".
On the left panel, select DS.Documents.Imaging
On the right panel, click Install.

In the Preview Changes dialog, click OK and choose I Accept in the next screen.
This adds all the required references of the package to your application. After this step, follow the steps in the Quick Start section.
Visual Studio for Mac
Open Visual Studio for Mac.
Create any application (any target that supports .NET Standard 2.0).
In tree view on the left, right-click Dependencies and choose Add Packages.
In the Search panel, type "DS.Documents".
From the list of packages displayed in the left panel, select DS.Documents.Imaging and click Add Packages.
Click Accept.
This automatically adds references of the package and its dependencies to your application. After this step, follow the steps in the Quick Start section.
Visual Studio Code for Linux
Open Visual Studio Code.
Install Nuget Package Manager from Extensions.
Create a folder "MyApp" in your Home folder.
In the Terminal in Visual Studio Code, type "
cd MyApp"Type command "
dotnet new console"Observe: This creates a .NETCore application with MyApp.csproj file and Program.cs.
Press Ctrl+P. A command line opens at the top.
Type command: "
>"Observe: "Nuget Package Manager: Add Package" option appears.
Click the above option.
Type "DS" and press Enter.
Observe: DS packages get displayed in the dropdown.
Choose DS.Documents.Imaging.
Type following command in the Terminal window: "
dotnet restore"
This adds references of the package to your application. After this step, follow the steps in the Quick Start section.


