
Quick Start
This quick start will guide you through the steps of adding FlexGrid and FilterEditor controls to an application, binding FlexGrid to a data source and setting the properties of controls.
Complete the steps given below to see how the FilterEditor control appears after data binding and setting properties.
Step 1: Setting up the application
Create a new WPF application.
Drag and drop the C1FilterEditor control from the Toolbox onto your form.
Drag and drop the C1FlexGrid control from the Toolbox onto your form.
Note that the additional assemblies get automatically added to the References.
Open MainWindow.xaml and replace the existing XAML with the following code.
<Window x:Name="window" x:Class="QuickStart_FilterEditorControl.MainWindow"
xmlns="http://schemas.microsoft.com/winfx/2006/xaml/presentation"
xmlns:x="http://schemas.microsoft.com/winfx/2006/xaml"
xmlns:mc="http://schemas.openxmlformats.org/markup-compatibility/2006"
xmlns:d="http://schemas.microsoft.com/expression/blend/2008"
xmlns:c1="http://schemas.componentone.com/winfx/2006/xaml"
xmlns:c1df="clr-namespace:C1.DataFilter;assembly=C1.WPF.DataFilter.4.5.2"
xmlns:local="clr-namespace:QuickStart_FilterEditorControl"
mc:Ignorable="d"
Title="MainWindow" Height="450" Width="800" >
<Grid Name="LayoutRoot">
<Grid.RowDefinitions>
<RowDefinition Height="auto"/>
<RowDefinition />
</Grid.RowDefinitions>
<Grid Grid.Row="1">
<Grid.ColumnDefinitions>
<ColumnDefinition Width="231*" />
<ColumnDefinition Width="36*"/>
<ColumnDefinition Width="140*" />
<ColumnDefinition Width="393*"/>
</Grid.ColumnDefinitions>
<c1:C1FilterEditor x:Name="filterEditor" Grid.Column="0" Grid.Row="0" Grid.ColumnSpan="2">
</c1:C1FilterEditor>
<c1:C1FlexGrid x:Name="flexGrid" Grid.Column="2" Grid.Row="0" Grid.ColumnSpan="2">
</c1:C1FlexGrid>
</Grid>
</Grid>
</Window>
Step 2: Binding FilterEditor and FlexGrid to a data source
Add a class 'Customer' to define data.
csharp
public class Customer
{
    //fields
    int _id, _countryID;
    string _first, _last;
    double _weight;
    //data generators
    static Random _rnd = new Random();
    static string[] _firstNames = "Andy|Ben|Charlie|Dan|Ed|Fred|Gil|Herb|Jim|Elena|Stefan|Alaric|Gina".Split('|');
    static string[] _lastNames = "Ambers|Bishop|Cole|Danson|Evers|Frommer|Salvatore|Spencer|Saltzman|Rodriguez".Split('|');
    static string[] _countries = "China|India|United States|Japan|Myanmar".Split('|');
    public Customer()
        : this(_rnd.Next())
    {
    }
    public Customer(int id)
    {
        ID = id;
        First = GetString(_firstNames);
        Last = GetString(_lastNames);
        CountryID = _rnd.Next() % _countries.Length;
        Weight = 50 + _rnd.NextDouble() * 50;
    }
    //Object model
    public int ID
    {
        get { return _id; }
        set
        {
            if (value != _id)
            {
                _id = value;
                RaisePropertyChanged("ID");
            }
        }
    }
    public string Name
    {
        get { return string.Format("{0} {1}", First, Last); }
    }
    public string Country
    {
        get { return _countries[_countryID]; }
    }
    public int CountryID
    {
        get { return _countryID; }
        set
        {
            if (value != _countryID && value > -1 && value < _countries.Length)
            {
                _countryID = value;
                RaisePropertyChanged(null);
            }
        }
    }
    public string First
    {
        get { return _first; }
        set
        {
            if (value != _first)
            {
                _first = value;
                RaisePropertyChanged(null);
            }
        }
    }
    public string Last
    {
        get { return _last; }
        set
        {
            if (value != _last)
            {
                _last = value;
                RaisePropertyChanged(null);
            }
        }
    }
    public double Weight
    {
        get { return _weight; }
        set
        {
            if (value != _weight)
            {
                _weight = value;
                RaisePropertyChanged("Weight");
            }
        }
    }
    // ** utilities
    static string GetString(string[] arr)
    {
        return arr[_rnd.Next(arr.Length)];
    }
    static string GetName()
    {
        return string.Format("{0} {1}", GetString(_firstNames), GetString(_lastNames));
    }
    // ** static list provider
    public static ObservableCollection<Customer> GetCustomerList(int count)
    {
        var list = new ObservableCollection<Customer>();
        for (int i = 0; i < count; i++)
        {
            list.Add(new Customer(i));
        }
        return list;
    }
    // this interface allows bounds controls to react to changes in the data objects.
    void RaisePropertyChanged(string propertyName)
    {
        OnPropertyChanged(new PropertyChangedEventArgs(propertyName));
    }
    public event PropertyChangedEventHandler PropertyChanged;
    protected void OnPropertyChanged(PropertyChangedEventArgs e)
    {
        if (PropertyChanged != null)
            PropertyChanged(this, e);
    }
vbnet
Public Class Customer
    'fields
    Private _id, _countryID As Integer
    Private _first, _last As String
    Private _weight As Double
    'data generators
    Private Shared _rnd As Random = New Random()
    Private Shared _firstNames As String() = "Andy|Ben|Charlie|Dan|Ed|Fred|Gil|Herb|Jim|Elena|Stefan|Alaric|Gina".Split("|"c)
    Private Shared _lastNames As String() = "Ambers|Bishop|Cole|Danson|Evers|Frommer|Salvatore|Spencer|Saltzman|Rodriguez".Split("|"c)
    Private Shared _countries As String() = "China|India|United States|Japan|Myanmar".Split("|"c)
    Public Sub New()
        Me.New(_rnd.Next())
    End Sub
    Public Sub New(ByVal id As Integer)
        Me.ID = id
        First = GetString(_firstNames)
        Last = GetString(_lastNames)
        CountryID = _rnd.Next() Mod _countries.Length
        Weight = 50 + _rnd.NextDouble() * 50
    End Sub
    'Object model
    Public Property ID As Integer
        Get
            Return _id
        End Get
        Set(ByVal value As Integer)
            If value <> _id Then
                _id = value
                RaisePropertyChanged("ID")
            End If
        End Set
    End Property
    Public ReadOnly Property Name As String
        Get
            Return String.Format("{0} {1}", First, Last)
        End Get
    End Property
    Public ReadOnly Property Country As String
        Get
            Return _countries(_countryID)
        End Get
    End Property
    Public Property CountryID As Integer
        Get
            Return _countryID
        End Get
        Set(ByVal value As Integer)
            If value <> _countryID AndAlso value > -1 AndAlso value < _countries.Length Then
                _countryID = value
                RaisePropertyChanged(Nothing)
            End If
        End Set
    End Property
    Public Property First As String
        Get
            Return _first
        End Get
        Set(ByVal value As String)
            If Not Equals(value, _first) Then
                _first = value
                RaisePropertyChanged(Nothing)
            End If
        End Set
    End Property
    Public Property Last As String
        Get
            Return _last
        End Get
        Set(ByVal value As String)
            If Not Equals(value, _last) Then
                _last = value
                RaisePropertyChanged(Nothing)
            End If
        End Set
    End Property
    Public Property Weight As Double
        Get
            Return _weight
        End Get
        Set(ByVal value As Double)
            If value <> _weight Then
                _weight = value
                RaisePropertyChanged("Weight")
            End If
        End Set
    End Property
    ' ** utilities
    Private Shared Function GetString(ByVal arr As String()) As String
        Return arr(_rnd.Next(arr.Length))
    End Function
    Private Shared Function GetName() As String
        Return String.Format("{0} {1}", GetString(_firstNames), GetString(_lastNames))
    End Function
    ' ** static list provider
    Public Shared Function GetCustomerList(ByVal count As Integer) As ObservableCollection(Of Customer)
        Dim list = New ObservableCollection(Of Customer)()
        For i As Integer = 0 To count - 1
            list.Add(New Customer(i))
        Next
        Return list
    End Function
    ' this interface allows bounds controls to react to changes in the data objects.
    Private Sub RaisePropertyChanged(ByVal propertyName As String)
        OnPropertyChanged(New PropertyChangedEventArgs(propertyName))
    End Sub
    Public Event PropertyChanged As PropertyChangedEventHandler
    Protected Sub OnPropertyChanged(ByVal e As PropertyChangedEventArgs)
        RaiseEvent PropertyChanged(Me, e)
    End Sub
Add the following code to C1filterEditor_FilterChanged event.
csharp
private void filterEditor_FilterChanged(object sender, EventArgs e)
{
    flexGrid.ItemsSource = filterEditor.View.Cast<Customer>().ToList();
}
vbnet
Private Sub filterEditor_FilterChanged(sender As Object, e As EventArgs) Handles filterEditor.FilterChanged
    flexGrid.ItemsSource = filterEditor.View.Cast(Of Customer)().ToList()
End Sub
Bind the FlexGrid and FilterEditor controls to the same datasource.
csharp
var data = Customer.GetCustomerList(12);
filterEditor.ItemsSource = data;
flexGrid.ItemsSource = data;
vbnet
Dim data = Customer.GetCustomerList(12)
Me.filterEditor.ItemsSource = data
Me.flexGrid.ItemsSource = data
Add the following XAML code to populate the FlexGrid columns with data.
<c1:C1FlexGrid AutoGenerateColumns="False" x:Name="flexGrid" Grid.Column="2" Grid.Row="0" Grid.ColumnSpan="2">
<c1:C1FlexGrid.Columns>
<c1:Column Header="ID" Binding="{Binding ID}" />
<c1:Column Header="Name" Binding="{Binding Name}" />
<c1:Column Header="Country" Binding="{Binding Country}" />
<c1:Column Header="CountryID" Binding="{Binding CountryID}" />
<c1:Column Header="First" Binding="{Binding First}" />
<c1:Column Header="Last" Binding="{Binding Last}" />
<c1:Column Header="Weight" Binding="{Binding Weight}" />
</c1:C1FlexGrid.Columns>
</c1:C1FlexGrid>
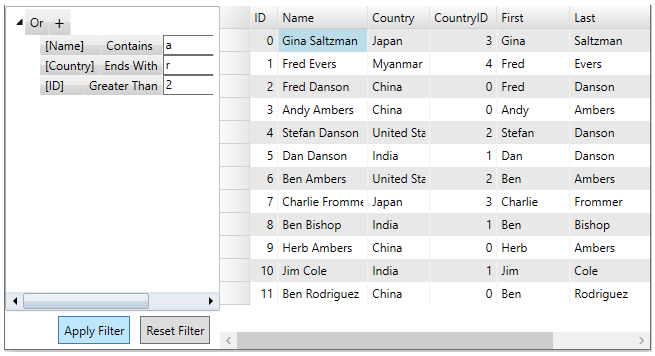
Step 3: Creating Filter Expressions
To create a filter expression in the FilterEditor control at runtime, select a Combination from the drop-down list which contains AND & OR logical functions. Note that the AND function is set by default.
After adding the combination, click on the (+) sign and select an Operation from the drop-down list.
Select Field using the ellipsis button. It is the property to which expression applies.
Now, select the logical operator and Operand Value. The implementation can be seen in the GIF.
The above filter expression can also be created using the below XAML code.
<c1:C1FilterEditor x:Name="filterEditor" Grid.Column="0" Grid.Row="0" Grid.ColumnSpan="2">
<c1:C1FilterEditor.Expression>
<c1df:CombinationExpression FilterCombination="Or">
<c1df:CombinationExpression.Expressions>
<c1df:OperationExpression
PropertyName="Name"
FilterOperation="Contains"
Value="a"
/>
<c1df:OperationExpression
PropertyName="Country"
FilterOperation="EndsWith"
Value="r"
/>
<c1df:OperationExpression
PropertyName="ID"
FilterOperation="GreaterThan"
Value="2"
/>
</c1df:CombinationExpression.Expressions>
</c1df:CombinationExpression>
</c1:C1FilterEditor.Expression>
</c1:C1FilterEditor>
To apply the filter conditions given in example above, C1FilterEditor provides the ApplyFilterAync method:
csharp
private async void ApplyFilterAsync()
{
    CombinationExpression filterExpression = null;
    filterEditor.Expression = filterExpression;
    await filterEditor.ApplyFilterAsync();
}
vbnet
Private Async Sub ApplyFilterAsync()
    Dim filterExpression As CombinationExpression = Nothing
    Me.filterEditor.Expression = filterExpression
    Await Me.filterEditor.ApplyFilterAsync()
End Sub