
- Introduction
- Report Readers
- Report Authors
- DevOps
-
Developers
- Quick Start
- Breaking Changes
- ActiveReports Version Compatibility and Migration
- License ActiveReports
- Configure ActiveReports Using Code
-
Work with Reports using Code
- Visual Studio Integrated Designer
- RDLX-based Reports
-
Section Report
- Create a Report or Load an Existing Report
- Bind a Section Report to Data
- Save Section Reports
- Change Ruler Measurements
- Modify Printer Settings
- Insert or Add Report Pages
- Save and Load RDF Files
- Work with Subreports
- Draw on the Canvas of Rendered Report
- Work with Code-based Section Reports
- Optimize Section Reports
- Custom Properties in Chart
- Report Parts
- Create Designer and Viewer Applications
- Extensibility in ActiveReports
- External Customizations in ActiveReports
- Export Reports
- Print Reports
- Plugins Development
- Samples
- Troubleshooting
Work with Subreports
This tutorial illustrates creating a subreport using scripts.
ActiveReports allows you to use scripting to permit reports saved to an XML file to contain code. By including scripting when reports are saved into XML, the reports later can be loaded, run, and displayed directly to the viewer control without needing to use the designer.
type=note
Note: We are using Visual Studio 2019 and will be connecting to Microsoft Jet 4.0 OLE DB Provider. Since Visual Studio 2022 runs in 64 bit, it does not show Microsoft Jet 4.0 OLE DB provider; you should use one of the compatible providers (e.g. Microsoft.ACE.OLEDB.12.0).
This walkthrough uses the Northwind database. The NWIND.mdb file can be downloaded from GitHub: ..\Samples19\Data\NWIND.mdb.
When you have finished this walkthrough, you will have main report that looks similar to the following.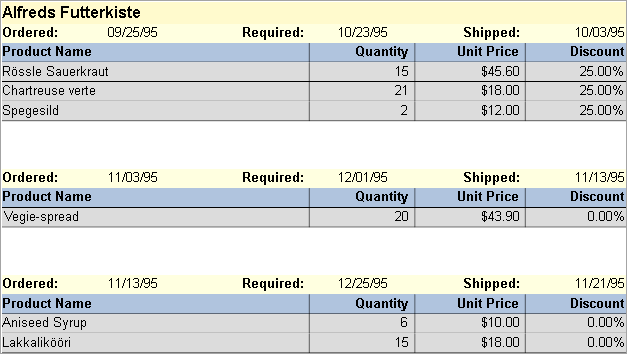
Create Project and the Main Report
- Create a new or open an existing Windows Forms App (.NET Framework or .NET) in Visual Studio project.
- Go to the Project Explorer, right-click the project and select Add > New Item.
- Select ActiveReports 19 Standalone Report > Add and choose Section report type, and then click Finish.
The xml-based Section report (report.rpx) is added. - Rename the default report as 'rptMain'.
- Double-click the rpx file to open the Section Report in the designer.
Connect the Main Report to Data
In the Report Data Source dialog, on the OLE DB tab, next to Connection String, click the Build button.
In the Data Link Properties window that appears, select Microsoft Jet 4.0 OLE DB Provider and click the Next button to move to the Connection tab.
Note:Click the ellipsis (...) button to browse to your database, for example the NWind.mdb sample database. Click Open once you have selected the appropriate database path.
Click the Test Connection button to see if you have successfully connected to the database.
Click OK to close the Data Link Properties window and return to the Report Data Source dialog. Notice that the Connection String field gets filled automatically.
In the Query field on the OLE DB tab, enter the following SQL query.
SELECT * FROM Orders INNER JOIN Customers ON Orders.CustomerID = Customers.CustomerID ORDER BY CompanyName, OrderDateClick OK to save the data source and return to the report design surface.
Add a Subreport
- Go to the Project Explorer, right-click the project and select Add > New Item.
- Select ActiveReports 19 Standalone Report > Add and choose Section report type, and then click Finish.
The xml-based Section report (report.rpx) is added. - In the Name field, rename the file as rptSub.
- Click the Add button to open a new Section Report in the designer.
- Right-click the PageHeader or PageFooter section and select Delete. Subreports do not render these sections, so deleting them saves processing time.
- Click in the grey area below the report to select it, and in the Properties window, change the report's ShowParameterUI property to False. This prevents the subreport from requesting a parameter from the user.
Connect the Subreport to Data
In the Report Data Source dialog, on the OLE DB tab, next to Connection String, click the Build button.
In the Data Link Properties window that appears, select Microsoft Jet 4.0 OLE DB Provider and click the Next button to move to the Connection tab.
Click the ellipsis (...) button to browse to your database, for example the NWind.mdb sample database. Click Open once you have selected the appropriate database path.
Click the Test Connection button to see if you have successfully connected to the database.
Click OK to close the Data Link Properties window and return to the Report Data Source dialog. Notice that the Connection String field gets filled automatically.
In the Query field on the OLE DB tab, enter the following SQL query.
SELECT * FROM [order details] inner join products on [order details].productid = products.productidClick OK to save the data source and return to the report design surface.
Create Layout for Main Report
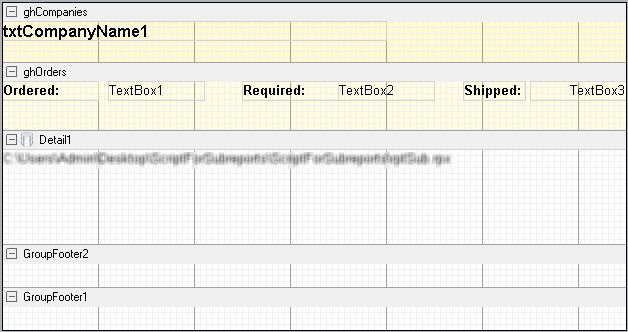
Right-click the design surface of rptMain and select Insert then Group Header/Footer to add group header and footer sections to the report.
In the Properties Panel, make the following changes to the group header.
Property Name Property Value Name ghCompanies BackColor LemonChiffon CanShrink True DataField CompanyName GroupKeepTogether All KeepTogether True In the Report Explorer, expand the Fields node, then the Bound node. Drag the CompanyName field onto ghCompanies and in the Properties window, set the properties as follows.
Property Name Property Value Size 4, 0.2 in Location 0, 0 in Font Bold True Font Size 12 Right-click the design surface of rptMain and select Insert then Group Header/Footer to add the second group header and footer sections to the report.
In the Properties Panel, make the following changes to the second group header.
Property Name Property Value Name ghOrders BackColor LightYellow CanShrink True DataField OrderDate GroupKeepTogether All KeepTogether True From the toolbox, drag three TextBox controls onto ghOrders and set the properties for each control as follows.
TextBox1
Property Name Property Value DataField OrderDate OutputFormat MM/dd/yy TextBox2
Property Name Property Value DataField RequiredDate OutputFormat MM/dd/yy TextBox3
Property Name Property Value DataField ShippedDate OutputFormat MM/dd/yy Alignment Right From the toolbox, drag three Label controls onto ghOrders and set the properties for each control as follows.
Label1
Property Name Property Value Text Ordered: Font Bold:True Label2
Property Name Property Value Text Required: Font Bold:True Label3
Property Name Property Value Text Shipped: Font Bold:True Select the Detail section and in the Properties window, set the CanShrink property to True.
From the toolbox, drag the Subreport control onto the Detail section and in the Properties window, set the properties as follows.
Property Name Property Value ReportName full project path\rptSub.rpx Name SubReport1
Create a Layout for the SubReport
Right-click the design surface of rptSub and select Insert then Group Header/Footer to add group header and footer sections to the report.
In the Properties window, make the following changes to the group header.
Property Name Property Value Name ghOrderDetails BackColor LightSteelBlue CanShrink True DataField OrderID From the toolbox, drag four label controls to ghOrderDetails and set the properties for each label as follows.
Label1
Property Name Property Value Text Product Name Font Bold:True Alignment Left Label2
Property Name Property Value Text Quantity Font Bold:True Alignment Right Label3
Property Name Property Value Text Unit Price Font Bold:True Alignment Right Label4
Property Name Property Value Text Discount Font Bold:True Alignment Right Click the Detail section and in the Properties window, set the following properties.
Property Name Property Value BackColor Gainsboro CanShrink True From the toolbox, drag four TextBox controls onto the Detail section and set the properties as follows.
TextBox1
Property Name Property Value DataField ProductName Alignment Left TextBox2
Property Name Property Value DataField Quantity Alignment Right TextBox3
Property Name Property Value DataField Products.UnitPrice Alignment Right OutputFormat Currency TextBox4
Property Name Property Value DataField Discount Alignment Right OutputFormat Percentage
Embed script in the main report (rptMain)
- Change the ScriptLanguage property for the report to the appropriate scripting language. The default setting is C#.
- Click the Script tab located below the report designer to access the scripting editor.
- Embed script to set the data source for the main report and pass data into the subreport.
Dim rptSub As GrapeCity.ActiveReports.SectionReport
Sub ActiveReport_ReportStart
  'Create a new instance of the generic report
  rptSub = new GrapeCity.ActiveReports.SectionReport()
  'Load the rpx file into the generic report
  rptSub.LoadLayout(me.SubReport1.ReportName)
  'Connect data to the main report
  Dim connString As String = "Provider=Microsoft.Jet.OLEDB.4.0;Data Source=[User Folder]\Samples19\Data\NWIND.mdb;Persist Security Info=False"
  Dim sqlString As String = "Select * from orders inner join customers on orders.customerid = customers.customerid order by CompanyName,OrderDate"
  Dim ds As new GrapeCity.ActiveReports.Data.OleDBDataSource()
  ds.ConnectionString = connString
  ds.SQL = sqlString
  rpt.DataSource = ds
End Sub
Sub Detail_Format
  Dim rptSubCtl As GrapeCity.ActiveReports.SubReport = me.SubReport1
  Dim childDataSource As New GrapeCity.ActiveReports.Data.OleDBDataSource()
  childDataSource.ConnectionString = CType(rpt.DataSource, GrapeCity.ActiveReports.Data.OleDBDataSource).ConnectionString
  'Set a parameter in the SQL query
  childDataSource.SQL = "Select * from [order details] inner join products on [order details].productid = products.productid where [order details].orderid = <%OrderID%>"
  'Pass the data to the subreport
  rptSub.DataSource = childDataSource
  'Display rptSub in the subreport control
  rptSubCtl.Report = rptSub
End Sub
GrapeCity.ActiveReports.SectionReport rptSub;
public void Detail_Format()
{
  GrapeCity.ActiveReports.SectionReportModel.SubReport rptSubCtl = this.SubReport1;
  GrapeCity.ActiveReports.Data.OleDBDataSource childDataSource = new GrapeCity.ActiveReports.Data.OleDBDataSource();
  childDataSource.ConnectionString = ((GrapeCity.ActiveReports.Data.OleDBDataSource) rpt.DataSource).ConnectionString;
  //Set a parameter in the SQL query
  childDataSource.SQL = "Select * from [order details] inner join products on [order details].productid = products.productid where [order details].orderid = <%OrderID%>";
  //Pass the data to the subreport
  rptSub.DataSource = childDataSource;
  //Display rptSub in the subreport control
  rptSubCtl.Report = rptSub;
}
public void ActiveReport_ReportStart()
{
  //Create a new instance of the generic report
  rptSub = new GrapeCity.ActiveReports.SectionReport();
  //Load the rpx file into the generic report
  rptSub.LoadLayout(this.SubReport1.ReportName);
  //Connect data to the main report
  string connString = @"Provider=Microsoft.Jet.OLEDB.4.0;Data Source=[User Folder]\Samples19\Data\NWIND.mdb;Persist Security Info=False";
  string sqlString = "Select * from orders inner join customers on orders.customerid = customers.customerid order by CompanyName,OrderDate";
  GrapeCity.ActiveReports.Data.OleDBDataSource ds = new GrapeCity.ActiveReports.Data.OleDBDataSource();
  ds.ConnectionString = connString;
  ds.SQL = sqlString;
  rpt.DataSource = ds;
}
Preview report
Click the preview tab to view the report at design time.
OR
Open the report in the Viewer. See Save Section Reports for further information on how to load the xml-based Section Report onto the viewer.