Validation Error Indicators
You can use different highlighting styles to identify erroneous information in a cell. Spread for WPF allows you to customize the UI of validation error indicators, which appear when users enter invalid data. In this case, you can use the built-in validation error indicator or design your own style based on your needs. You may also change the appearance of error indications, such as the background color, foreground color, border color, and so on, to personalize the style of the built-in validation error indicator.
Using Built-In Validation Error Indicators
To apply the built-in validation error indicators, set a data template in the DataValidationTemplate property of the GcSpreadSheet class. The data type used for the data template is DataValidationContext. After setting this, use the ValidationErrorIndicator class to apply the built-in styles.
!type=note
Note: If a data template is assigned to DataValidationTemplate, it can also be used to show error exceptions when entering invalid values for the data source with which the spreadsheet is associated.
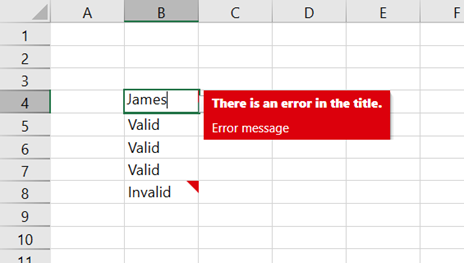
The following image displays a validation error with a built-in style applied where a red triangle appears in the top right corner of a cell when contains an incorrect value by default.

Refer to the following example code to use the built-in validation error.
XAML
<Grid>
      <gss:GcSpreadSheet Margin="5" Grid.Row="0" x:Name="spreadSheet1" HorizontalAlignment="Stretch" VerticalAlignment="Stretch"  >
          <gss:GcSpreadSheet.DataValidationTemplate>
              <DataTemplate DataType="{x:Type gss:DataValidationContext}" >
                  <gss:ValidationErrorIndicator />
              </DataTemplate>
          </gss:GcSpreadSheet.DataValidationTemplate>
      </gss:GcSpreadSheet>
</Grid>
C#
IValidation val = spreadSheet1.Workbook.ActiveSheet.Cells["B4:B8"].Validation.Add(DataValidationType.List, DataValidationErrorStyle.Stop, DataValidationOperator.Equal, "Valid", "");
val.ShowError = true;
val.ShowInput = true;
val.ErrorMessage = "Error message";
val.ErrorTitle = "There is an error in the title.";
val.InputMessage = "The message you entered.";
val.InputTitle = "The title you entered.";
// Sample data.
spreadSheet1.Workbook.ActiveSheet.Cells["B4"].Value = "Invalid";
spreadSheet1.Workbook.ActiveSheet.Cells[3, 1].Activate();
spreadSheet1.Workbook.ActiveSheet.Cells["B5:B7"].Value = "Valid";
spreadSheet1.Workbook.ActiveSheet.Cells["B8"].Value = "Invalid";
spreadSheet1.Workbook.ActiveSheet.CircleInvalid();
VB
Dim val As IValidation = spreadSheet1.Workbook.ActiveSheet.Cells("B4:B8").Validation.Add(DataValidationType.List, DataValidationErrorStyle.[Stop], DataValidationOperator.Equal, "Valid", "")
val.ShowError = True
val.ShowInput = True
val.ErrorMessage = "Error message"
val.ErrorTitle = "There is an error in the title."
val.InputMessage = "The message you entered."
val.InputTitle = "The title you entered."
' Sample data.
spreadSheet1.Workbook.ActiveSheet.Cells("B4").Value = "Invalid"
spreadSheet1.Workbook.ActiveSheet.Cells(3, 1).Activate()
spreadSheet1.Workbook.ActiveSheet.Cells("B5:B7").Value = "Valid"
spreadSheet1.Workbook.ActiveSheet.Cells("B8").Value = "Invalid"
spreadSheet1.Workbook.ActiveSheet.CircleInvalid()
Customizing Style of Validation Error Indicator
The built-in validation error indicator can also be customized to include formatting for changing the background color, forecolor, border colors, etc. To change the style of the error messages, customize the attributes of the ValidationErrorIndicator class in your data template.
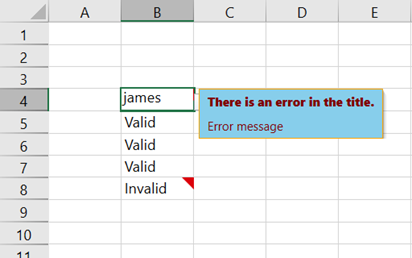
The image below displays the validation error with a built-in style where the background color, foreground color, border color have been changed.

Below is an example that demonstrates how to customize validation error indicators in DataValidationTemplate to display error messages for invalid entries in a worksheet bound to a data source.
XAML
<Grid>
     <gss:GcSpreadSheet x:Name="spreadSheet1">
         <gss:GcSpreadSheet.DataValidationTemplate>
             <DataTemplate DataType="{x:Type gss:DataValidationContext}" >
                 <gss:ValidationErrorIndicator Background="SkyBlue" Foreground="Maroon" BorderBrush="Orange" BorderThickness="1"/>
             </DataTemplate>
         </gss:GcSpreadSheet.DataValidationTemplate>
     </gss:GcSpreadSheet>
</Grid>
C#
IValidation val = spreadSheet1.Workbook.ActiveSheet.Cells["B4:B8"].Validation.Add(DataValidationType.List, DataValidationErrorStyle.Stop, DataValidationOperator.Equal, "Valid", "");
val.ShowError = true;
val.ShowInput = true;
val.ErrorMessage = "Error message";
val.ErrorTitle = "There is an error in the title.";
val.InputMessage = "The message you entered.";
val.InputTitle = "The title you entered.";
// Sample data.
spreadSheet1.Workbook.ActiveSheet.Cells["B4"].Value = "Invalid";
spreadSheet1.Workbook.ActiveSheet.Cells[3, 1].Activate();
spreadSheet1.Workbook.ActiveSheet.Cells["B5:B7"].Value = "Valid";
spreadSheet1.Workbook.ActiveSheet.Cells["B8"].Value = "Invalid";
spreadSheet1.Workbook.ActiveSheet.CircleInvalid();
VB
Dim val As IValidation = spreadSheet1.Workbook.ActiveSheet.Cells("B4:B8").Validation.Add(DataValidationType.List, DataValidationErrorStyle.[Stop], DataValidationOperator.Equal, "Valid", "")
val.ShowError = True
val.ShowInput = True
val.ErrorMessage = "Error message"
val.ErrorTitle = "There is an error in the title."
val.InputMessage = "The message you entered."
val.InputTitle = "The title you entered."
' Sample data.
spreadSheet1.Workbook.ActiveSheet.Cells("B4").Value = "Invalid"
spreadSheet1.Workbook.ActiveSheet.Cells(3, 1).Activate()
spreadSheet1.Workbook.ActiveSheet.Cells("B5:B7").Value = "Valid"
spreadSheet1.Workbook.ActiveSheet.Cells("B8").Value = "Invalid"
spreadSheet1.Workbook.ActiveSheet.CircleInvalid()
Creating Custom Validation Error Indicator
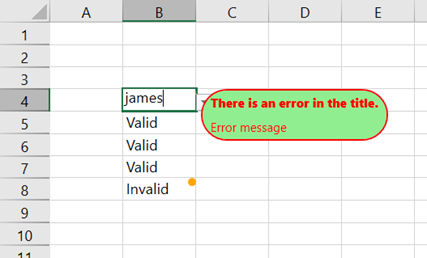
If you want complete control over the appearance of the validation error indicator, you can create a custom one. This includes creating your own error messages and even creating your own control to use it as an error indicator.

Refer to the following example code to create a custom control for data validation error messages.
XAML
<Grid>
      <gss:GcSpreadSheet x:Name="spreadSheet1" HorizontalAlignment="Stretch" VerticalAlignment="Stretch" >
          <gss:GcSpreadSheet.Resources>
              <ControlTemplate x:Key="ValidationToolTipTemplate" TargetType="ToolTip">
                  <Grid x:Name="Root" Margin="5,0" Opacity="0" RenderTransformOrigin="0,0">
                      <Grid.RenderTransform>
                          <TranslateTransform x:Name="xform" X="-25"/>
                      </Grid.RenderTransform>
                      <VisualStateManager.VisualStateGroups>
                          <VisualStateGroup x:Name="OpenStates">
                              <VisualStateGroup.Transitions>
                                  <VisualTransition GeneratedDuration="0"/>
                                  <VisualTransition GeneratedDuration="0:0:0.2" To="Open">
                                      <Storyboard>
                                          <DoubleAnimation Duration="0:0:0.2" To="0" Storyboard.TargetProperty="X" Storyboard.TargetName="xform">
                                              <DoubleAnimation.EasingFunction>
                                                  <BackEase Amplitude=".3" EasingMode="EaseOut"/>
                                              </DoubleAnimation.EasingFunction>
                                          </DoubleAnimation>
                                          <DoubleAnimation Duration="0:0:0.2" To="1" Storyboard.TargetProperty="Opacity" Storyboard.TargetName="Root"/>
                                      </Storyboard>
                                  </VisualTransition>
                              </VisualStateGroup.Transitions>
                              <VisualState x:Name="Closed">
                                  <Storyboard>
                                      <DoubleAnimation Duration="0" To="0" Storyboard.TargetProperty="Opacity" Storyboard.TargetName="Root"/>
                                  </Storyboard>
                              </VisualState>
                              <VisualState x:Name="Open">
                                  <Storyboard>
                                      <DoubleAnimation Duration="0" To="0" Storyboard.TargetProperty="X" Storyboard.TargetName="xform"/>
                                      <DoubleAnimation Duration="0" To="1" Storyboard.TargetProperty="Opacity" Storyboard.TargetName="Root"/>
                                  </Storyboard>
                              </VisualState>
                          </VisualStateGroup>
                      </VisualStateManager.VisualStateGroups>
                      <Border CornerRadius="25" BorderBrush="{TemplateBinding BorderBrush}" BorderThickness="{TemplateBinding BorderThickness}" Background="{TemplateBinding Background}" >
                          <ContentPresenter/>
                      </Border>
                  </Grid>
              </ControlTemplate>
              <Style TargetType="local:MyCustomValidationIndicatorControl">
                  <Style.Triggers>
                      <Trigger Property="IsEditError" Value="False">
                          <Setter Property="Background" Value="#FFFFE1" />
                          <Setter Property="BorderBrush" Value="#5D5D5D"/>
                          <Setter Property="BorderThickness" Value="1"/>
                          <Setter Property="Foreground" Value="#5D5D5D"/>
                      </Trigger>
                      <Trigger Property="IsEditError" Value="True">
                          <Setter Property="Background" Value="LightGreen" />
                          <Setter Property="BorderBrush" Value="Red"/>
                          <Setter Property="BorderThickness" Value="2"/>
                          <Setter Property="Foreground" Value="Red"/>
                      </Trigger>
                  </Style.Triggers>
                  <Setter Property="Template">
                      <Setter.Value>
                          <ControlTemplate TargetType="local:MyCustomValidationIndicatorControl">
                              <Grid x:Name="Root" >
                                  <Border x:Name="validationErrorElementBorder" CornerRadius="1" IsHitTestVisible="False">
                                      <ToolTipService.ToolTip>
                                          <ToolTip x:Name="ValidationTooltip"
                             Margin="-2,0,0,0"
                             Placement="Right"
                             PlacementTarget="{Binding RelativeSource={RelativeSource TemplatedParent}}"
                             IsOpen="{TemplateBinding IsActived}"
                             BorderBrush="{TemplateBinding BorderBrush}"
                             BorderThickness="{TemplateBinding BorderThickness}"
                             Background="{TemplateBinding Background}"
                             Template="{StaticResource ValidationToolTipTemplate}">
                                              <StackPanel>
                                                  <StackPanel.Resources>
                                                      <Style TargetType="TextBlock">
                                                          <Style.Triggers>
                                                              <Trigger Property="Text" Value="">
                                                                  <Setter Property="Visibility" Value="Collapsed" />
                                                              </Trigger>
                                                          </Style.Triggers>
                                                      </Style>
                                                  </StackPanel.Resources>
                                                  <TextBlock   MaxWidth="250" Margin="8,4,8,4" TextWrapping="Wrap"
                                   Text="{TemplateBinding Title}"  FontWeight="ExtraBold"  UseLayoutRounding="false" IsEnabled="False" Foreground="{TemplateBinding Foreground}"/>
                                                  <TextBlock  MaxWidth="250" Margin="8,4,8,4" TextWrapping="Wrap"
                                  Text="{TemplateBinding Message}" UseLayoutRounding="false" IsEnabled="False" Foreground="{TemplateBinding Foreground}"/>
                                              </StackPanel>
                                          </ToolTip>
                                      </ToolTipService.ToolTip>
                                      <Rectangle HorizontalAlignment="Right" VerticalAlignment="Top" Height="8" Width="8">
                                          <Rectangle.Style>
                                              <Style TargetType="Rectangle">
                                                  <Style.Triggers>
                                                      <DataTrigger Binding="{Binding  IsInvalid}" Value="True">
                                                          <Setter Property="Fill" Value="Orange" />
                                                      </DataTrigger>
                                                      <DataTrigger Binding="{Binding  IsInvalid}" Value="False">
                                                          <Setter Property="Visibility" Value="Hidden" />
                                                      </DataTrigger>
                                                  </Style.Triggers>
                                              </Style>
                                          </Rectangle.Style>
                                          <Rectangle.Clip>
                                             <EllipseGeometry Center="4,4" RadiusX="4" RadiusY="4" />
                                          </Rectangle.Clip>
                                      </Rectangle>
                                  </Border>
                              </Grid>
                          </ControlTemplate>
                      </Setter.Value>
                  </Setter>
              </Style>
          </gss:GcSpreadSheet.Resources>
          <gss:GcSpreadSheet.DataValidationTemplate>
              <DataTemplate DataType="{x:Type gss:DataValidationContext}" >
                  <local:MyCustomValidationIndicatorControl/>
              </DataTemplate>
          </gss:GcSpreadSheet.DataValidationTemplate>
      </gss:GcSpreadSheet>
</Grid>
C#
IValidation val = spreadSheet1.Workbook.ActiveSheet.Cells["B4:B8"].Validation.Add(DataValidationType.List, DataValidationErrorStyle.Stop, DataValidationOperator.Equal, "Valid", "");
val.ShowError = true;
val.ShowInput = true;
val.ErrorMessage = "Error message";
val.ErrorTitle = "There is an error in the title.";
val.InputMessage = "The message you entered.";
val.InputTitle = "The title you entered.";
// Sample data.
spreadSheet1.Workbook.ActiveSheet.Cells["B4"].Value = "Invalid";
spreadSheet1.Workbook.ActiveSheet.Cells[3, 1].Activate();
spreadSheet1.Workbook.ActiveSheet.Cells["B5:B7"].Value = "Valid";
spreadSheet1.Workbook.ActiveSheet.Cells["B8"].Value = "Invalid";
spreadSheet1.Workbook.ActiveSheet.CircleInvalid();
VB
Dim val As IValidation = spreadSheet1.Workbook.ActiveSheet.Cells("B4:B8").Validation.Add(DataValidationType.List, DataValidationErrorStyle.[Stop], DataValidationOperator.Equal, "Valid", "")
val.ShowError = True
val.ShowInput = True
val.ErrorMessage = "Error message"
val.ErrorTitle = "There is an error in the title."
val.InputMessage = "The message you entered."
val.InputTitle = "The title you entered."
' Sample data.
spreadSheet1.Workbook.ActiveSheet.Cells("B4").Value = "Invalid"
spreadSheet1.Workbook.ActiveSheet.Cells(3, 1).Activate()
spreadSheet1.Workbook.ActiveSheet.Cells("B5:B7").Value = "Valid"
spreadSheet1.Workbook.ActiveSheet.Cells("B8").Value = "Invalid"
spreadSheet1.Workbook.ActiveSheet.CircleInvalid()

