Spread WPF 18
Features / Row
In This Topic
    Row
    In This Topic

    A row is a group of cells located horizontally in the workbook. They appear from left to right in the worksheet and identified through numbers, such as 1, 2, 3, and so on. By default, a worksheet has 1,048,576 rows.

    The following sections explain various operations on rows that you can perform in Spread for WPF.

    Insert Rows

    You can insert single or multiple rows at the specified position in a worksheet. Use the InsertRows method of the IWorksheet interface to insert rows.

    Refer to the following example code to insert three rows above the second row.

    Copy Code
    // Insert rows.
    spreadSheet1.Workbook.ActiveSheet.InsertRows(1, 3);
    
    Copy Code
    ' Insert rows.
    spreadSheet1.Workbook.ActiveSheet.InsertRows(1, 3)
    

    Hide/Show Rows

    You can hide rows in a worksheet by using the Hidden property of the IRange interface. If the property value is set to true, it hides the row. To show the row again, change the property value to false.

    Refer to the following example code to hide rows.

    Copy Code
    // Hide row.
    spreadSheet1.Workbook.ActiveSheet.Rows[1].Hidden = true;
    
    Copy Code
    ' Hide row.
    spreadSheet1.Workbook.ActiveSheet.Rows(1).Hidden = True
    

    Delete Rows

    You can delete rows from a worksheet using the RemoveRows method of the IWorksheet interface.

    Refer to the following example code to remove three rows starting with row 3.

    Copy Code
    // Remove rows.
    spreadSheet1.Workbook.ActiveSheet.RemoveRows(3, 3);
    
    Copy Code
    ' Remove rows.
    spreadSheet1.Workbook.ActiveSheet.RemoveRows(3, 3)
    

    Clear Rows

    You can remove all the data and formulas from the specified rows. To clear content, use the IWorksheet's Rows property to reference the row collection and then set the IRange's Clear method.

    Refer to the following example code that clears the content of the rows.

    Copy Code
    // Clear the content of all rows.
    spreadSheet1.Workbook.ActiveSheet.Rows.Clear();
    // Clear the content of row 2.
    spreadSheet1.Workbook.ActiveSheet.Rows[1].Clear();
    
    Copy Code
    ' Clear the content of all rows.
    spreadSheet1.Workbook.ActiveSheet.Rows.Clear()
    ' Clear the content of row 2.
    spreadSheet1.Workbook.ActiveSheet.Rows(1).Clear()
    

    Drag and Move Rows

    You can enable users to move rows by dragging when the value of the DragDropMode enumeration is set to Row. To move a row, click on the row header that you want to move and then drag and drop the header to the desired position.

    Copy Code
    // Move rows.
    spreadSheet1.DragDropMode = DragDropMode.Row;
    
    Copy Code
    ' Move rows.
    spreadSheet1.DragDropMode = DragDropMode.Row
    

    Set Row Count

    You can limit the number of rows that you want to display in a worksheet using the RowCount property of the IWorksheet interface.

    Note: If the control is bound to a data source, the number of rows is automatically determined by the number of records in the data source. In this case, the RowCount property has no effect.

    Refer to the following example code to set the number of rows to 10.

    Copy Code
    // Set row count.
    spreadSheet1.Workbook.ActiveSheet.RowCount = 10;
    
    Copy Code
    ' Set row count.
    spreadSheet1.Workbook.ActiveSheet.RowCount = 10
    

    Set Row Height

    By default, all rows in a worksheet are the same size. To set the desired height of a specific row, use the RowHeight property of the IRange interface. A row height is defined in pixels.
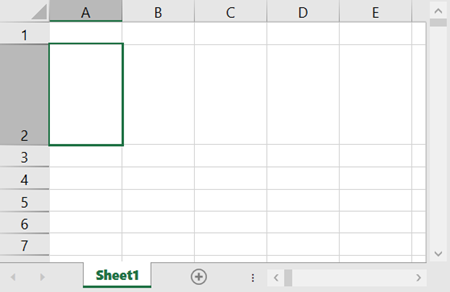
    Refer to the following example code to set the height of the row 2 to 100 pixels.

    Copy Code
    // Set row height.
    spreadSheet1.Workbook.ActiveSheet.Rows[1].RowHeight = 100;
    
    Copy Code
    ' Set row height.
    spreadSheet1.Workbook.ActiveSheet.Rows[1].RowHeight = 100;
    

    Change Row Height

    You can expand or reduce the height of the rows in the worksheet. When a user moves the mouse cursor over the row header border, the mouse pointer changes to a resizing shape; dragging the bottom border of the row header to the desired height changes the row size. Similarly, if you want to resize multiple rows, select them and then drag the bottom border of the selected row headers.

    By default, resizing row heights is enabled. However, you can prevent resizing by setting the Resizable property of the IRange interface to false.

    Refer to the following example code that disables users to resize the rows.

    Copy Code
    // Disable resizing for second row.
    spreadSheet1.Workbook.ActiveSheet.Rows[1].Resizable = false;
    // Disable resizing for all rows.
    spreadSheet1.Workbook.ActiveSheet.Rows.Resizable = false;
    
    Copy Code
    ' Disable resizing for second row.
    spreadSheet1.Workbook.ActiveSheet.Rows(1).Resizable = False
    ' Disable resizing for all rows.
    spreadSheet1.Workbook.ActiveSheet.Rows.Resizable = False
    

    AutoFit Row Height

    By default, automatic row height adjustment is enabled. When you move the mouse over the border of a row header, the mouse pointer changes to a resizing shape. Double-clicking on the row edge resizes the row to fit the long content of that row to the preferred height. To autofit multiple rows, select them, and double-click on the border between any two row headers in the selection.

    Note: The AutoFit feature cannot be applied to merged cells.

    You can also specify the automatic fit behavior using the AutoFit method for the rows.

    The following example code autofits data in the rows.

    Copy Code
    // Autofit only the second row.
    spreadSheet1.Workbook.ActiveSheet.Rows[1].AutoFit();
    // Autofit all rows.
    spreadSheet1.Workbook.ActiveSheet.Rows.AutoFit();
    
    Copy Code
    ' Autofit only the second row.
    spreadSheet1.Workbook.ActiveSheet.Rows(1).AutoFit()
    ' Autofit all rows.
    spreadSheet1.Workbook.ActiveSheet.Rows.AutoFit()
    

    Auto-Merge Rows

    You can automatically merge adjacent cells in the same row when their values are equal. To enable this feature, set the MergePolicy enumeration for a specific row, which has the following values.

    Value Description
    None Do not merge automatically.
    Always Merge adjacent cells whenever their values are equal.
    Restricted  Adjacent cells are merged if their values are equal and the corresponding range in the previous row are merged.

    The following code sample sets auto-merging for rows 1 and 2 as shown in the above image.

    Copy Code
    // Auto-merge rows.
    spreadSheet1.Workbook.ActiveSheet.Rows[0].MergePolicy = MergePolicy.Always;
    spreadSheet1.Workbook.ActiveSheet.Rows[1].MergePolicy = MergePolicy.Restricted;
    
    Copy Code
    ' Auto-merge rows.
    spreadSheet1.Workbook.ActiveSheet.Rows(0).MergePolicy = MergePolicy.Always
    spreadSheet1.Workbook.ActiveSheet.Rows(1).MergePolicy = MergePolicy.Restricted
    

    Set Alternate Row Color

    In a spreadsheet control, you can set alternate row colors to the rows of your worksheet by using the AlternatingRows property of the IWorksheetStyles interface. Setting the alternate row colors can improve the readability of your worksheet.

    To use this functionality, ensure that the Enabled property of the IAlternatingStyles interface is set to true, which allows the alternate row colors to be applied. You can choose a color from the color list by setting the ThemeColor property of the IInterior interface. This property accepts values from the ThemeColors enumeration.
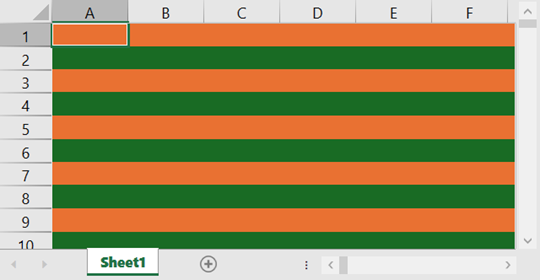
    The following example code sets different colors to the alternate rows(check col page) as shown in the above image.

    Copy Code
    // Apply the alternate row color.
    spreadSheet1.Workbook.ActiveSheet.Styles.AlternatingRows.Enabled = true;
    spreadSheet1.Workbook.ActiveSheet.Styles.AlternatingRows.Count = 2;
    spreadSheet1.Workbook.ActiveSheet.Styles.AlternatingRows[0].Interior.ThemeColor = GrapeCity.Core.ThemeColors.Accent2;
    spreadSheet1.Workbook.ActiveSheet.Styles.AlternatingRows[1].Interior.ThemeColor = GrapeCity.Core.ThemeColors.Accent3;
    
    Copy Code
    ' Apply the alternate row color.
    spreadSheet1.Workbook.ActiveSheet.Styles.AlternatingRows.Enabled = True
    spreadSheet1.Workbook.ActiveSheet.Styles.AlternatingRows.Count = 2
    spreadSheet1.Workbook.ActiveSheet.Styles.AlternatingRows(0).Interior.ThemeColor = GrapeCity.Core.ThemeColors.Accent2
    spreadSheet1.Workbook.ActiveSheet.Styles.AlternatingRows(1).Interior.ThemeColor = GrapeCity.Core.ThemeColors.Accent3