
Work with SuperLabel
The following topics cover how to work with SuperLabels:
.NET Framework
The following topics explain how to create C1SuperLabels at design time using the C1SuperLabel Editor and programmatically in code, as well as how to add images labels.
You can create SuperLabels both at design time as well as via code.
Creating C1SuperLabels at Design Time
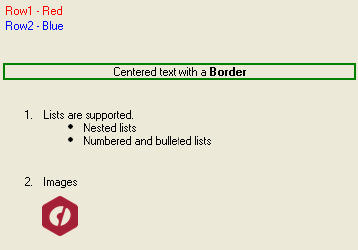
SuperTooltip for WinForms provides a design-time editor, the C1SuperLabel Editor, to simplify the process of creating labels in your applications. This topic will show you how to create labels and change their appearance and behavior using this editor. The C1SuperLabel component is very similar to the Label control, except it can display HTML content instead of just plain text. You can display an HTML page including tables, images, lists or pre-formatted text, for example, right within the label.
To add C1SuperLabel to your application:
Double-click the C1SuperLabel component in the Toolbox to add it to your form.
Click the ellipsis button next to the Text property. The C1SuperLabel Editor appears.
Enter your HTML code.
Run the application and the rendered HTML appears within the C1SuperLabel.
Creating a C1SuperLabel Programmatically
You can specify the C1SuperLabel text and associate it with a control using the Text property. All you need to do is add the text as a string. You can add plain text or HTML code.
To create a C1SuperLabel programmatically:
Add a C1SuperLabel to your form.
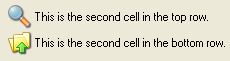
Add the following code to the Form_Load event. It adds a table containing two rows with two graphics and some text in the label:
To write code in Visual Basic
'add two rows to the C1SuperLabel
                                              C1SuperLabel1.Text = _
                                                "<table>" + _
                                                 "<tr>" + _
                                                  "<td><img src='search.png'>" + _
                                                  "<td>This is the second cell in the top row" + _
                                                 "<tr>" + _
                                                  "<td><img src='up.png'>" + _
                                                  "<td>This is the second cell in the bottom row." + _
                                                "</table>"
                                        ' automatically resize the label to show all contents
                                        C1SuperLabel1.AutoSize = True
To write code in C#
// add two rows to the C1SuperLabel
                                              c1SuperLabel1.Text =
                                                "<table>" +
                                                 "<tr>" +
                                                  "<td><img src='search.png'>" +
                                                  "<td>This is the second cell in the top row" +
                                                 "<tr>" +
                                                  "<td><img src='up.png'>" +
                                                  "<td>This is the second cell in the bottom row." +
                                                "</table>";
                                        // automatically resize the label to show all contents
                                        c1SuperLabel1.AutoSize = true;
Run your project. The code creates a C1SuperLabel like the following:
Note: In this example embedded resources containing images are used: search.png and up.png. To embed a resource, select Project | YourProjectName Properties. Select Add Resource and choose to add an existing file or add a new one. Then, in the Solution Explorer, select the resource file and set Build Action to Embedded Resource in the Properties window.
For more information, see the Text property.
Adding Images
SuperTooltip for WinForms supports adding images, including animated images, at design time. First, add the image to the C1SuperTooltip Image collection, and then specify the image in the C1SuperTooltip Editor.
Add a C1SuperLabel control to your form.
Select the C1SuperLabel control and click the ellipsis button next to the Images property in the Properties window. The Edit Image Collection editor appears.
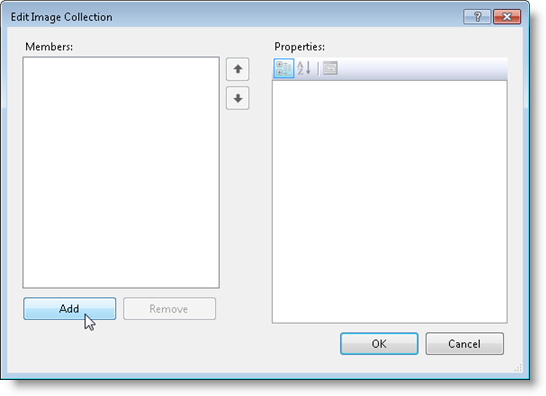
Click the Add button and browse to find the image you want to use.
Select the image and click Open. The image is added to the ToolTip's image collection.
Click OK to close the Edit Image Collection editor.
Click the ellipsis button next to the Text property.
When you enter your HTML code, the image you added to the label's image collection can be referenced in the code like this:
<img src= "res://mybitmap.png" />.NET
To create a simple WinForms application in .NET to work with SuperLabel, complete the following steps:
1. Declare C1SuperLabel object.
C1SuperLabel superLabel;2. Add images and text using the Image and Text property.
private void Form1_Load(object sender, EventArgs e)
{
    FormBorderStyle = FormBorderStyle.FixedSingle;
    // Creating superlabel programmatically
    superLabel = new C1SuperLabel();
    // Adding images
    superLabel.Images.Add(new ImageEntry("SearchIcon", SuperLabelResource.SearchIcon));
    superLabel.Images.Add(new ImageEntry("UploadIcon", SuperLabelResource.UploadIcon));
    superLabel.Text = "<table>" +
                     "<tr>" +
                      "<td>< img src = 'res://icons8-search-24.png' >" +
                      "<td>This is the second cell in the top row" +
                     "<tr>" +
                      "<td><img src='res://icons8-upload-mail-50.png' height='20' width='20'>" +
                      "<td>This is the second cell in the bottom row." +
                    "</table>";
    superLabel.AutoSize = true;
    this.Controls.Add(superLabel);
}
3. Run the code and observe the Super labels.