The C1SuperTooltip control consists of several elements that can be modified through the Office tab of the C1SuperTooltip Editor. For more information about the C1SuperTooltip Editor and these elements, please see the Office tab topic.
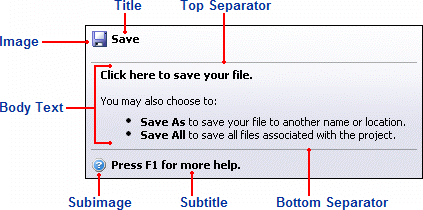
This is the text that appears at the top of the ToolTip; you can add HTML code to customize the appearance of the title text.
This is the image that appears to the left of the Title. You can add an image through the C1SuperTooltip Editor or you can add an image to the collection by using the Edit Image Collection Editor.
The top separator is a horizontal rule that appears between the ToolTip's title and the body text. You can add a top separator through the Office tab of the C1SuperTooltip Editor or you can add a horizontal rule to the HTML code by using the <hr> tag.
The body text is the main content of the ToolTip; you can add HTML to customize the appearance of the body text.
The bottom separator is a horizontal rule that appears between the ToolTip's body text and subtitle. You can add a bottom separator through the Office tab of the C1SuperTooltip Editor or you can add a horizontal rule to the HTML code by using the <hr> tag.
This is text that appears below the ToolTip's body text; you can add HTML code to customize the appearance of the subtitle text.
This is the image that appears to the left of the subimage. You can add an image through the C1SuperTooltip Editor or you can add an image to the collection by using the Edit Image Collection Editor.
For more information about creating a ToolTip using the Office tab, see the Creating C1SuperTooltips at Design Time topic.