Tables provide one of the most useful features in documents. They can used both for tabular presentation of data, and for layout of other elements of a document. C1PrintDocument provides full-featured tables. In this section you will learn how to start using tables. We will use the "Hello, World!" sample application created in the C1PrintDocument Quick Start topic as our base, and add a table to it.
To write code in Visual Basic
| Visual Basic |
Copy Code
|
|---|---|
Dim rt As New RenderTable()
Me.C1PrintDocument1.Body.Children.Add(rt)

Dim row As Integer = 0
Do While (row < 10)
    Dim col As Integer = 0
    Do While (col < 6)
        rt.Cells.Item(row, col).Text = String.Format("Cell ({0},{1})", row, col)
        col += 1
    Loop
    row += 1
Loop
|
|
To write code in C#
| C# |
Copy Code
|
|---|---|
RenderTable rt = new RenderTable();
this.c1PrintDocument1.Body.Children.Add(rt);

for (int row = 0; row < 10; ++ row)
{
    for (int col = 0; col < 6; ++ col)
    {
        rt.Cells[row, col].Text = string.Format("Cell ({0},{1})", row, col);
    }
}
|
|
To write code in Visual Basic
| Visual Basic |
Copy Code
|
|---|---|
Me.C1PrintDocument1.Generate() |
|
To write code in C#
| C# |
Copy Code
|
|---|---|
this.c1PrintDocument1.Generate(); |
|
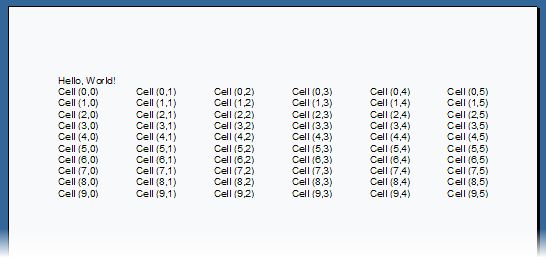
The preview will show the document similar to the one in the following picture:

This simple example shows several important aspects of using tables in C1PrintDocument:
To write code in Visual Basic
| Visual Basic |
Copy Code
|
|---|---|
rt.Cells(10, 7).Text = "text at row 10, column 7" |
|
To write code in C#
| C# |
Copy Code
|
|---|---|
rt.Cells[10, 7].Text = "text at row 10, column 7"; |
|
To write code in Visual Basic
| Visual Basic |
Copy Code
|
|---|---|
rt.Style.GridLines.All = LineDef.Default |
|
To write code in C#
| C# |
Copy Code
|
|---|---|
rt.Style.GridLines.All = LineDef.Default; |
|
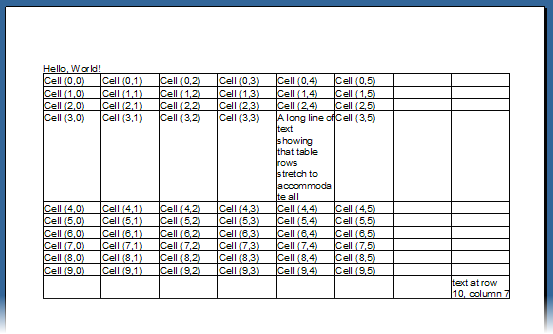
By default, a table is as wide as its parent's client area (in this case, the whole page), with equally-sized columns. Rows' heights are automatic, though. So, if you add a line setting the text of an arbitrary cell in a table to a long text, you will see that the row containing that cell will grow vertically to accommodate all text. For example, adding this code to our example will produce a table looking like this (this table includes both changes described above):
To write code in Visual Basic
| Visual Basic |
Copy Code
|
|---|---|
rt.Cells(3, 4).Text = "A long line of text showing that table rows stretch " + "to accommodate all content." |
|
To write code in C#
| C# |
Copy Code
|
|---|---|
rt.Cells[3, 4].Text = "A long line of text showing that table rows stretch " + "to accommodate all content."; |
|

For your reference, here is the complete text of the form load event handler that produced the above document:
To write code in Visual Basic
| Visual Basic |
Copy Code
|
|---|---|
Private Sub Form1_Load(ByVal sender As System.Object, ByVal e As System.EventArgs) Handles MyBase.Load
    Me.C1PrintDocument1.Body.Children.Add(New RenderText("Hello, World!"))
    Dim rt As New RenderTable()
    Me.C1PrintDocument1.Body.Children.Add(rt)

Dim row As Integer = 0
Do While (row < 10)
    Dim col As Integer = 0
    Do While (col < 6)
        rt.Cells.Item(row, col).Text = String.Format("Cell ({0},{1})", row, col)
        col += 1
    Loop
    row += 1
Loop
    rt.Cells(3, 4).Text = "A long line of text showing that table rows " + "stretch to accommodate all content."
    rt.Cells(10, 7).Text = "text at row 10, column 7"
    rt.Style.GridLines.All = LineDef.Default
    Me.C1PrintDocument1.Generate()
End Sub
|
|
To write code in C#
| C# |
Copy Code
|
|---|---|
private void Form1_Load(object sender, EventArgs e)
{
    this.c1PrintDocument1.Body.Children.Add(new RenderText("Hello, World!"));
    RenderTable rt = new RenderTable();
    this.c1PrintDocument1.Body.Children.Add(rt);
    for (int row = 0; row < 10; ++row)
    {
        for (int col = 0; col < 6; ++col)
        {
            rt.Cells[row, col].Text = string.Format("Cell ({0},{1})", row, col);
        }
    }
    rt.Cells[3, 4].Text = "A long line of text showing that table rows " + "stretch to accommodate all content.";
    rt.Cells[10, 7].Text = "text at row 10, column 7";
    rt.Style.GridLines.All = LineDef.Default;
    this.c1PrintDocument1.Generate();
}
|
|