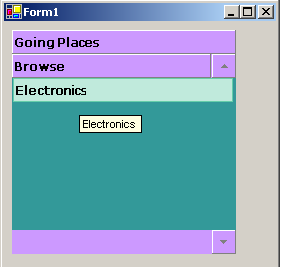
Modifying the Appearance of the OutBar
To modify the appearance of the C1OutBar at design time, complete the following steps:
- Place the C1OutBar component from the toolbox to your form using a drag-and-drop operation. The default C1OutBar control contains a C1OutPage with a C1ToolBar control inside it.
- In the Properties window for the C1OutBar control, select C1OutPage1 from its Properties window drop-down list.
- Select the Text property and change it from "Page1" to "Going Places".
- Right-click the C1ToolBar control on the form and select Append Item from its context menu. A new command and the Link to Command designer appears.
- In the Link to Command designer set the following properties:
- Text to "Air Tickets"
- Name to "cmdGPAirTicket"
- Select C1Command from the Create a new command listbox and click OK to close the dialog box.
Adding a text and image to the command link
- Select the C1CommandLink1 from the Properties window drop-down list and set its ButtonLook property to TextAndImage.
- In the C1CommandLink1's Properties window, expand the Command properties node and click on the ellipses button in the image properties field. The Open dialog box appears.
- Browse for an image to add to the Air tickets command link. The new image appears in the Air tickets command link.
Adding a new command link
- Right-click the Air tickets commandlink on the toolbar and select Append Item from its context menu. A new commandlink appears in the toolbar.
- In the Link to Command designer set the following properties:
- Text to City Guides
- Name to cmdGPCityGuides
- Command Type in the create a new command listbox to C1Command
- Select OK to apply the changes and close the Link to Command designer.
Adding a text and image to the command link
- Select the C1CommandLink2, City Guides, on the toolbar and set its ButtonLook property to TextAndImage.
- Expand the Command properties node in CommandLink2's Properties window and click on the ellipses button in the image properties field. Select the desired image and click on the Open button in the Open dialog box. The new image will appear above C1CommandLink2's text.
Modifying the Appearance properties for C1OutPage1 and C1ToolBar1
- Select C1OutPage1 from the Properties drop-down list and modify its properties to the following:
- Expand the Font property and set Bold to True.
- Select the BorderStyle property and select FixedSingle from its drop-down list.
- Select the C1ToolBar1 on the form and set its properties to the following:
- BackColor to White
- BackHiColor to SkyBlue
- Select C1OutBar1from the Properties drop-down list and set its properties to the following:
- BackColor to #CC99FF
- Font.Size to 9
- Bold to True
Adding a new C1OutPage
- Right-click on Going Places and select Add Page with Toolbar from its context menu. A new C1OutPage2 appears below the C1OutPage1, Going Places.
- Select C1OutPage2 from the drop-down list in the Properties window and set its Text property to Browse.
- Right-click in the C1ToolBar2 on the form and select Append Item from its context menu. The Link to Command designer appears.
- In the Link to Command designer set the following properties:
- Text to Electronics
- Name to cmdBrowseElectronics
- Select C1Command from the Create a new command link listbox and click OK to close the designer
- Select the C1CommandLink3, Electronics, on the toolbar and set its ButtonLook property to Text.
- Select C1ToolBar2 from the Properties window drop-down list and set its properties to the following:
- BackColor to Teal
- BackHiColor to MediumAquamarine
- ButtonAlign to Near
- Build and the run the application.
The C1OutBar's Browse out page at run time appears like following image:


