Setting the Location of the Splitter
In This Topic
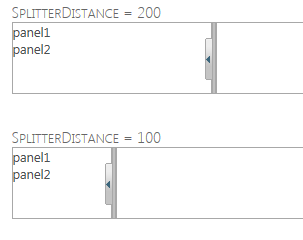
The WijSplitter control allows you to specify the location of the splitter, in pixels, from the left or top edge of the SplitContainer. Simply set the SplitterDistance property to take advantage of this feature.
- Create an ASP.NET Web application with a ScriptManager control and install Juice UI and the Wijmo Juice libraries to your project via NuGet.
- Add a standard Panel control to the main content of your page.
- Add a second Panel control within the first panel, Panel1.
- Add markup within each panel so the final markup looks like this:
<asp:Panel runat="server" ID="Panel1">
<h3>SplitterDistance = 200</h3>
<div id="splitter1">
<div>panel1</div>
<div>panel2</div>
</div>
</asp:Panel>
<div class="layout" style="width: 100px;">
</div>
<asp:Panel ID="Panel2" runat="server">
<h3>SplitterDistance = 100</h3>
<div id="splitter2">
<div>panel1</div>
<div>panel2</div>
</div>
</asp:Panel>
- While still in Source view, use the following markup to add a WijSplitter control to the page and set the TargetControlID to Panel1.
<cc1:WijSplitter ID="Panel1_WijSplitter" runat="server"
TargetControlID="Panel1">
</cc1:WijSplitter>
- Use the following markup to add a second WijSplitter control to the page and set the TargetControlID to Panel2.
<cc1:WijSplitter ID="Panel2_WijSplitter" runat="server"
TargetControlID="Panel2">
</cc1:WijSplitter>
- Select View | Properties Window in the Visual Studio menu.
- Click the drop-down list at the top of the Properties window and select Panel1_WijSplitter.
- Set the SplitterDistance property to 200.
- Click the drop-down list at the top of the Properties window and select Panel2_WijSplitter.
- Set the Orientation property to Horizontal.
- Press F5 to run the application. The splitters will look similar to this:

