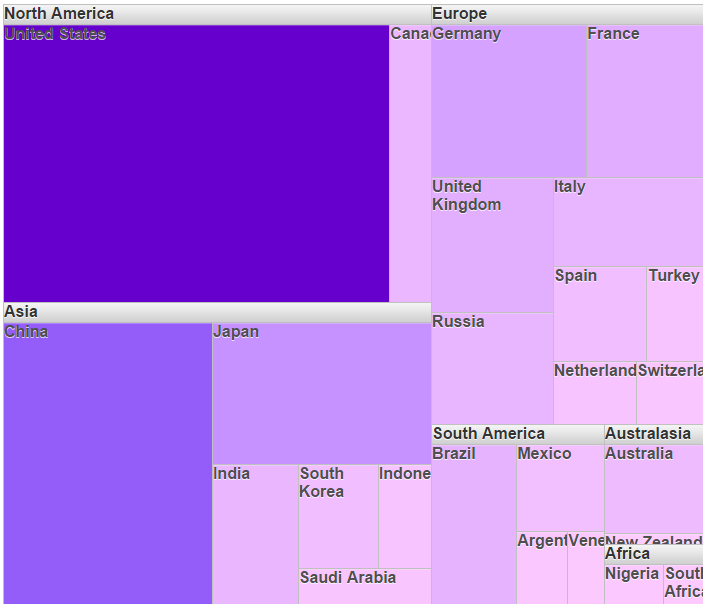
You can bind the TreeMap control to a .sitemap file or an XML. Complete the following steps to bind the TreeMap control to an XML file or a .sitemap file.
The XML file used in this sample contains two fields:
Sample XML file
| Sample XML |
Copy Code
|
|---|---|
<?xml version="1.0" encoding="utf-8" ?> <root> <treeMapItem label="North America" value="18625"> <treeMapItem label="United States" value="16800"></treeMapItem> <treeMapItem label="Canada" value="1825"></treeMapItem> </treeMapItem> <treeMapItem label="Asia" value="18934"> <treeMapItem label="China" value="9240"></treeMapItem> <treeMapItem label="Japan" value="4901"></treeMapItem> <treeMapItem label="India" value="1876"></treeMapItem> <treeMapItem label="South Korea" value="1304"></treeMapItem> <treeMapItem label="Indonesia" value="868"></treeMapItem> <treeMapItem label="Saudi Arabia" value="745"></treeMapItem> </treeMapItem> <treeMapItem label="Europe" value="16685"> <treeMapItem label="Germany" value="3634"></treeMapItem> <treeMapItem label="France" value="2734"></treeMapItem> <treeMapItem label="United Kingdom" value="2522"></treeMapItem> <treeMapItem label="Russia" value="2096"></treeMapItem> <treeMapItem label="Italy" value="2071"></treeMapItem> <treeMapItem label="Spain" value="1358"></treeMapItem> <treeMapItem label="Turkey" value="820"></treeMapItem> <treeMapItem label="Netherlands" value="800"></treeMapItem> <treeMapItem label="Switzerland" value="650"></treeMapItem> </treeMapItem> <treeMapItem label="South America" value="4554"> <treeMapItem label="Brazil" value="2245"></treeMapItem> <treeMapItem label="Mexico" value="1260"></treeMapItem> <treeMapItem label="Argentina" value="611"></treeMapItem> <treeMapItem label="Venezuela" value="438"></treeMapItem> </treeMapItem> <treeMapItem label="Australasia & Oceania" value="1742"> <treeMapItem label="Australia" value="1560"></treeMapItem> <treeMapItem label="New Zealand" value="182"></treeMapItem> </treeMapItem> <treeMapItem label="Africa" value="872"> <treeMapItem label="Nigeria" value="522"></treeMapItem> <treeMapItem label="South Africa" value="350"></treeMapItem> </treeMapItem> </root> |
|
Complete the following steps to populate the TreeMap with XML Data.
Add the following markup between the <form></form> tags to add an XmlDataSource control.
| Source View |
Copy Code
|
|---|---|
<asp:XmlDataSource ID="XmlDataSource1" runat="server" DataFile="~/treemap_structure.xml" XPath="root/treeMapItem"></asp:XmlDataSource> |
|
Set the DataSourceID property in the <c1:C1TreeMap> tag, to bind the TreeMap to the XML Data Source, and add the markup for DataBindings, between <c1:C1TreeMap></c1:C1TreeMap> tags as shown below:
| Source View |
Copy Code
|
|---|---|
<c1:c1treemap ID="C1TreeMap1" runat="server" MaxColor="#6600cc" MinColor="#ffccff" MidColor="#9966ff" DataSourceID="XmlDataSource1" Height="600" Width="700px"> <DataBindings> <c1:C1TreeMapItemBinding LabelField="label" ValueField="value" /> </DataBindings> </c1:c1treemap> |
|
Add the following code to the Page_Load event, to add and configure the XmlDataSource and populate the TreeMap control with XML data.
| C# |
Copy Code
|
|---|---|
// set colors for the TreeMap C1TreeMap1.MinColor = System.Drawing.ColorTranslator.FromHtml("#ffccff" ); C1TreeMap1.MidColor = System.Drawing.ColorTranslator.FromHtml("#9966ff"); C1TreeMap1.MaxColor = System.Drawing.ColorTranslator.FromHtml("#6600cc"); // add and configure XmlDataSource XmlDataSource XmlDataSource1 = new XmlDataSource(); XmlDataSource1.ID = "XmlDataSource1"; this.Controls.Add(XmlDataSource1); XmlDataSource1.DataFile = "~/treemap_structure.xml"; XmlDataSource1.XPath = "root / treeMapItem"; C1TreeMap1.DataSourceID = "XmlDataSource1"; // create and add DataBindingsItem C1TreeMapItemBinding Item1 = new C1TreeMapItemBinding(); Item1.LabelField = "label"; Item1.ValueField = "value"; C1TreeMap1.DataBindings.Add(Item1); |
|
| VB |
Copy Code
|
|---|---|
' set colors for the TreeMap C1TreeMap1.MinColor = System.Drawing.ColorTranslator.FromHtml("#ffccff") C1TreeMap1.MidColor = System.Drawing.ColorTranslator.FromHtml("#9966ff") C1TreeMap1.MaxColor = System.Drawing.ColorTranslator.FromHtml("#6600cc") ' add and configure XmlDataSource Dim XmlDataSource1 As New XmlDataSource() XmlDataSource1.ID = "XmlDataSource1" Me.Controls.Add(XmlDataSource1) XmlDataSource1.DataFile = "~/treemap_structure.xml" XmlDataSource1.XPath = "root / treeMapItem" C1TreeMap1.DataSourceID = "XmlDataSource1" ' create and add DataBindingsItem Dim Item1 As New C1TreeMapItemBinding() Item1.LabelField = "label" Item1.ValueField = "value" C1TreeMap1.DataBindings.Add(Item1) |
|
When you run the project, regions are added to the TreeMap based on the XML data bound to it.
