This topic demonstrates how to create a basic SiteMap and customize it's LevelSettings and node templates.
Complete the following steps to add SiteMap control and bind it to an existing .sitemap file using the C1SiteMapDataSource control.
Add the following markup within the <form></form> tags, to add a SiteMap control to the form bind it to an existing .sitemap file using a C1SiteMapDataSource control.
| Markup |
Copy Code
|
|---|---|
<cc1:C1SiteMap ID="C1SiteMap1" runat="server" DataSourceID="C1SiteMapDataSource1"> </cc1:C1SiteMap> <cc1:C1SiteMapDataSource ID="C1SiteMapDataSource1" runat="server" SiteMapFile="~/web1.sitemap" /> |
|
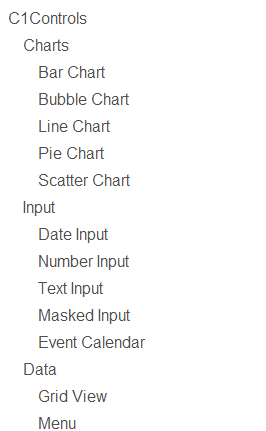
When you run the project, a basic SiteMap is created, as shown in the image below.
Complete the following steps to add new LevelSettings to customize the appearance of the SiteMap.
Add the following markup within the <cc1:C1SiteMap></cc1:C1SiteMap> tags to add new LevelSettings to the SiteMap.
| Markup |
Copy Code
|
|---|---|
<LevelSettings> <cc1:C1SiteMapLevelSetting Level="1" SeparatorText="||"> <ListLayout RepeatColumns="2" /> </cc1:C1SiteMapLevelSetting> <cc1:C1SiteMapLevelSetting Layout="Flow" Level="2" SeparatorText="||"> </cc1:C1SiteMapLevelSetting> </LevelSettings> |
|
Add the following code to the Page_Load event, to add new LevelSettings to the SiteMap.
|
Copy Code
|
|
|---|---|
// Add new LevelSettings C1SiteMap1.LevelSettings.Add(new C1.Web.Wijmo.Controls.C1SiteMap.C1SiteMapLevelSetting()); C1SiteMap1.LevelSettings.Add(new C1.Web.Wijmo.Controls.C1SiteMap.C1SiteMapLevelSetting()); // Customize LevelSetting[0] C1SiteMap1.LevelSettings[0].Level = 1; C1SiteMap1.LevelSettings[0].Layout = C1.Web.Wijmo.Controls.C1SiteMap.SiteMapLayoutType.List; C1SiteMap1.LevelSettings[0].ListLayout.RepeatColumns = 2; // Customize LevelSetting[1] C1SiteMap1.LevelSettings[1].Level = 2; C1SiteMap1.LevelSettings[1].Layout = C1.Web.Wijmo.Controls.C1SiteMap.SiteMapLayoutType.Flow; C1SiteMap1.LevelSettings[1].SeparatorText = "||"; |
|
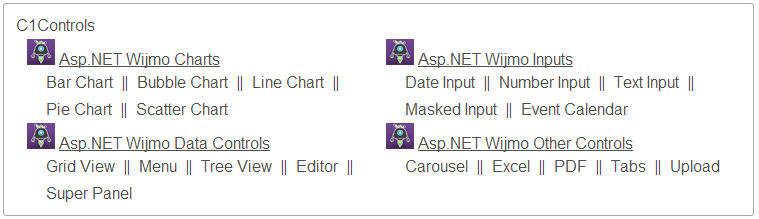
When you run the project, the SiteMap now appear as shown in the image below.

Complete the following steps to customize nodes by adding node templates.
Add the following markup within the <cc1:C1SiteMapLevelSetting></cc1:C1SiteMapLevelSetting> tags, to customize nodes using node templates. This template replaces the name of the nodes at Level1 with an image, that is added to the project, and the node description.
| Markup |
Copy Code
|
|---|---|
<NodeTemplate> <asp:Image ID="Image1" runat="server" Width="28px" Height="26px" ImageUrl="~/Wijmo.png" /> <a href="#" > <%# Eval("description") %> </a> </NodeTemplate> |
|
When you run the project, the SiteMap looks as shown in the image below.