Step 3 of 5: Formatting the Control
In This Topic
This topic shows how to format the controls using the Tasks menu. To begin, click the Design tab located below the Document window to switch to Design view. Follow the steps below to format each of the Input for ASP.NET Web Forms controls on your Web form.
To format the C1InputMask control:
- Select the C1InputMask control and click the smart tag (). The C1InputMask Tasks menu appears.
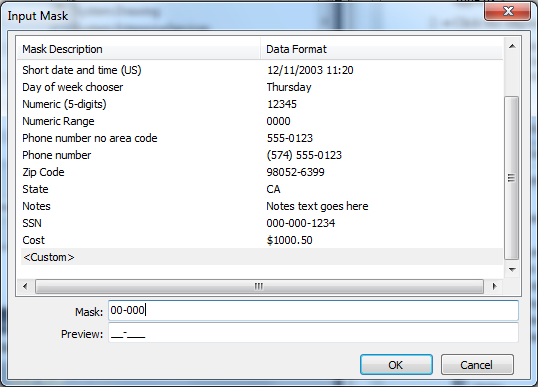
- Click the ellipsis button next to Mask. The Input Mask dialog box appears.
- Enter 00-000 in the Mask text box. Note that the Mask Description column automatically switches to when you start typing the mask (if the typed mask is not found in list of masks). The output value from the mask value appears in the Preview text box.

- Click OK to close the Input Mask dialog box.
- Select View | Properties Window and notice ui-state-error next to the InvalidClass property. If a user enters invalid input, such as alphanumeric characters, the input color appears red identifying the invalid entry, as specified in the ui-state-error in the CSS.
To format the C1InputDate control:
- Select the C1InputDate control and click the smart tag (). The C1InputDate Tasks menu appears.
- Enter a date format in the DateFormat text box. In this example, we'll use D. Standard format characters include the following:
| Preset Pattern |
Name |
| d |
Short date pattern |
| D |
Long date pattern |
| t |
Short time pattern |
| T |
Long time pattern |
| F |
Full date/time pattern(short time) |
| g |
General date/time pattern (short time) |
| G |
General date/time pattern (long time) |
| U |
Universal sortable date/time pattern |
The Resulting date pattern text box updates automatically.
- In the C1InputDate Tasks menu, click the drop-down arrow next to Date, and select a date from the drop-down calendar.
- Locate the ShowSpinner property in the Visual Studio Properties window, click the drop-down arrow and select True.
Note: You may have to resize the controls using the Height and Width properties in the Visual Studio Properties window.
To format the C1InputCurrency control:
- Select the C1InputCurrency control and locate the ShowSpinner property in the Visual Studio Properties window.
- Click the drop-down arrow and select True.
You have successfully changed the format of the Input for ASP.NET Web Forms controls. To see the HTML that you created, switch to Source view.
The following image shows the appearance of the updated controls (note that the width of each control has been set to 200px):

The next topic shows how to add buttons to change the culture information for the C1InputDate and C1InputCurrency controls.

