- Data Connectors Overview
- Free and Open Source Software (FOSS) License
- Redistributable Files
- OAuth Authorization
- Licensing
- ADO.NET provider for CSV
- ADO.NET provider for Dynamics 365 Sales
- ADO.NET provider for Google Analytics
- ADO.NET provider for JSON
- ADO.NET provider for Kintone
- ADO.NET provider for OData
- ADO.NET provider for QuickBooks Online
- ADO.NET provider for Salesforce
- ADO.NET provider for ServiceNow
- ADO.NET provider for Magento
- ADO.NET provider for Snowflake
- SQL Compliance
- Incremental Caching
- Proxy Server
- Logging
- Scaffolding
- DbFactory Support
- Visual Studio Integration
- Walkthrough
Getting Started
The ADO.NET provider for Salesforce provides a wide range of features that enable connectivity to Salesforce from .Net applications. The documentation will help you understand the C1.AdoNet.Salesforce namespace, which includes all the available classes that can be used to connect and retrieve data from Salesforce.
DataConnectors are mostly used in combination with other ComponentOne components, such as DataEngine and FlexPivot. The procedure below describes how to use the DataConnector in a console application within Visual Studio.
How to create a new Console Application
The ADO.NET provider for Salesforce can be used in any application. In this guide, a console application is created:
- Open Visual Studio.
- Select Create a new project from the Get Started pane.
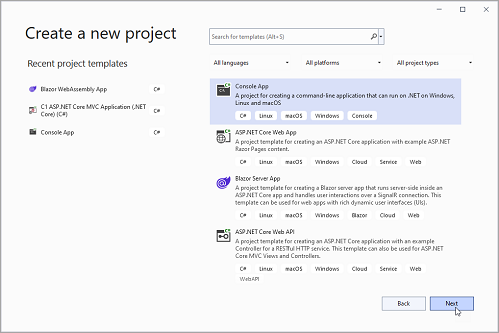
- In the Create a new project window, select Console Application and click Next, as in the screenshot below:

- In the Configure your new project window, write your project name, choose a location to save your project, and click Create.
How to add the NuGet packages
- From the Project menu, select Manage NuGet Packages. The NuGet Package Manager appears.
- In the NuGet Package Manager, click the Package source drop down and select nuget.org
- In the left pane of the Browse tab, select C1.AdoNet.Salesforce.
- In the right pane of the Browse tab, click Install to add the reference to the package.
How to use the ADO.Net provider for Salesforce to retrieve data
Follow the steps provided below to learn and implement data retrieval using the ADO.NET provider for Salesforce.
In the first step, create a reference to the Salesforce service URL. The connection string contains various parameters such as username, password, security token, OAuth client ID, OAuth client secret, OAuth token endpoint, and URL. Make sure to replace the asterisks ("*********") with the appropriate values for your Salesforce environment
const string GCSalesforceServerConnectionString = @"Username=*********;Password=*********;Security Token=***********;
                                                    OAuth Client Id=**************;
                                                    OAuth Client Secret=*************;
                                                    OAuth Token Endpoint=https://ap16.salesforce.com/services/oauth2/token;
                                                    Url=https://ap16.salesforce.com/services/data/v45.0";
In the next step, use the C1SalesforceDataAdapter class to retrieve the data. It starts by defining an SQL query that selects specific fields from the "Order" object, limiting the results to 10 records. Click here for more information on creating connections. The C1SalesforceConnection class implements the ADO.NET DbConnection, similar to the standard ADO.NET connection object. Once the connection is established, the adapter's Fill method is used to retrieve the data from the source and fill it into a DataTable as shown in the following code example.
String sql = "SELECT Id,BillingCity,BillingState from [Order] limit 10";
using (C1SalesforceConnection c = new C1SalesforceConnection($@"{GCSalesforceServerConnectionString}"))
{
    //Open Connection
    c.Open();
    using (C1SalesforceDataAdapter a = new C1SalesforceDataAdapter(c, sql))
    {
        //Filling Data Table with the help of adapter
        DataTable t = new DataTable();
        a.Fill(t);
        //Printing the fetched table data on console
        foreach (DataRow dataRow in t.Rows)
        {
            foreach (var item in dataRow.ItemArray)
            {
                Console.Write(item + " - ");
            }
            Console.WriteLine();
        }
    }
}


