# Using Wijmo with Vue

Learn how to use Wijmo components in Vue using this QuickStart Tutorial

## Content

<span lang="EN-US" style="mso-ascii-font-family:Aptos;mso-fareast-font-family:
Aptos;mso-hansi-font-family:Aptos;mso-bidi-font-family:Aptos">Wijmo provides built-in support for Vue, enabling developers to integrate powerful UI components seamlessly into Vue applications. With Wijmo’s lightweight and high-performance controls, you can build responsive, data-driven applications while leveraging Vue’s reactive and component-based architecture.</span>
<span lang="EN-US" style="mso-ascii-font-family:Aptos;mso-fareast-font-family:
Aptos;mso-hansi-font-family:Aptos;mso-bidi-font-family:Aptos">Wijmo components for Vue allow you to use Wijmo controls within Vue templates markup. Each Wijmo Vue component acts as a wrapper for its corresponding Wijmo control. It automatically creates the Wijmo control instance behind the scenes which is accessible through the </span><span lang="EN-US" style="font-family:Consolas;
mso-fareast-font-family:Consolas;mso-bidi-font-family:Consolas">control</span><span lang="EN-US" style="mso-ascii-font-family:Aptos;mso-fareast-font-family:Aptos;
mso-hansi-font-family:Aptos;mso-bidi-font-family:Aptos"> property. Additionally, these components allow declarative binding to control properties and events directly within the Vue template markup.</span>

> type=note
> **<span lang="EN-US">Note</span>**<span lang="EN-US">: If you are using Wijmo with Vue 2, we recommend migrating to Vue 3 and updating the existing custom components to ensure complete compatibility.</span>

## <span lang="EN-US">Vue3 Quick Start</span>

<span lang="EN-US" style="mso-ascii-font-family:Aptos;mso-fareast-font-family:
Aptos;mso-hansi-font-family:Aptos;mso-bidi-font-family:Aptos;color:black;
mso-themecolor:text1">This topic walks you through setting up Wijmo with a Vue3 project. For demonstration purpose, we are using Wijmo's FlexGrid component and see how to create a Vue 3 DataGrid, utilizing </span>**<span lang="EN-US" style="mso-ascii-font-family:Aptos;mso-fareast-font-family:
Aptos;mso-hansi-font-family:Aptos;mso-bidi-font-family:Aptos;color:black;
mso-themecolor:text1">Composition API</span>** <span lang="EN-US" style="mso-ascii-font-family:Aptos;mso-fareast-font-family:
Aptos;mso-hansi-font-family:Aptos;mso-bidi-font-family:Aptos;color:black;
mso-themecolor:text1">(Custom component level registration method)</span>**<span lang="EN-US" style="mso-ascii-font-family:Aptos;mso-fareast-font-family:
Aptos;mso-hansi-font-family:Aptos;mso-bidi-font-family:Aptos;color:black;
mso-themecolor:text1">.</span>**
![Vue3](https://cdn.mescius.io/document-site-files/images/3c7113e2-10b3-45ed-8f3b-9fb1e0af2b74/Vue3.3aff7a.png)

> type=note
> <span lang="EN-US" style="mso-ascii-font-family:Aptos;mso-fareast-font-family:
> Aptos;mso-hansi-font-family:Aptos;mso-bidi-font-family:Aptos;color:black;
> mso-themecolor:text1">Note that the topic assumes that the user understands how to create a Vue3 application using Vue CLI. For more information, see </span>[<span style="mso-ascii-font-family:Aptos;mso-fareast-font-family:Aptos;mso-hansi-font-family:
> Aptos;mso-bidi-font-family:Aptos">Vue CLI</span>](https://cli.vuejs.org/#getting-started)<span lang="EN-US" style="mso-ascii-font-family:Aptos;mso-fareast-font-family:Aptos;mso-hansi-font-family:
> Aptos;mso-bidi-font-family:Aptos;color:black;mso-themecolor:text1">.</span>

The QuickStart is categorized into the following sections:

1. <span style="mso-ascii-font-family:Aptos;mso-fareast-font-family:Aptos;
    mso-hansi-font-family:Aptos;mso-bidi-font-family:Aptos;color:black;mso-themecolor:
    text1" lang="EN-US">Install Wijmo Packages</span>
2. <span style="mso-ascii-font-family:
    Aptos;mso-fareast-font-family:Aptos;mso-hansi-font-family:Aptos;mso-bidi-font-family:
    Aptos;color:black;mso-themecolor:text1" lang="EN-US">Import Wijmo Components and Data</span>
3. <span style="mso-ascii-font-family:
    Aptos;mso-fareast-font-family:Aptos;mso-hansi-font-family:Aptos;mso-bidi-font-family:
    Aptos;color:black;mso-themecolor:text1" lang="EN-US">Adding Vue Datagrid Markup</span>

### Install Wijmo Packages

1. <span style="mso-ascii-font-family:Aptos;mso-fareast-font-family:Aptos;
    mso-hansi-font-family:Aptos;mso-bidi-font-family:Aptos;color:black;mso-themecolor:
    text1" lang="EN-US">Open your Vue application and switch to the application folder where you want to install the package.</span>
2. <span style="mso-list:Ignore">I</span><span style="mso-ascii-font-family:
    Aptos;mso-fareast-font-family:Aptos;mso-hansi-font-family:Aptos;mso-bidi-font-family:
    Aptos;color:black;mso-themecolor:text1" lang="EN-US">nstall Wijmo's Vue package using npm</span><span style="mso-spacerun:yes">  </span>by running the following command:

    ```auto
    npm install @mescius/wijmo.vue2.all
    ```

### Import Wijmo Modules and Data

1. Import the required Wijmo Component and directive and register them at Component level. For our FlexGrid example, we will add a *wj-flex-grid* component to the App.vue file’s template section by including the code in the following files:
    1. **App.Vue file**

        ```auto
        <script setup>=
        import * as wjcCore from "@mescius/wijmo";
        import { ref } from "vue";
        const data = ref(_getData()); 
        function _getData() {
          // create some
           random data
           let countries ="US,Germany,UK,Japan,Italy,Greece".split(","),
            data = [];
            for (let i = 0; i< countries.length; i++) {
              data.push({
                  id: i,
                  country:
            countries[i],
                  sales:Math.random() * 10000,
                  expenses:Math.random() * 5000,
              });
          }
          return data;
        }
        </script> 
        
        <template>
        
          <div class="container-fluid">
        
           </div>
        
        </template>
        ```
    2. **Main.js file**

        ```auto
        import '@mescius/wijmo.styles/wijmo.css';
        import { createApp } from "vue";
        import App from "./App.vue";
        import { registerGrid } from "@mescius/wijmo.vue2.grid";
        const app = createApp(App);
        registerGrid(app);
        app.mount('#app');
        ```
2. In the **main.js** file, add a CSS import statement at the top of the file to import the Wijmo CSS.

    ```auto
    import '@mescius/wijmo.styles/wijmo.css';
    ```

### Adding Vue Datagrid Markup

The WjFlexGrid component is written as wj-flex-grid, as for HTML the lower-case-dash syntax is used.

```auto
<template>
  <div class="container-fluid"> 
<wj-flex-grid :itemsSource="data"
:initialized="flexInitialized">         
<wj-flex-grid-column :header="'Country'"
:binding="'country'" width="2*" />        
<wj-flex-grid-column :header="'Sales'"
:binding="'sales'" width="*" format="n2" />         
<wj-flex-grid-column :header="'Expenses'"
:binding="'expenses'" width="*" format="n2" />     
</wj-flex-grid>
  </div>
</template>
```

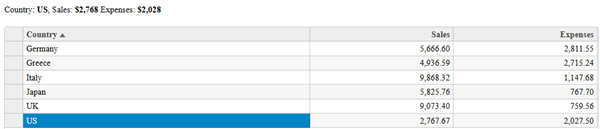
**Run the application**
<span lang="EN-US" style="mso-ascii-font-family:Aptos;
mso-fareast-font-family:Aptos;mso-hansi-font-family:Aptos;mso-bidi-font-family:
Aptos;color:black;mso-themecolor:text1">You have successfully integrated Wijmo FlexGrid into your Vue application. To explore additional Wijmo components like charts, input controls, and pivot grids, see </span>*[<span style="mso-ascii-font-family:
Aptos;mso-fareast-font-family:Aptos;mso-hansi-font-family:Aptos;mso-bidi-font-family:
Aptos">Wijmo Demos</span>](https://developer.mescius.com/wijmo/demos/)*<span lang="EN-US" style="mso-ascii-font-family:
Aptos;mso-fareast-font-family:Aptos;mso-hansi-font-family:Aptos;mso-bidi-font-family:
Aptos;color:black;mso-themecolor:text1">.</span>