# Quick Start
This topic describes how to install NuGet packages which contain APIs for Spread for WPF.
## Content
This quick start guide will help you create a simple WPF application, install NuGet packages, and add Spread WPF controls to your Visual Studio project. You can get started with Spread for WPF with NuGet packages in .NET Framework and .NET Core editions by following the steps mentioned in the section below.
## .NET Framework
To create a simple WPF application (.NET Framework) in Visual Studio, complete the following steps:
1. Open **Microsoft Visual Studio** and click **Create a new project.**
2. In the **Create a new project** dialog, choose **WPF App (.NET Framework)**, and click **Next**.
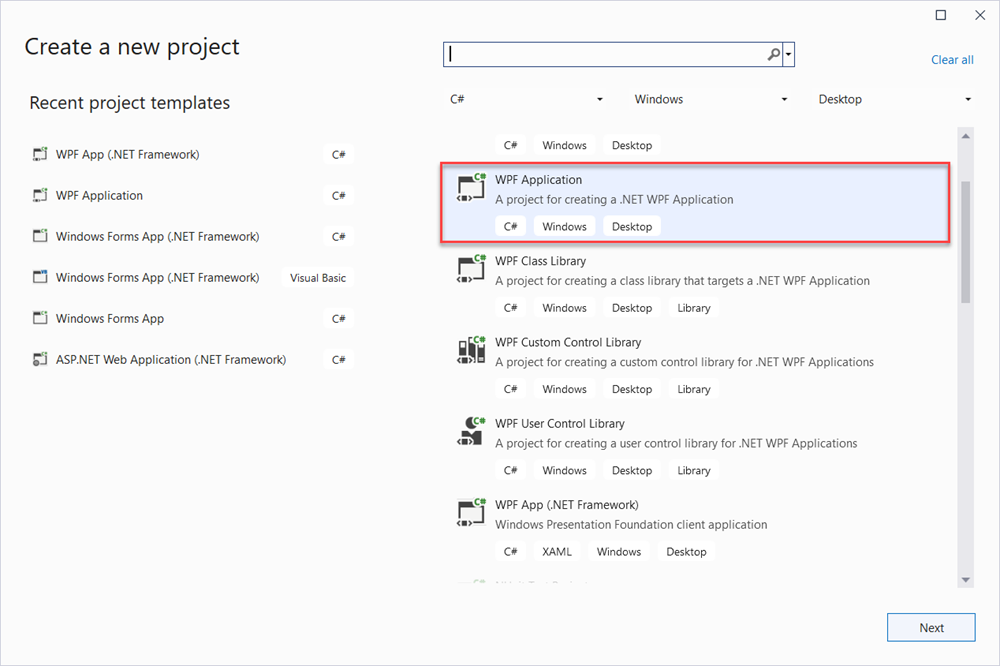
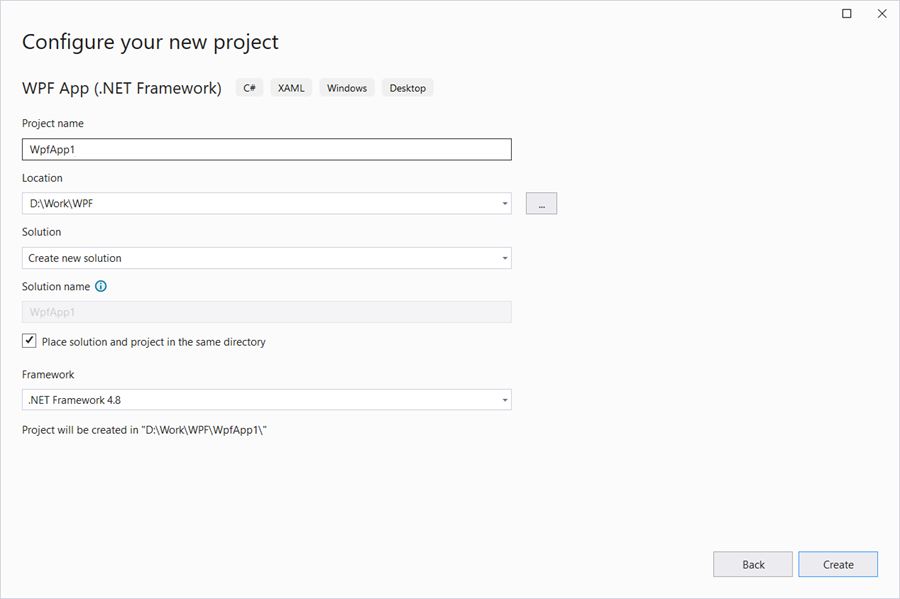
3. In the **Configure your new project** dialog, enter the name and location for your project and click **Create**.
This is an optional step as you can use the default project name and location if you want.
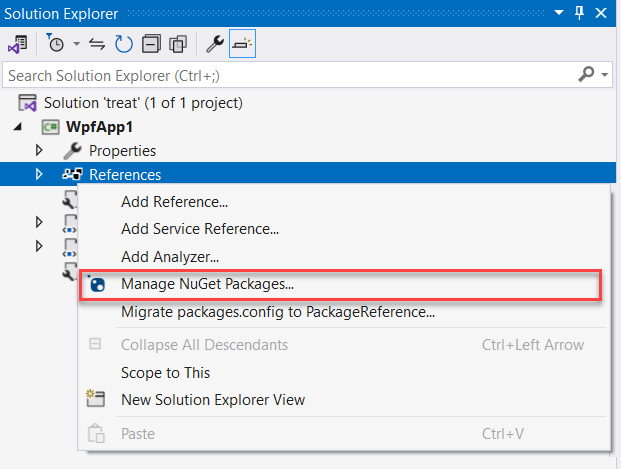
4. Open the **Solution Explorer** panel, right-click on the project and select **Manage NuGet Packages** to add the .NET references to the project.
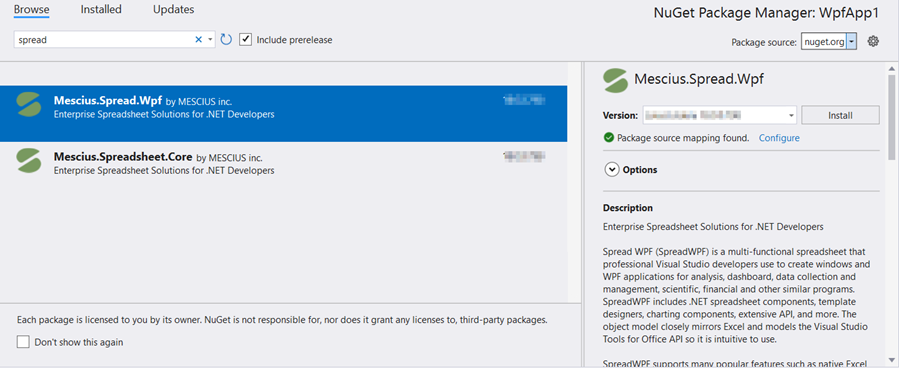
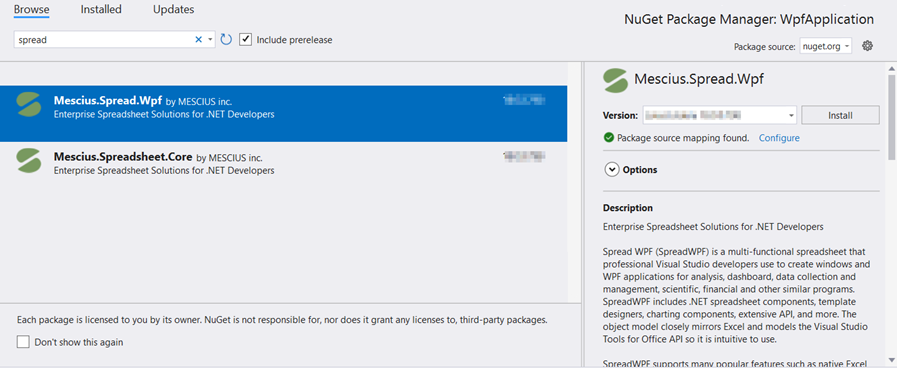
5. In the **NuGet Package Manager** dialog, select **nuget.org** as the **Package source**.
6. Browse and install the **Mescius.Spread.Wpf** NuGet package into your solution.
Once installed, all the available assembly files will be added under **References.**
7. **Right-click on Properties** and select **Add** \> **New Item...**
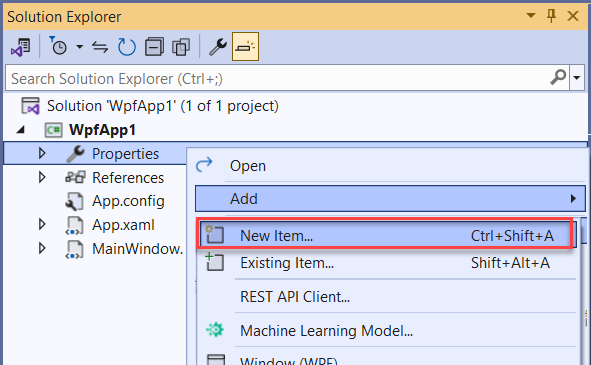
8. From the **Add new item** dialog, add a text file and name it as **Licenses.licx**.
9. Add the license string for Spread as follows:
```auto
GrapeCity.Wpf.SpreadSheet.GcSpreadSheet, GrapeCity.Wpf.SpreadSheet
```
10. Open the XAML view, i.e. **MainWindow.xaml** file.
Add the following code to declare the XML namespace for integrating the spreadsheet component into a XAML application. The URL provided in the namespace declaration refers to an XML schema that defines the controls of the spreadsheet component.
```xml
xmlns:gss="http://schemas.grapecity.com/windows/spreadsheet/2020"
```
Create Window\_Loaded event and assign names to the GcSpreadSheet and GcFormulaBar controls in the XAML code.
The XAML markup should look like the following:
```xml
```
11. Switch to the code view. (**MainWindow.xaml.cs** for C# or **MainWindow.xaml.vb** for Visual Basic)
Under the **Window\_Loaded** event handler, add the following example codes to start the basic operations with the controls.
```csharp
private void Window_Loaded(object sender, RoutedEventArgs e)
{
// Create an instance of GcSpreadSheet workbook.
GrapeCity.Spreadsheet.IWorkbook workbook = spreadSheet1.Workbook;
// Get the default worksheet.
GrapeCity.Spreadsheet.IWorksheet worksheet = spreadSheet1.Workbook.ActiveSheet;
// Add data to the cells.
worksheet.Cells[0, 0].Value = "Welcome to Spread for WPF";
// Save the workbook.
workbook.SaveAs("SavedWorkbook.xlsx", GrapeCity.Spreadsheet.IO.FileFormat.OpenXMLWorkbook);
}
```
```auto
Private Sub Window_Loaded(sender As Object, e As RoutedEventArgs)
' Create an instance of GcSpreadSheet workbook.
Dim workbook As GrapeCity.Spreadsheet.IWorkbook = spreadSheet1.Workbook
' Get the default worksheet.
Dim worksheet As GrapeCity.Spreadsheet.IWorksheet = spreadSheet1.Workbook.ActiveSheet
' Add data to the cells.
worksheet.Cells[0, 0].Value = "Welcome to Spread for WPF"
' Save the workbook.
workbook.SaveAs("SavedWorkbook.xlsx", GrapeCity.Spreadsheet.IO.FileFormat.OpenXMLWorkbook)
End Sub
```
12. Build the project and run to view the controls in your application.
## .NET Core
To create a simple WPF application (.NET Core) in Visual Studio, complete the following steps:
1. Open **Microsoft Visual Studio and** click **Create a new project.**
2. In the **Create a new project** dialog, select **WPF Application**, and then click **Next**.
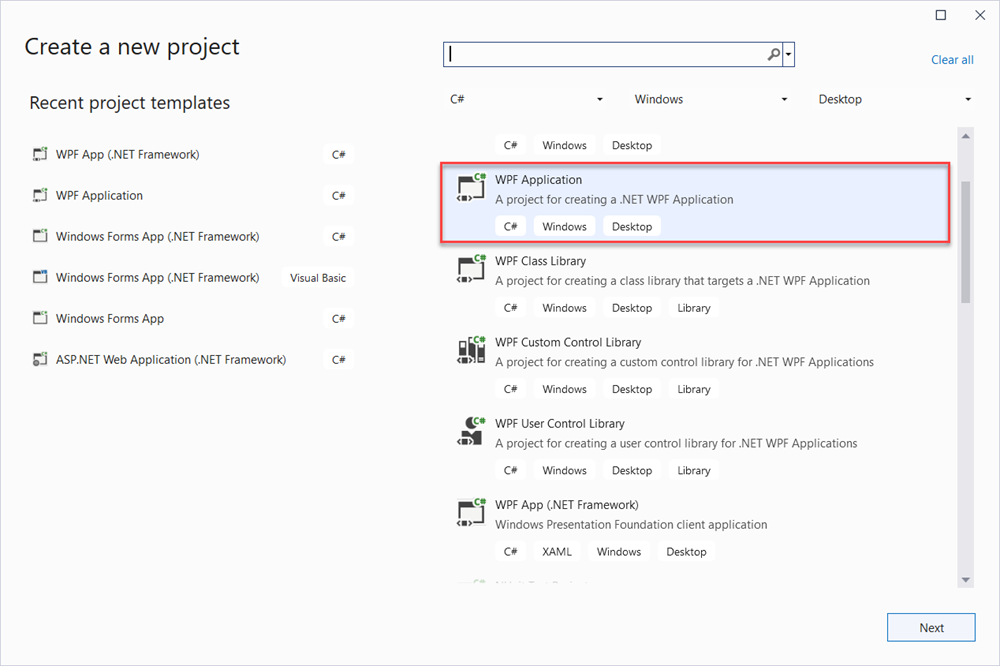
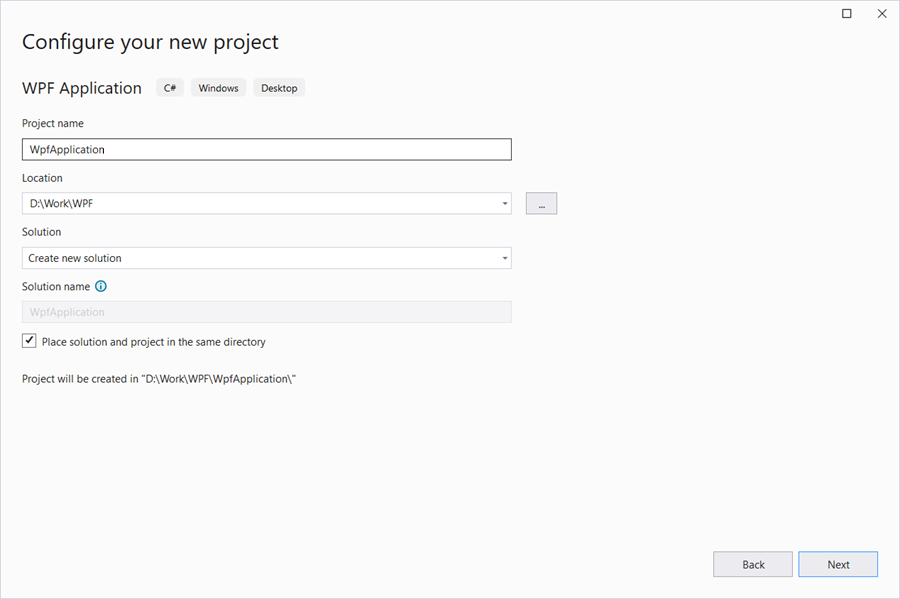
3. In the **Configure your new project** dialog, enter the name and location for your project and click **Next**.
This is an optional step as you can use the default project name and location if you want.
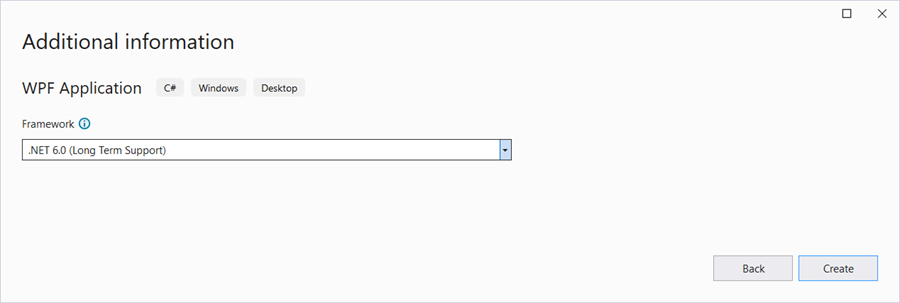
4. In the **Additional information** dialog, select the framework version from the dropdown and click **Create**.
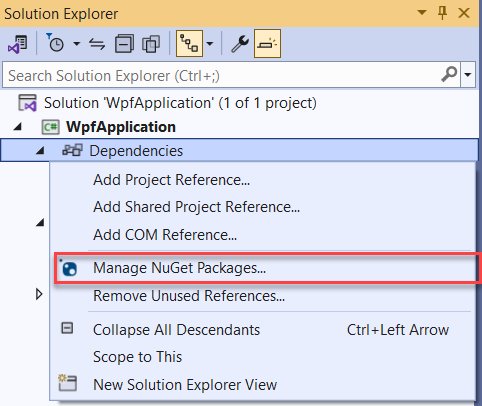
5. Open the **Solution Explorer** panel, right-click on **Dependencies** and select **Manage NuGet Packages..** to add the .NET references to the project.
6. In the **NuGet Package Manager**, select **nuget.org** as the **Package source**.
7. Search for **Mescius.Spread.Wpf** and click **Install** to install the NuGet package into your solution.
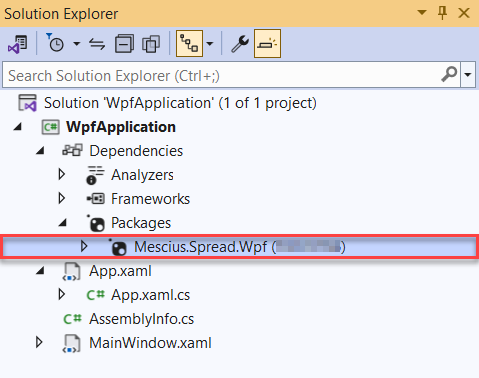
8. Once installed, the package will be added under **Packages**.
9. Open the XAML view, i.e. **MainWindow.xaml** file.
Add the following code to declare the XML namespace for integrating the spreadsheet component into a XAML application. The URL provided in the namespace declaration refers to an XML schema that defines the controls of the spreadsheet component.
```xml
xmlns:gss="http://schemas.grapecity.com/windows/spreadsheet/2020"
```
Create **Window\_Loaded** event and assign names to the **GcSpreadSheet** and **GcFormulaBar** controls in the XAML code.
The XAML markup should look like the following:
```xml
```
10. Switch to the code view. (**MainWindow.xaml.cs** for C# or **MainWindow.xaml.vb** for Visual Basic)
Under the **Window\_Loaded** event handler, add the following example codes to start the basic operations with the controls.
```csharp
private void Window_Loaded(object sender, RoutedEventArgs e)
{
// Create an instance of GcSpreadSheet workbook.
GrapeCity.Spreadsheet.IWorkbook workbook = spreadSheet1.Workbook;
// Get the default worksheet.
GrapeCity.Spreadsheet.IWorksheet worksheet = spreadSheet1.Workbook.ActiveSheet;
// Add data to the cells.
worksheet.Cells[0, 0].Value = "Welcome to Spread for WPF";
// Save the workbook.
workbook.SaveAs("SavedWorkbook.xlsx", GrapeCity.Spreadsheet.IO.FileFormat.OpenXMLWorkbook);
}
```
```auto
Private Sub Window_Loaded(sender As Object, e As RoutedEventArgs)
' Create an instance of GcSpreadSheet workbook.
Dim workbook As GrapeCity.Spreadsheet.IWorkbook = spreadSheet1.Workbook
' Get the default worksheet.
Dim worksheet As GrapeCity.Spreadsheet.IWorksheet = spreadSheet1.Workbook.ActiveSheet
' Add data to the cells.
worksheet.Cells[0, 0].Value = "Welcome to Spread for WPF"
' Save the workbook.
workbook.SaveAs("SavedWorkbook.xlsx", GrapeCity.Spreadsheet.IO.FileFormat.OpenXMLWorkbook)
End Sub
```
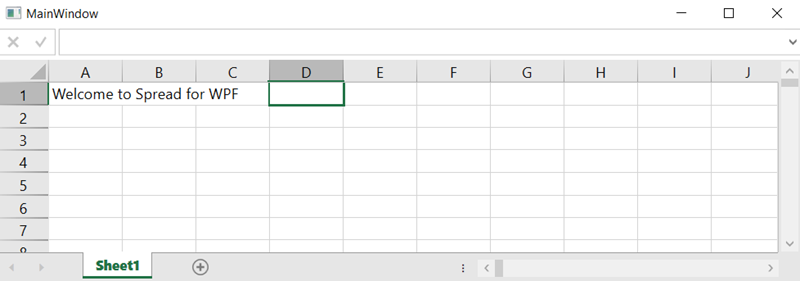
11. Build the project and run to view GcSpreadSheet and GcFormulaBar controls in your application.
The output will look like as below.
> type=note
> **Note**: You can also install Spread for WPF using the Spread Studio package from the [official website](https://developer.mescius.com/) and then create a WPF application. For more information, refer to [Add Components to Toolbox](/spreadnet/docs/latest/online-wpf/quickstart/quickstartbyusingsdlls).