# Adding a Component to a Visual Studio 2013 Project
## Content
If you are new to the .NET platform, you might be unfamiliar with how to start a new project using a component. To use the Spread Windows Forms product, you need to add the component to a project in Visual Studio .NET.
The first step is to create a new project in Visual Studio .NET, and to add a Spread Windows Forms component to the project.
1. Start Visual Studio .NET.
2. From the **File** menu, choose **New**, **Project** or select **New Project**... under **Start**.
3. In the **New Project** dialog, in the **Installed** area, select a project type depending on the language environment in which you are developing. For example, choose **Windows** under **Visual Basic**.
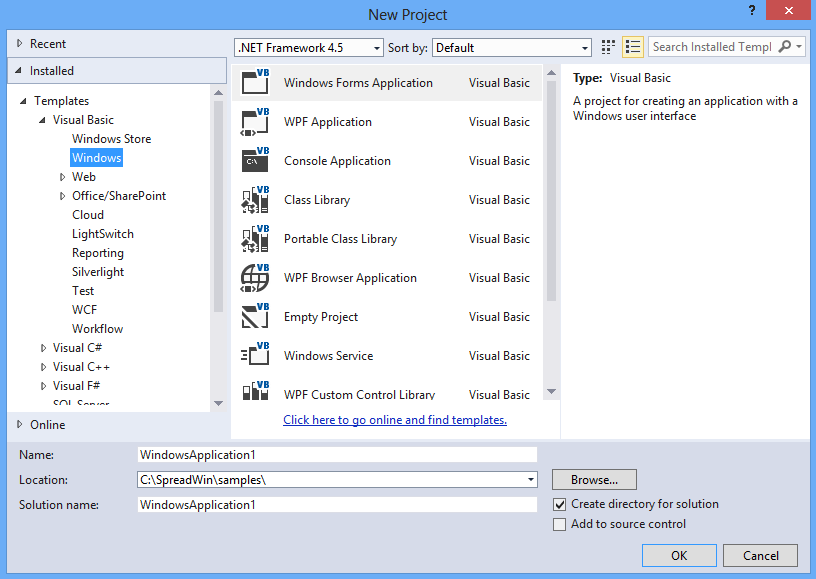
1. Choose the type of project such as **Windows Forms Application**.
2. In the **Name** box, type the name of the new project. The default is **WindowsApplication1** for the first Windows Forms application.
3. In the **Location** box, leave the location path as the designated path, or click **Browse** to change the path to a new directory.
4. Click **OK**.
If your project does not display the **Solution Explorer**, from the **View** menu, choose **Solution Explorer**.
4. In the **Solution Explorer**, right-click on the form name, **Form1**. Choose **Rename** from the pop-up menu, then type the new form name you prefer for the new form name.
The next step is to add the Spread component to the toolbox. This only has to be done once.
1. If the Toolbox is not displayed, from the **View** menu choose **Toolbox**.
2. Once the Toolbox is displayed, look in the **GrapeCity Spread** category (or in any other category if you have installed Spread and placed the toolbox icon in a different category).
3. If the Spread component is not in the Toolbox:
1. Right-click in the Toolbox, and from the pop-up menu choose **Choose Items**.
2. In the **Choose Toolbox Items** dialog, click the **.NET Framework Components** tab.
3. In the **.NET Framework Components** tab, the FpSpread component (in the FarPoint.Win.Spread namespace) should be displayed in the list of components. Select the Spread component check box and click **OK**. Select fpChart (FarPoint.Win.Chart namespace) for the chart control.
If the Spread component is not displayed in the list of components, click **Browse** and browse to the installation path for the Spread Windows Forms component. Once there, select the FarPoint.Win.Spread.dll and click **Open**. The Spread component is now displayed in the list of components. Select it and click **OK**. Select FarPoint.Win.Chart.dll for the chart control.
4. You can test that the component has been added by opening a project and inserting the component.
The next step is to add the Spread component to a project.
1. With an open project, in the Toolbox under **GrapeCity Spread** (or whatever category to which you added it), select the FpSpread component.
2. On your Windows Forms page, draw a Spread component by dragging a rectangle the size that you would like the initial component or simply double-click on the page. The Spread component appears. The Spread Designer also appears by default. Close the designer.
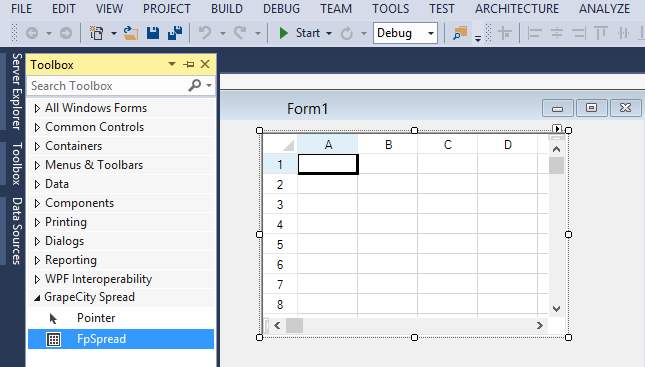
Your project should now look similar to the picture shown here.
You have added the Spread component to the project.