# Hierarchy Data

An explanation of the hierarchy options available in the data schema in SpreadJS, including the parameters and types

## Content

SpreadJS provides the hierarchy option in the data schema to define that the data source is hierarchical. The hierarchy option is inherited from the **[GC.Data.IDataSourceOption](https://developer.mescius.com/spreadjs/api/modules/GC.Data#idatasourceoption)** interface, which provides the following parameters:

* <strong>type</strong>: Defines the hierarchy type. It could be a value out of the following: Parent, ChildrenPath, Level, or Custom.
* <strong>column</strong>: Specifies the hierarchy key that will help to build the hierarchical data.
* <strong>levelOffset</strong>: Indicates the level offset that can increase or decrease the level. Usually, the hierarchical level starts with 0.
* <strong>outlineColumn</strong>: Inherited from <strong>GC.Data.IHierarchyOutlineColumnOptions</strong>, it specifies the column that can be shown as a hierarchy.
* <strong>summaryFields</strong>: Inherited from <strong>GC.Data.IHierarchySummaryFieldCollection</strong>, it defines the formula for the fields.
* <strong>parse</strong>: Inherited from <strong>GC.Data.IHierarchyCustomParseOptions</strong>, it parses the primary key of the custom hierarchy type to the parent key.
* <strong>unparse</strong>: Inherited from <strong>GC.Data.IHierarchyCustomUnparseOptions</strong>, it builds the primary key of the custom hierarchy type.

>type=note
> TableSheet builds on the Data Manager infrastructure. The following sections describe how Hierarchy Data is used within TableSheet. For a more detailed explanation of the underlying Hierarchy Data mechanisms, see the [Data Manager Hierarchical Data](/spreadjs/docs/features/data-manager/schema/hierarchical-data).

## Hierarchy Types

There are four types of hierarchy, Parent, Level, ChildrenPath, and Custom. Each of them can be configured when adding a Table to the data manager:

#### **Parent Hierarchy**

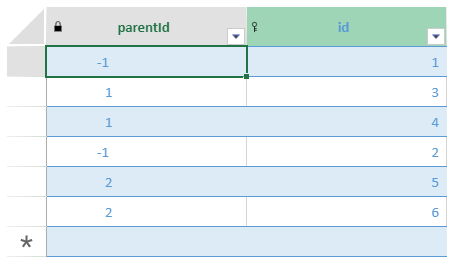
In Parent hierarchy, the hierarchy type 'Parent' is used, and the primary key is used to indicate the hierarchy id.
![parent-hierarchy.png](https://cdn.mescius.io/document-site-files/images/df1fe1ee-eb3c-4da7-8c20-a0d8d2b7e734/parent-hierarchy.0a0565.png)

The following code sample shows how to set parent hierarchy in the tablesheet:

```JavaScript
<script>
        var spread = new GC.Spread.Sheets.Workbook(document.querySelector('#ss'), { sheetCount: 0 });
        initSpread(spread)
        function initSpread(spread) {
            var dataManager = spread.dataManager();

            initHierarchyParentType(spread, dataManager);

        }
        function initHierarchyParentType(spread, dataManager) {
            var table = dataManager.addTable("hierarchyParentTable", {
                data: initHierarchyParentData(),
                schema: {
                    hierarchy: {
                        type: 'Parent', // config the parent hierarchy type
                        column: 'parentId', // specify the column that could be used for building hierarchical view
                    },
                    columns: {
                        'id': { dataName: 'id', isPrimaryKey: true }, // the primary key is required
                        'parentId': { dataName: 'parentId' },
                    }
                }
            });
            var sheet = spread.addSheetTab(0, "HierarchyParent", GC.Spread.Sheets.SheetType.tableSheet);
            sheet.setDefaultRowHeight(40, GC.Spread.Sheets.SheetArea.colHeader);
            sheet.options.allowAddNew = true;

            table.fetch().then(function () {
                var myView = table.addView("myView", [
                    {
                        value: "parentId", width: 200,
                        outlineColumn: {
                            showImage: true,
                            images: ['https://developer.mescius.com/spreadjs/demos/spread/source/images/task-1.png', 'https://developer.mescius.com/spreadjs/demos/spread/source/images/task-2.png', 'https://developer.mescius.com/spreadjs/demos/spread/source/images/task-3.png'],
                            expandIndicator: 'https://developer.mescius.com/spreadjs/demos/spread/source/images/increaseIndicator.png',
                            collapseIndicator: 'https://developer.mescius.com/spreadjs/demos/spread/source/images/decreaseIndicator.png',
                        },

                    },
                    { value: "id", width: 200 },
                ]);

                sheet.setDataView(myView);
            });
        }
        function initHierarchyParentData() {
            var data = [
                { id: 1, parentId: -1 },
                { id: 2, parentId: -1 },
                { id: 3, parentId: 1 },
                { id: 4, parentId: 1 },
                { id: 5, parentId: 2 },
                { id: 6, parentId: 2 },
                { id: 6, parentId: 2 },
            ];
            return data;
        }
</script>
```

#### **ChildrenPath Hierarchy**

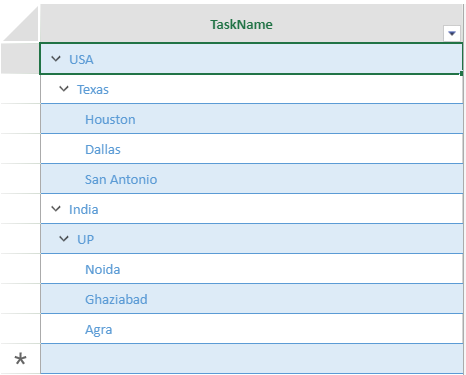
In ChildrenPath hierarchy, the hierarchy type 'ChildrenPath' is used. In this case, the primary key is not required, however, it’s better to indicate the primary key for the child.
![childrenpath-hierarchy.png](https://cdn.mescius.io/document-site-files/images/df1fe1ee-eb3c-4da7-8c20-a0d8d2b7e734/childrenpath-hierarchy.8ff026.png)

The following code sample shows how to set ChildrenPath hierarchy in tablesheet:

```JavaScript
<script>
        var spread = new GC.Spread.Sheets.Workbook(document.querySelector('#ss'), { sheetCount: 0 });
        initSpread(spread)
        function initSpread(spread) {
            var dataManager = spread.dataManager();
            initHierarchyParentType(spread, dataManager);
        }
        function initHierarchyParentType(spread, dataManager) {
            var taskTable = dataManager.addTable("Tasks", {
                data: initHierarchyChildData(),
                schema: {
                    hierarchy: {
                        type: 'ChildrenPath',
                        column: 'TaskChildren',
                    },
                    columns: {
                        TaskName: { dataName: 'name' },
                        TaskChildren: { dataName: 'children' },
                        // other columns in the child
                    }
                }
            });
            var sheet = spread.addSheetTab(0, "HierarchyParent", GC.Spread.Sheets.SheetType.tableSheet);
            sheet.setDefaultRowHeight(40, GC.Spread.Sheets.SheetArea.colHeader);
            sheet.options.allowAddNew = true;
            taskTable.fetch().then(r => {
                var taskView = taskTable.addView('TaskView', [
                    {
                        value: 'TaskName', outlineColumn: true, width: "*" // this option indicates the column showing as outline column
                    }
                ]);
                sheet.setDataView(taskView);
            })
        }
        function initHierarchyChildData() {
            var data = [
                {
                    name: 'USA',
                    children: [
                        {
                            name: 'Texas',
                            children: [
                                {
                                    name: 'Houston',
                                },
                                {
                                    name: 'Dallas',
                                },
                                {
                                    name: 'San Antonio',
                                }
                            ]
                        }
                    ]
                },
                {
                    name: 'India',
                    children: [
                        {
                            name: 'UP',
                            children: [
                                { name: 'Noida' },
                                { name: 'Ghaziabad' },
                                { name: 'Agra' },
                            ]
                        }
                    ]
                }
            ]
            return data;
        }
</script>
```

#### **Level Hierarchy**

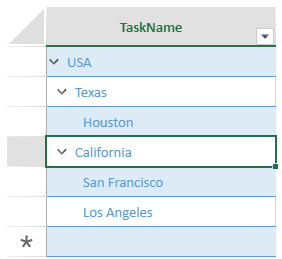
In Level hierarchy, the hierarchy type 'Level' is used. In this case as well, the primary key is not required, however it’s better to indicate the primary key.
![level-hierarchy.png](https://cdn.mescius.io/document-site-files/images/df1fe1ee-eb3c-4da7-8c20-a0d8d2b7e734/level-hierarchy.001cb2.png)

The following code sample shows how to set level hierarchy in the tablesheet:

```JavaScript
<script>
        var spread = new GC.Spread.Sheets.Workbook(document.querySelector('#ss'), { sheetCount: 0 });
        initSpread(spread)
        function initSpread(spread) {
            var dataManager = spread.dataManager();

            initHierarchyParentType(spread, dataManager);
        }
        function initHierarchyParentType(spread, dataManager) {
            var taskTable = dataManager.addTable("Tasks", {
                data: initHierarchyLevelData(),
                schema: {
                    hierarchy: {
                        type: 'Level',
                        column: 'TaskLevel',
                    },
                    columns: {
                        TaskName: { dataName: 'name' },
                        TaskId: { dataName: 'id', isPrimaryKey: true }, // using primary key to indicate the hierarchy id optionally if exist
                        TaskLevel: { dataName: 'level' },
                    }
                }
            });
            var sheet = spread.addSheetTab(0, "HierarchyParent", GC.Spread.Sheets.SheetType.tableSheet);
            sheet.setDefaultRowHeight(40, GC.Spread.Sheets.SheetArea.colHeader);
            sheet.options.allowAddNew = true;
            taskTable.fetch().then(r => {
                var taskView = taskTable.addView('TaskView', [
                    {
                        value: 'TaskName', outlineColumn: true// this option indicates the column showing as outline column
                    }
                ]);

                sheet.setDataView(taskView);
            })
        }
        function initHierarchyLevelData() {
            var data = [
                { name: 'USA', level: -1, id: 1 },
                { name: 'Texas', level: 0, id: 2 },
                { name: 'Houston', level: 1, id: 3 },
                { name: 'California', level: 0, id: 4 },
                { name: 'San Francisco', level: 1, id: 5 },
                { name: 'Los Angeles', level: 1, id: 6 },
            ];
            return data;
        }
 </script>
```

#### **Custom Hierarchy**

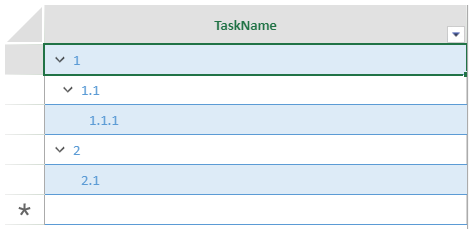
In Custom Hierarchy, the hierarchy type 'Custom' is used. Here, the primary key is optional.
![custom-hierarchy.png](https://cdn.mescius.io/document-site-files/images/df1fe1ee-eb3c-4da7-8c20-a0d8d2b7e734/custom-hierarchy.7ef0f0.png)
The following code sample shows how to set custom hierarchy in tablesheet:

```auto
<script>
        var spread = new GC.Spread.Sheets.Workbook(document.querySelector('#ss'), { sheetCount: 0 });
        initSpread(spread)
        function initSpread(spread) {
            var dataManager = spread.dataManager();

            initHierarchyParentType(spread, dataManager);

        }
        function initHierarchyParentType(spread, dataManager) {
            var taskTable = dataManager.addTable("Tasks", {
                data: initHierarchyChildData(),
                schema: {
                    hierarchy: {
                        type: 'Custom',
                        column: 'id',
                        parse: function (options) {
                            // parse the primary key "1.1.1" to "1.1"
                            // the returned value will be treated as parentId
                            let seg = options.data.TaskId.split('.');
                            return seg.slice(0, seg.length - 1).join('.')
                        },
                        unparse: function (options) {
                            let parentIds, currentIndex = options.index, parentData = options.parentData, parentKey = parentData && parentData.TaskId;
                            if (parentKey) {
                                let sp = parentKey.split('.');
                                parentIds = sp;
                            } else {
                                parentIds = [];
                            }
                            parentIds.push(currentIndex + 1);
                            return parentIds.join('.');
                        }
                    },
                    columns: {
                        TaskName: { dataName: 'name' },
                        TaskId: { dataName: 'id', isPrimaryKey: true }, // using primary key to indicate the hierarchy id optionally
                    }
                }
            });
            var sheet = spread.addSheetTab(0, "HierarchyParent", GC.Spread.Sheets.SheetType.tableSheet);
            sheet.setDefaultRowHeight(40, GC.Spread.Sheets.SheetArea.colHeader);
            sheet.options.allowAddNew = true;

            taskTable.fetch().then(r => {
                var taskView = taskTable.addView('TaskView', [
                    {
                        value: 'TaskName', outlineColumn: true, width: "*" // this option indicates the column showing as outline column
                    }
                ]);
                sheet.setDataView(taskView);
            })
        }
        function initHierarchyChildData() {
            var data = [
                {
                    id: '1', name: "1"
                },
                { id: '2', name: '2' },
                { id: '1.1', name: "1.1" },
                { id: '1.1.1', name: '1.1.1' },
                { id: '2.1', name: '2.1' }
            ]
            return data;
        }
</script>
```

## Hierarchy Operations

TableSheet supports the following hierarchical operations:

>type=note
> When working with the **Hierarchy Data View** where the `hierarchy.type` is set to `Parent`, performing operations such as moving or inserting rows requires a mechanism to track the adjusted data positions. To enable these hierarchical operations, you **must** configure a dedicated data column for `rowOrder`, then the Data Manager will automatically update the `rowOrder` values to reflect the new positions of the affected records. This ensures that the hierarchical integrity and the intended visual ordering of your data are preserved.

* **Promote the hierarchy data level of the specified row**

TableSheets let users promote the hierarchy data level by specified index using the **promoteHierarchyLevel(row: number)** method.

```JavaScript
tableSheet.promoteHierarchyLevel(8);
```

* **Demote the hierarchy data level of the specified row**

TableSheets let users demote the hierarchy data level of the specified row using the **demoteHierarchyLevel(row: number, withChildren?: boolean)** method.

```JavaScript
tableSheet.demoteHierarchyLevel(8);
```

* **Move the hierarchy data up by the specified row**

TableSheets let users move the hierarchy data by specified index up using the **moveUp(row: number)** method.

```JavaScript
tableSheet.moveUp(8);
```

* **Move the hierarchy data down by the specified row**

TableSheets let users move the hierarchy data up by the specified index using the **moveDown(row: number)** method.

```JavaScript
tableSheet.moveDown(8);
```

* **Add a record after the selected row**

TableSheets let users add a new row after the specified row using the **addHierarchyItemAfter(row: number, rowData: any)** method.

```JavaScript
tableSheet.addHierarchyItemAfter(8, {id: 8, name: "grapecity"});
```

* **Add a record above the selected row**

TableSheets let users add record above the selected row using the **addHierarchyItemAbove(row: number, rowData: any)** method. The added record will replace the position of the selected record, and the selected record will be the child of the added record.

```JavaScript
tableSheet.addHierarchyItemAbove(8, {id: 8, name: "grapecity"});
```

* **Add a record below the selected row**

Tablesheet let users add a new row data as the child of the specified row using the **addHierarchyItemBelow(row: number, rowData: any)** method. You can add a record below the selected row, and the added record will be the last child of the selected record.

```JavaScript
tableSheet.addHierarchyItemBelow(8, {id: 8, name: "grapecity"});
```

* **Delete a record**

TableSheet let users delete the record and its sub-records.

* **Expand a record**

This menu item appears while clicking the column header. It expands all hierarchy levels using the **expandAllHierarchyLevels()** method.

```JavaScript
tableSheet.expandAllHierarchyLevels();
```

* **Collapse a record**

The menu item appears while clicking the column header, and it collapses all the hierarchy levels using the **collapseAllHierarchyLevels()** method.

```JavaScript
tableSheet.collapseAllHierarchyLevels();
```

## Toggle Menu Item Visibility

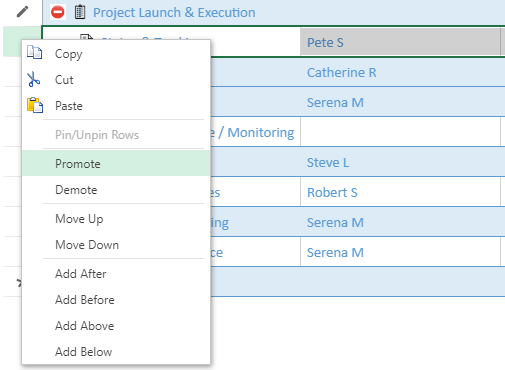
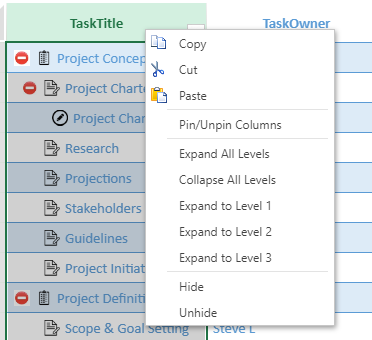
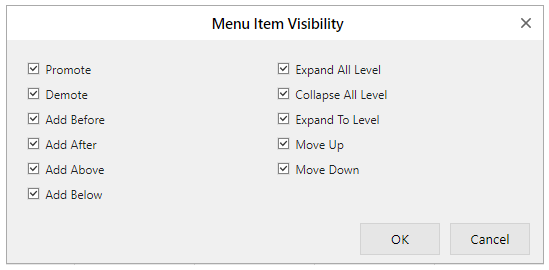
The menu items of promote, demote, move up/down, add before/after/above/below, and expand/collapse levels can be displayed or hidden at runtime.
The snapshot depicts displaying the following menu items while clicking the row header.
![row-rightclick.png](https://cdn.mescius.io/document-site-files/images/df1fe1ee-eb3c-4da7-8c20-a0d8d2b7e734/row-rightclick.d8db7e.png)

The snapshot depicts displaying the following menu items while right clicking the column header.
![column-rightclick.png](https://cdn.mescius.io/document-site-files/images/df1fe1ee-eb3c-4da7-8c20-a0d8d2b7e734/column-rightclick.02b3eb.png)

The code sample shows how to toggle the menu item visibility.

```JavaScript
// show the menu items for hierarchical records
sheet.options.menuItemVisibility = {
// the options below be on the row header
promoteMenuItemVisible: true,
demoteMenuItemVisible: true,
// the options below be on the column header
expandAllLevelMenuItemVisible: true,
collapseAllLevelMenuItemVisible: true,
expandToLevelMenuItemVisible: true,
// the options below be on the row header
// and the menu items be enable for the dataType of the column be rowOrder
moveUpMenuItemVisible: true,
moveDownMenuItemVisible: true,
addBeforeMenuItemVisible: true,
addAfterMenuItemVisible: true,
addAboveMenuItemVisible: true,
addBelowMenuItemVisible: true,
};
```

> <strong>Note</strong>: Few features like groupBy, pinning rows and resetRow may not work well with the hierarchy data.

## Using SpreadJS Designer

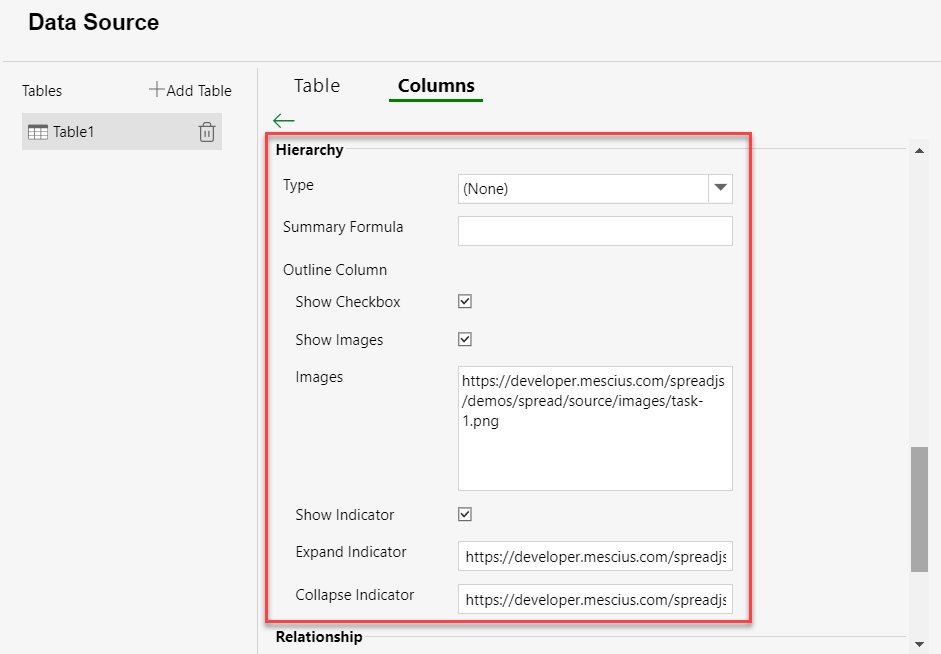
The hierarchy data is also supported in the SpreadJS Designer using the **Columns** tab of **Data Source** and **TableSheet** ribbon. You can configure hierarchy type, summary formula, outline column images, etc.
![datasource-hierarchy-designer](https://cdn.mescius.io/document-site-files/images/ef9b66d1-0ae2-4e94-b8cb-f9f893aacc8d/datasource-hierarchy-designer.0ea922.png?width=750)

The **Hierarchy** section provides the following options:

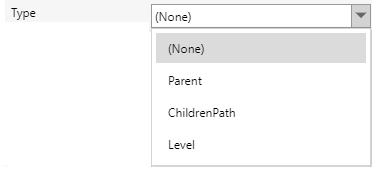
* <strong>Hierarchy Type</strong>: The type can be either the Parent, ChildrenPath, or Level.
<br>
    ![hierarchy-type-design.png](https://cdn.mescius.io/document-site-files/images/df1fe1ee-eb3c-4da7-8c20-a0d8d2b7e734/hierarchy-type-design.469f63.png)
* <strong>Summary Formula</strong>: Users can input the hierarchy summary formula for the specified column of the table.
    To learn more about the Summary formula, see [Formulas](https://developer.mescius.com/spreadjs/docs/features/tablesheet/hierarchy-data/formulas) topic.
* <strong>Outline Column</strong>: The Outline Column can be used to customize the display of the outline column.

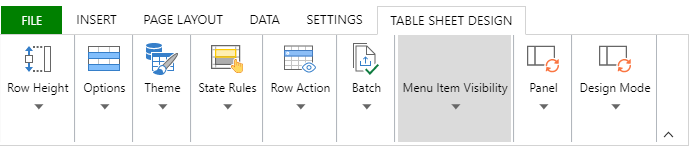
You can also configure the visibilities of hierarchy operation menu items in the **TABLE SHEET DESIGN** ribbon using the **Menu Item Visibility** button.
![menu-item-visibility.png](https://cdn.mescius.io/document-site-files/images/df1fe1ee-eb3c-4da7-8c20-a0d8d2b7e734/menu-item-visibility.90d7e6.png)
Click the **Menu Item Visibility** button to open the **Menu Item Visibility** dialog.
![menu-visible-dialog.png](https://cdn.mescius.io/document-site-files/images/df1fe1ee-eb3c-4da7-8c20-a0d8d2b7e734/menu-visible-dialog.657796.png)